> ## Documentation Index
> Fetch the complete documentation index at: https://docs.alterhq.com/llms.txt
> Use this file to discover all available pages before exploring further.
# Alter Actions
> Create and configure custom AI workflows with voice triggers and automation
**Alter Actions** are customizable AI workflows that let you create specialized assistants for specific tasks. Combine AI instructions, voice triggers, tools, and conditional execution to automate anything on your Mac.
## What is an Alter Action?
An **Alter Action** is an advanced automation that combines:
* **AI Instructions** - System prompts defining how the AI behaves
* **Triggers** - Voice commands, hotkeys, or conditional execution
* **Context** - Access to selected text, files, active applications
* **Tools** - Configured integrations with your Mac and 2000+ external services
* **Output** - How results are displayed (markdown, code, inline insertion)
Think of an Alter Action as a "specialized AI assistant" customized for a specific task.
## Opening the Action Editor
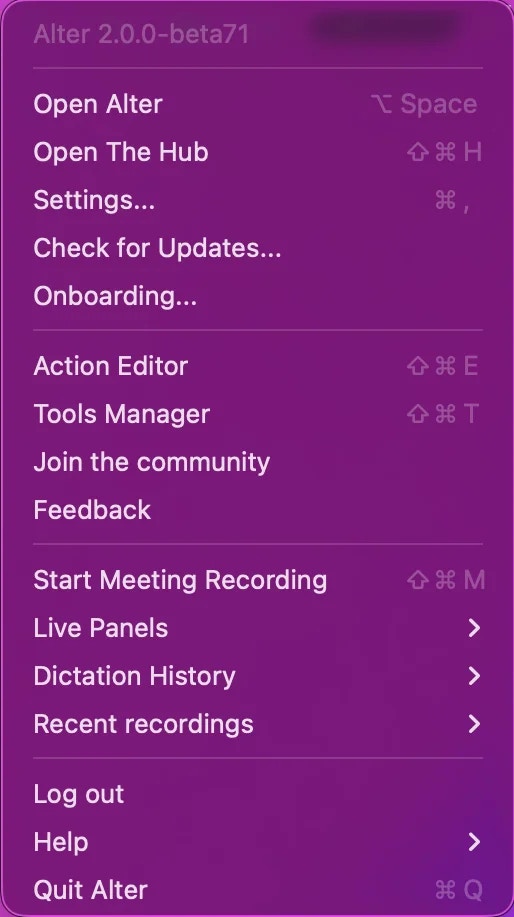
### Method 1: Menu Bar (Fastest)
1. Click the **Alter menu icon** in the menu bar (top right)
2. Select **Action Editor**
 ### Method 2: Options Menu
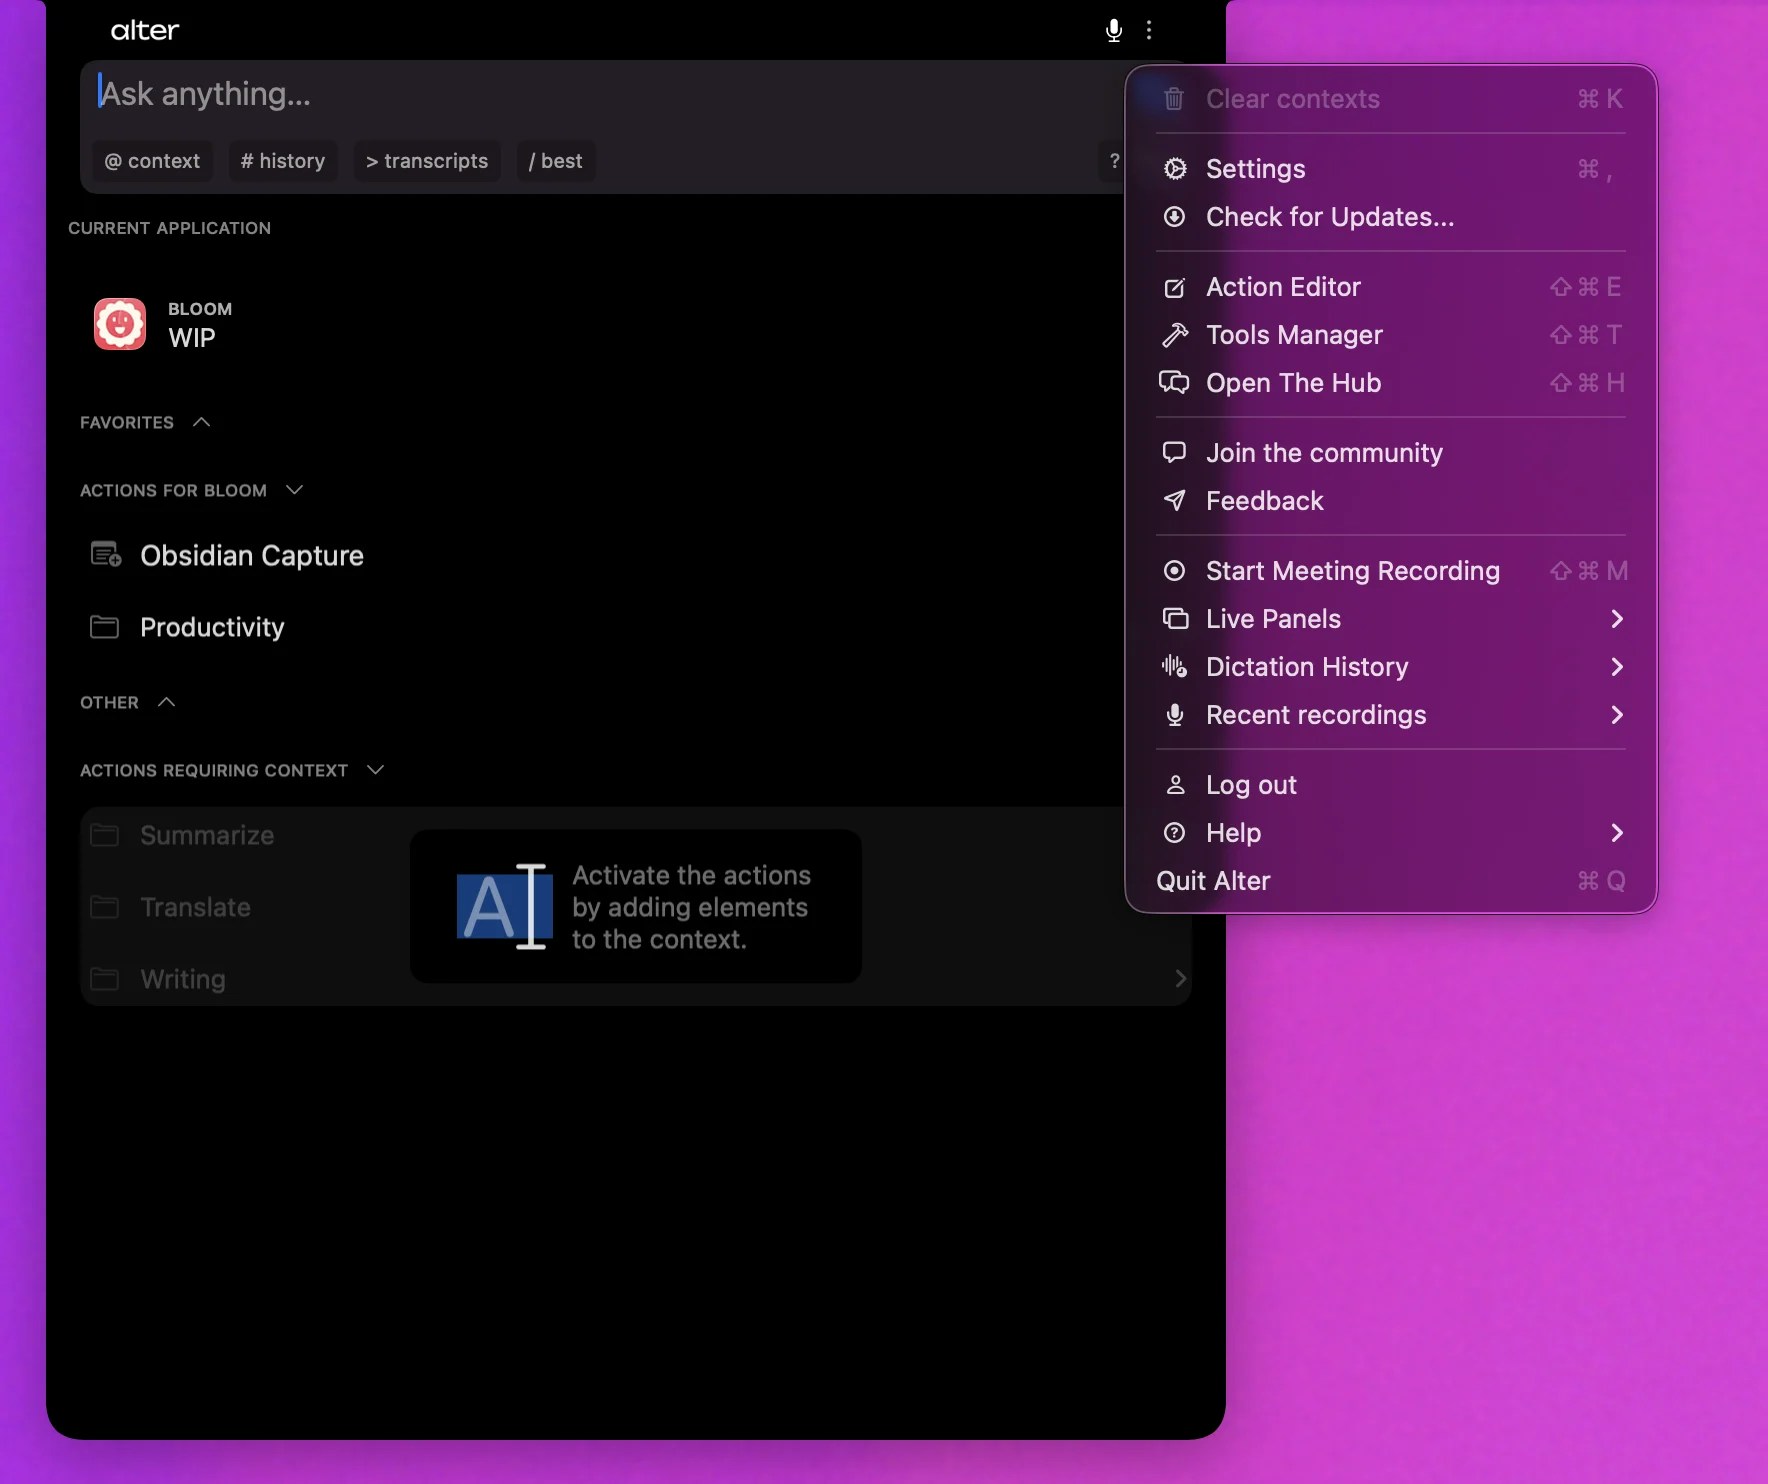
1. Open Alter window
2. Click **⋯** (three dots) in top right
3. Select **Action Editor**
### Method 2: Options Menu
1. Open Alter window
2. Click **⋯** (three dots) in top right
3. Select **Action Editor**
 ### Method 3: Keyboard Shortcut
Press **⌘ E** (Command + E) to open the Action Editor directly
The keyboard shortcut is the fastest method once you've memorized it.
## Action Editor Walkthrough
The Action Editor has 7 main sections, each controlling different aspects of your action. Use the left panel to navigate between tabs.
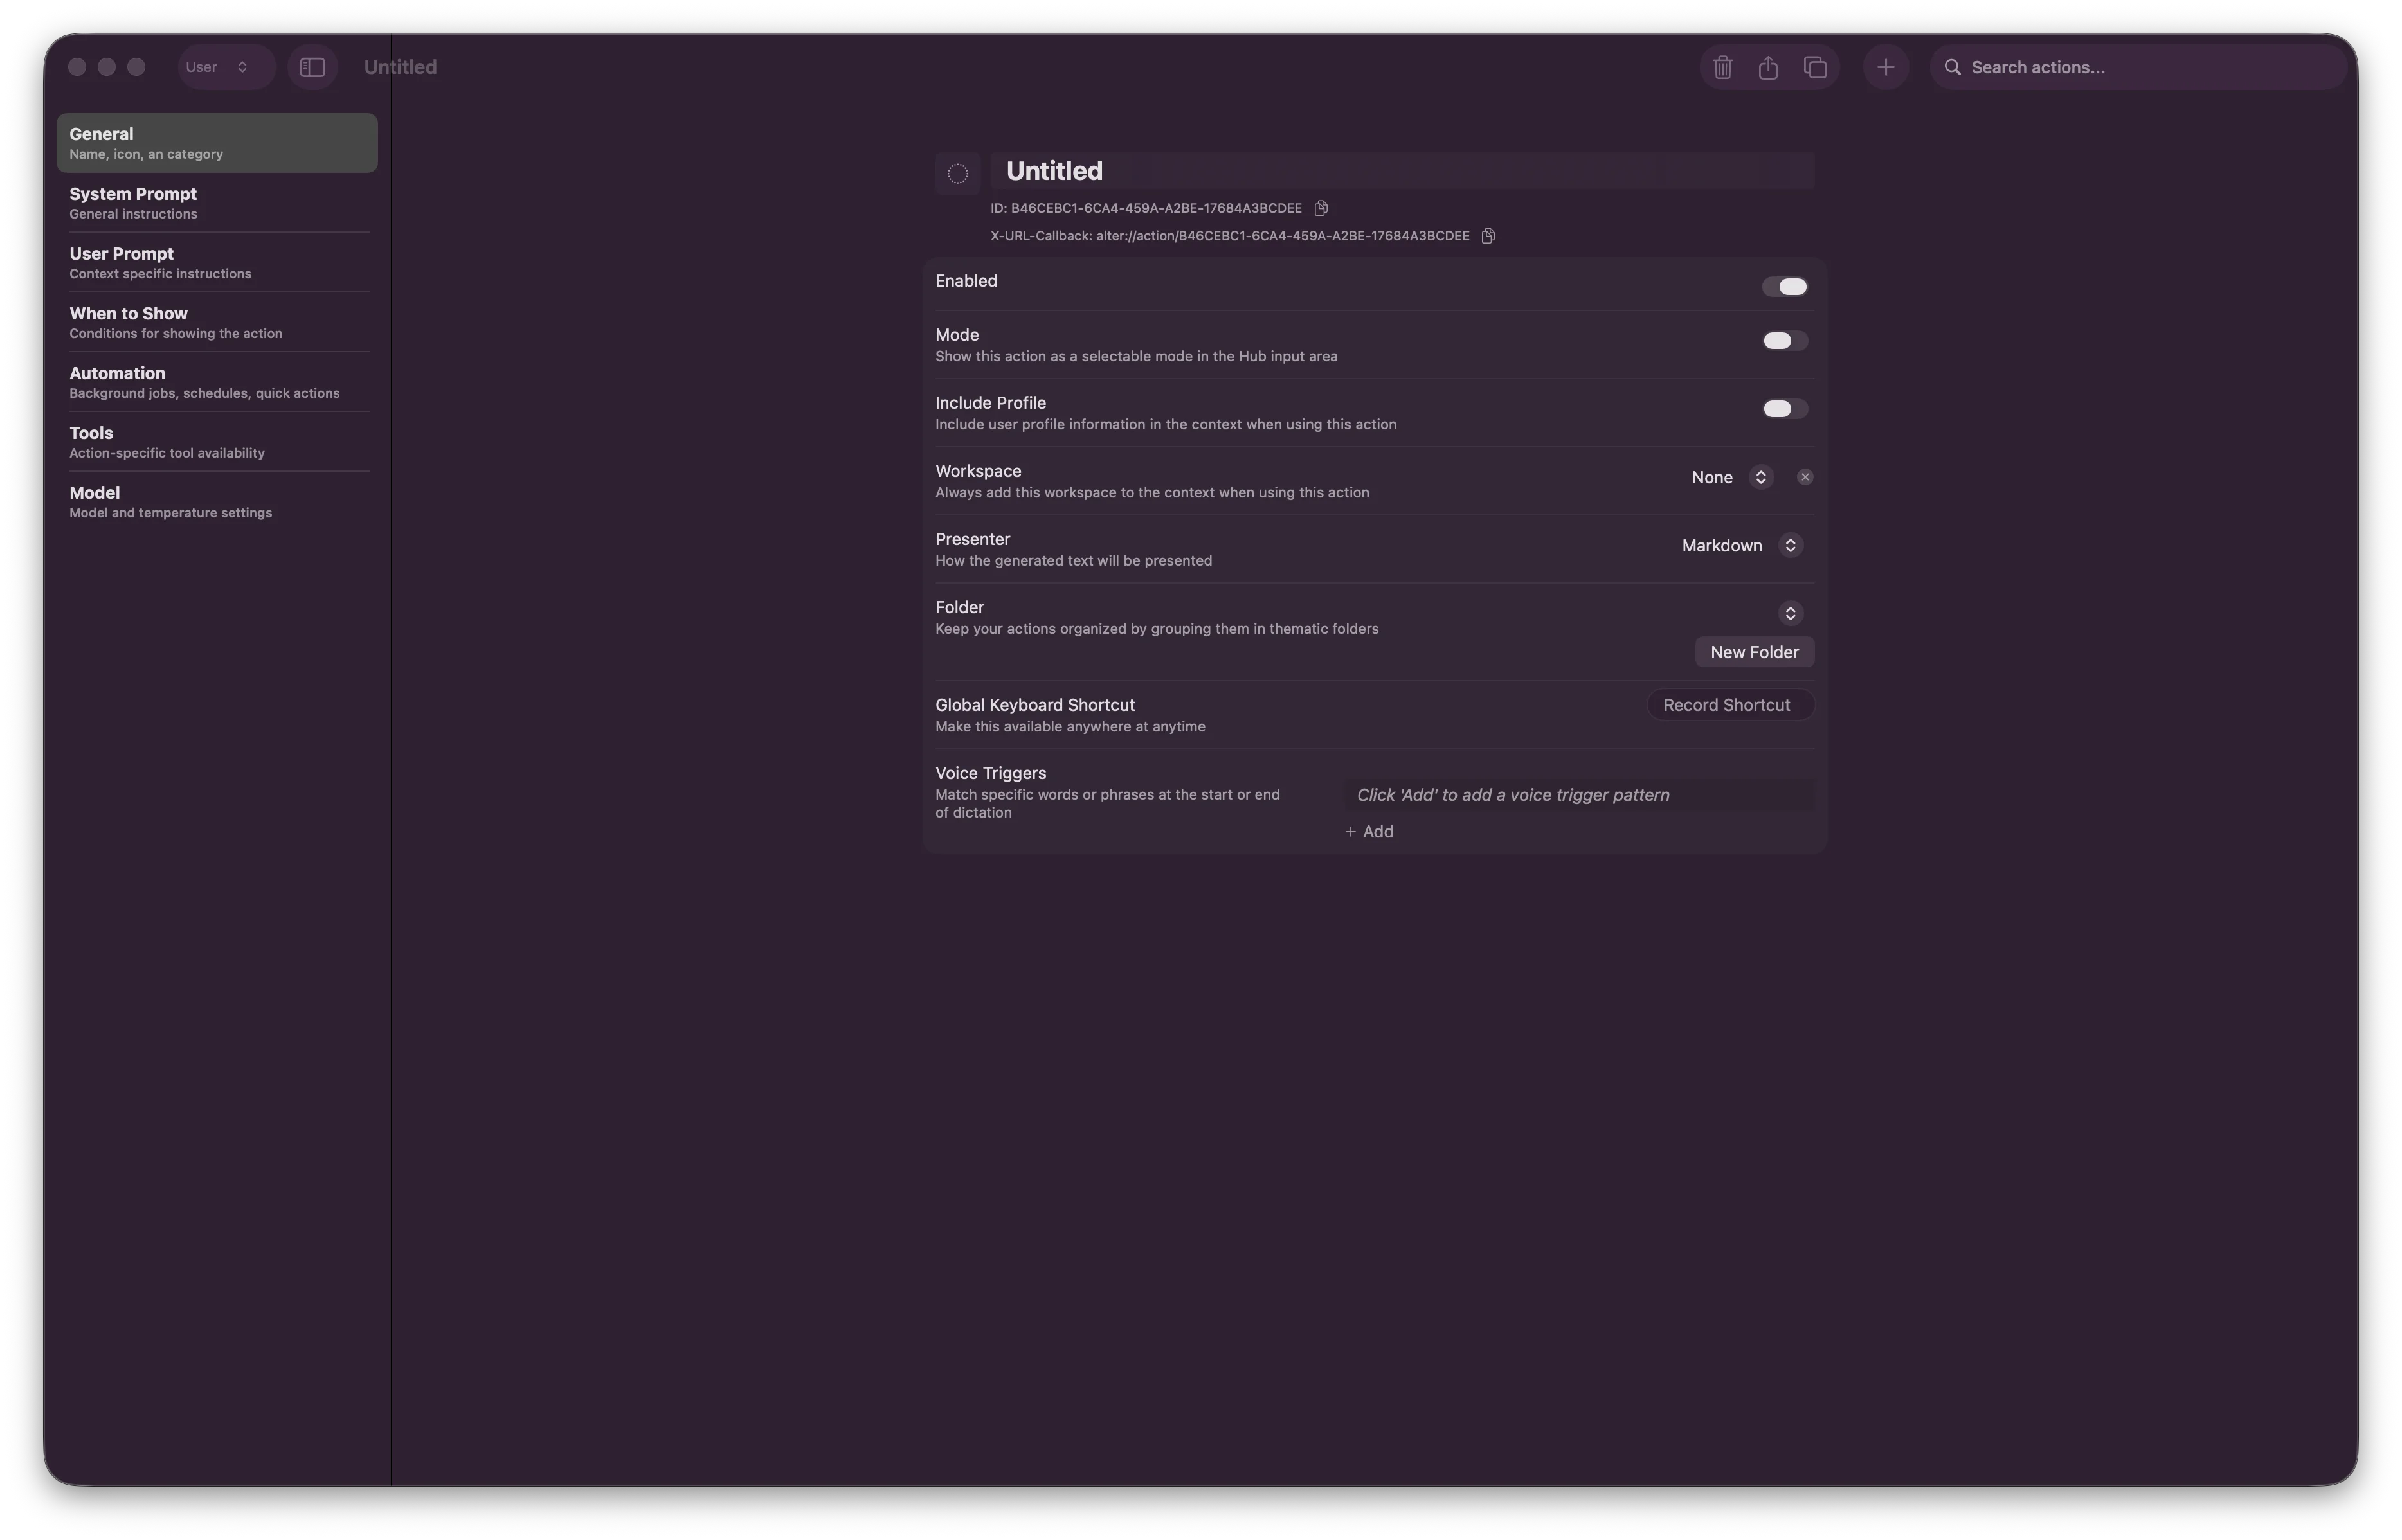
### 1. General Settings
Configure basic metadata and execution context.
### Method 3: Keyboard Shortcut
Press **⌘ E** (Command + E) to open the Action Editor directly
The keyboard shortcut is the fastest method once you've memorized it.
## Action Editor Walkthrough
The Action Editor has 7 main sections, each controlling different aspects of your action. Use the left panel to navigate between tabs.
### 1. General Settings
Configure basic metadata and execution context.
 **Fields:**
* **Name** - Human-readable action name (e.g., "Code Explainer")
* **Description** - What this action does (optional)
* **Category** - Organize actions by type (code, productivity, business, etc.)
* **Workspace** - Assign to a specific workspace (optional)
* **Include Profile** - Include user profile information in AI context
**Visibility Options:**
* **Show only when running** - Action only appears if an app is running
* **Show only when active** - Action only appears if an app has focus
* **Workspace context** - Choose which workspace(s) see this action
Each action gets a unique UUID automatically.
### 2. System Prompt
Define AI instructions and parameters for the model.
**Fields:**
* **Name** - Human-readable action name (e.g., "Code Explainer")
* **Description** - What this action does (optional)
* **Category** - Organize actions by type (code, productivity, business, etc.)
* **Workspace** - Assign to a specific workspace (optional)
* **Include Profile** - Include user profile information in AI context
**Visibility Options:**
* **Show only when running** - Action only appears if an app is running
* **Show only when active** - Action only appears if an app has focus
* **Workspace context** - Choose which workspace(s) see this action
Each action gets a unique UUID automatically.
### 2. System Prompt
Define AI instructions and parameters for the model.
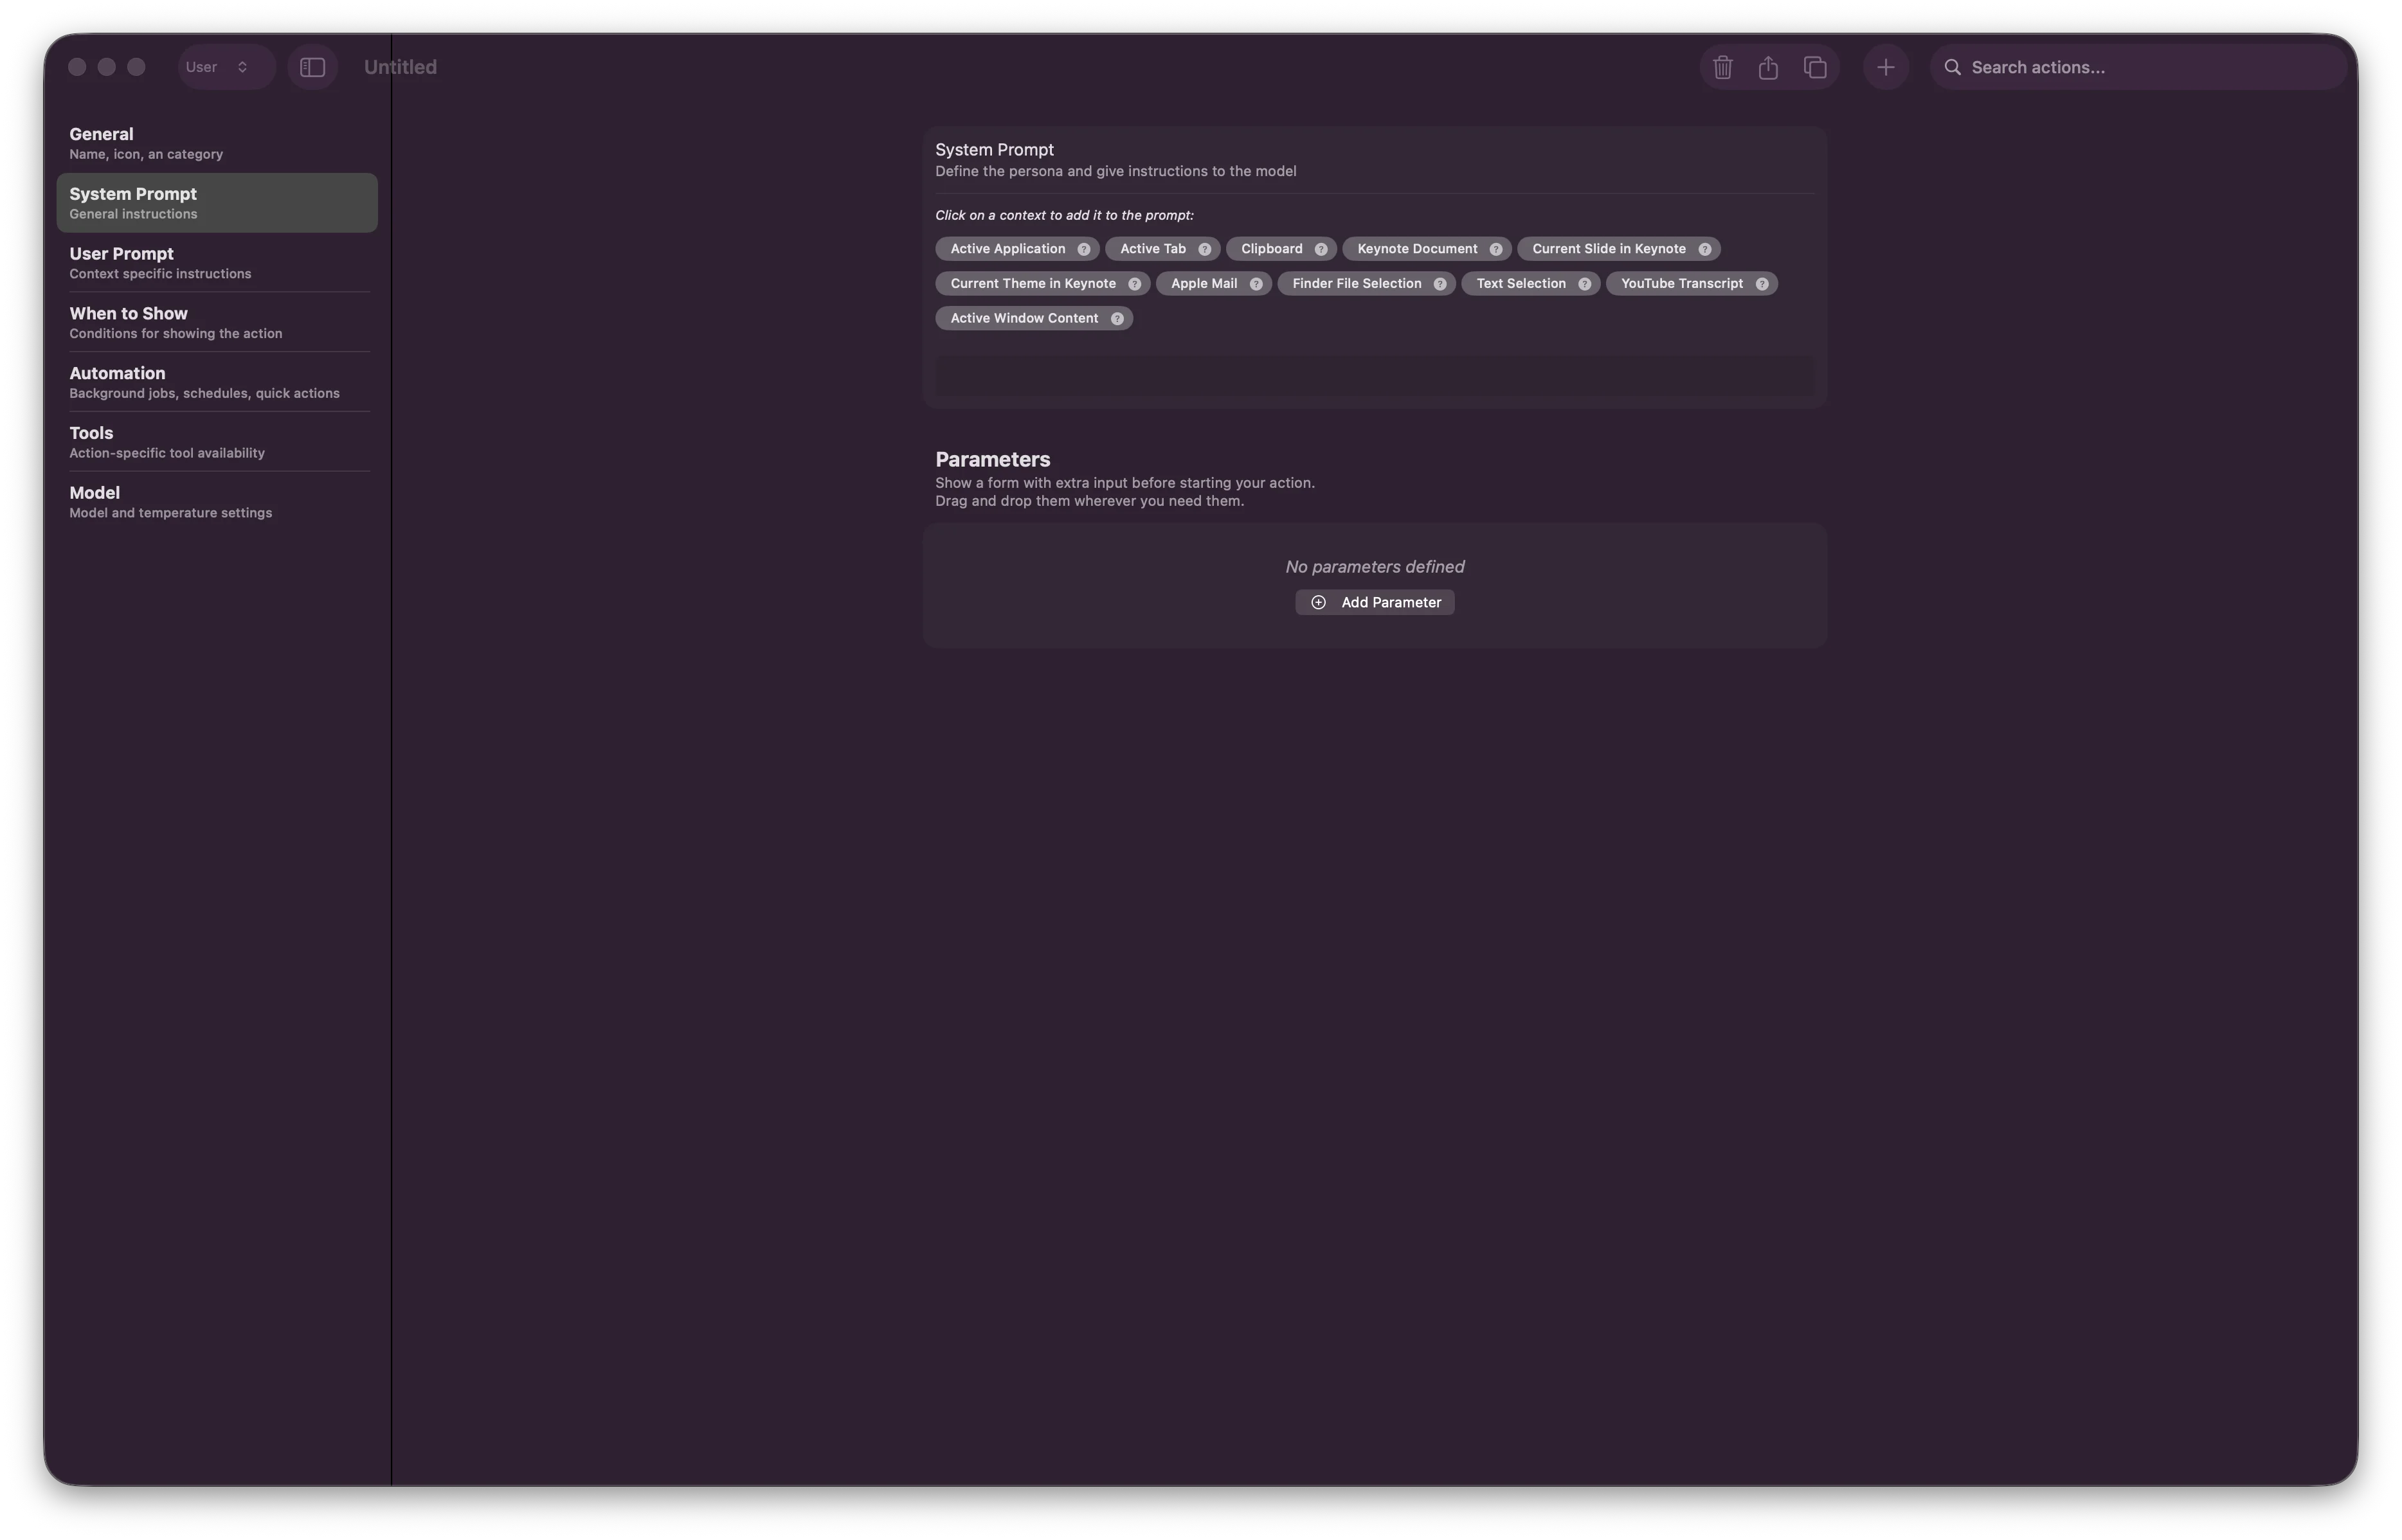 **System Prompt** - Core AI instructions describing the AI's behavior and expertise.
**Example:**
```
# IDENTITY AND PURPOSE
You are an expert software engineer who explains code clearly
and accessibly to developers of all skill levels.
# STEPS
1. Analyze the provided code
2. Identify its purpose and key components
3. Explain each section in simple terms
# OUTPUT INSTRUCTIONS
- Use markdown formatting
- Include code examples where helpful
- Keep language clear and non-technical
```
**Parameters** - Define input fields users can customize before execution (text input, dropdown selections, etc.).
### 3. User Prompt
Template for the user-facing prompt that gets sent to the AI.
**System Prompt** - Core AI instructions describing the AI's behavior and expertise.
**Example:**
```
# IDENTITY AND PURPOSE
You are an expert software engineer who explains code clearly
and accessibly to developers of all skill levels.
# STEPS
1. Analyze the provided code
2. Identify its purpose and key components
3. Explain each section in simple terms
# OUTPUT INSTRUCTIONS
- Use markdown formatting
- Include code examples where helpful
- Keep language clear and non-technical
```
**Parameters** - Define input fields users can customize before execution (text input, dropdown selections, etc.).
### 3. User Prompt
Template for the user-facing prompt that gets sent to the AI.
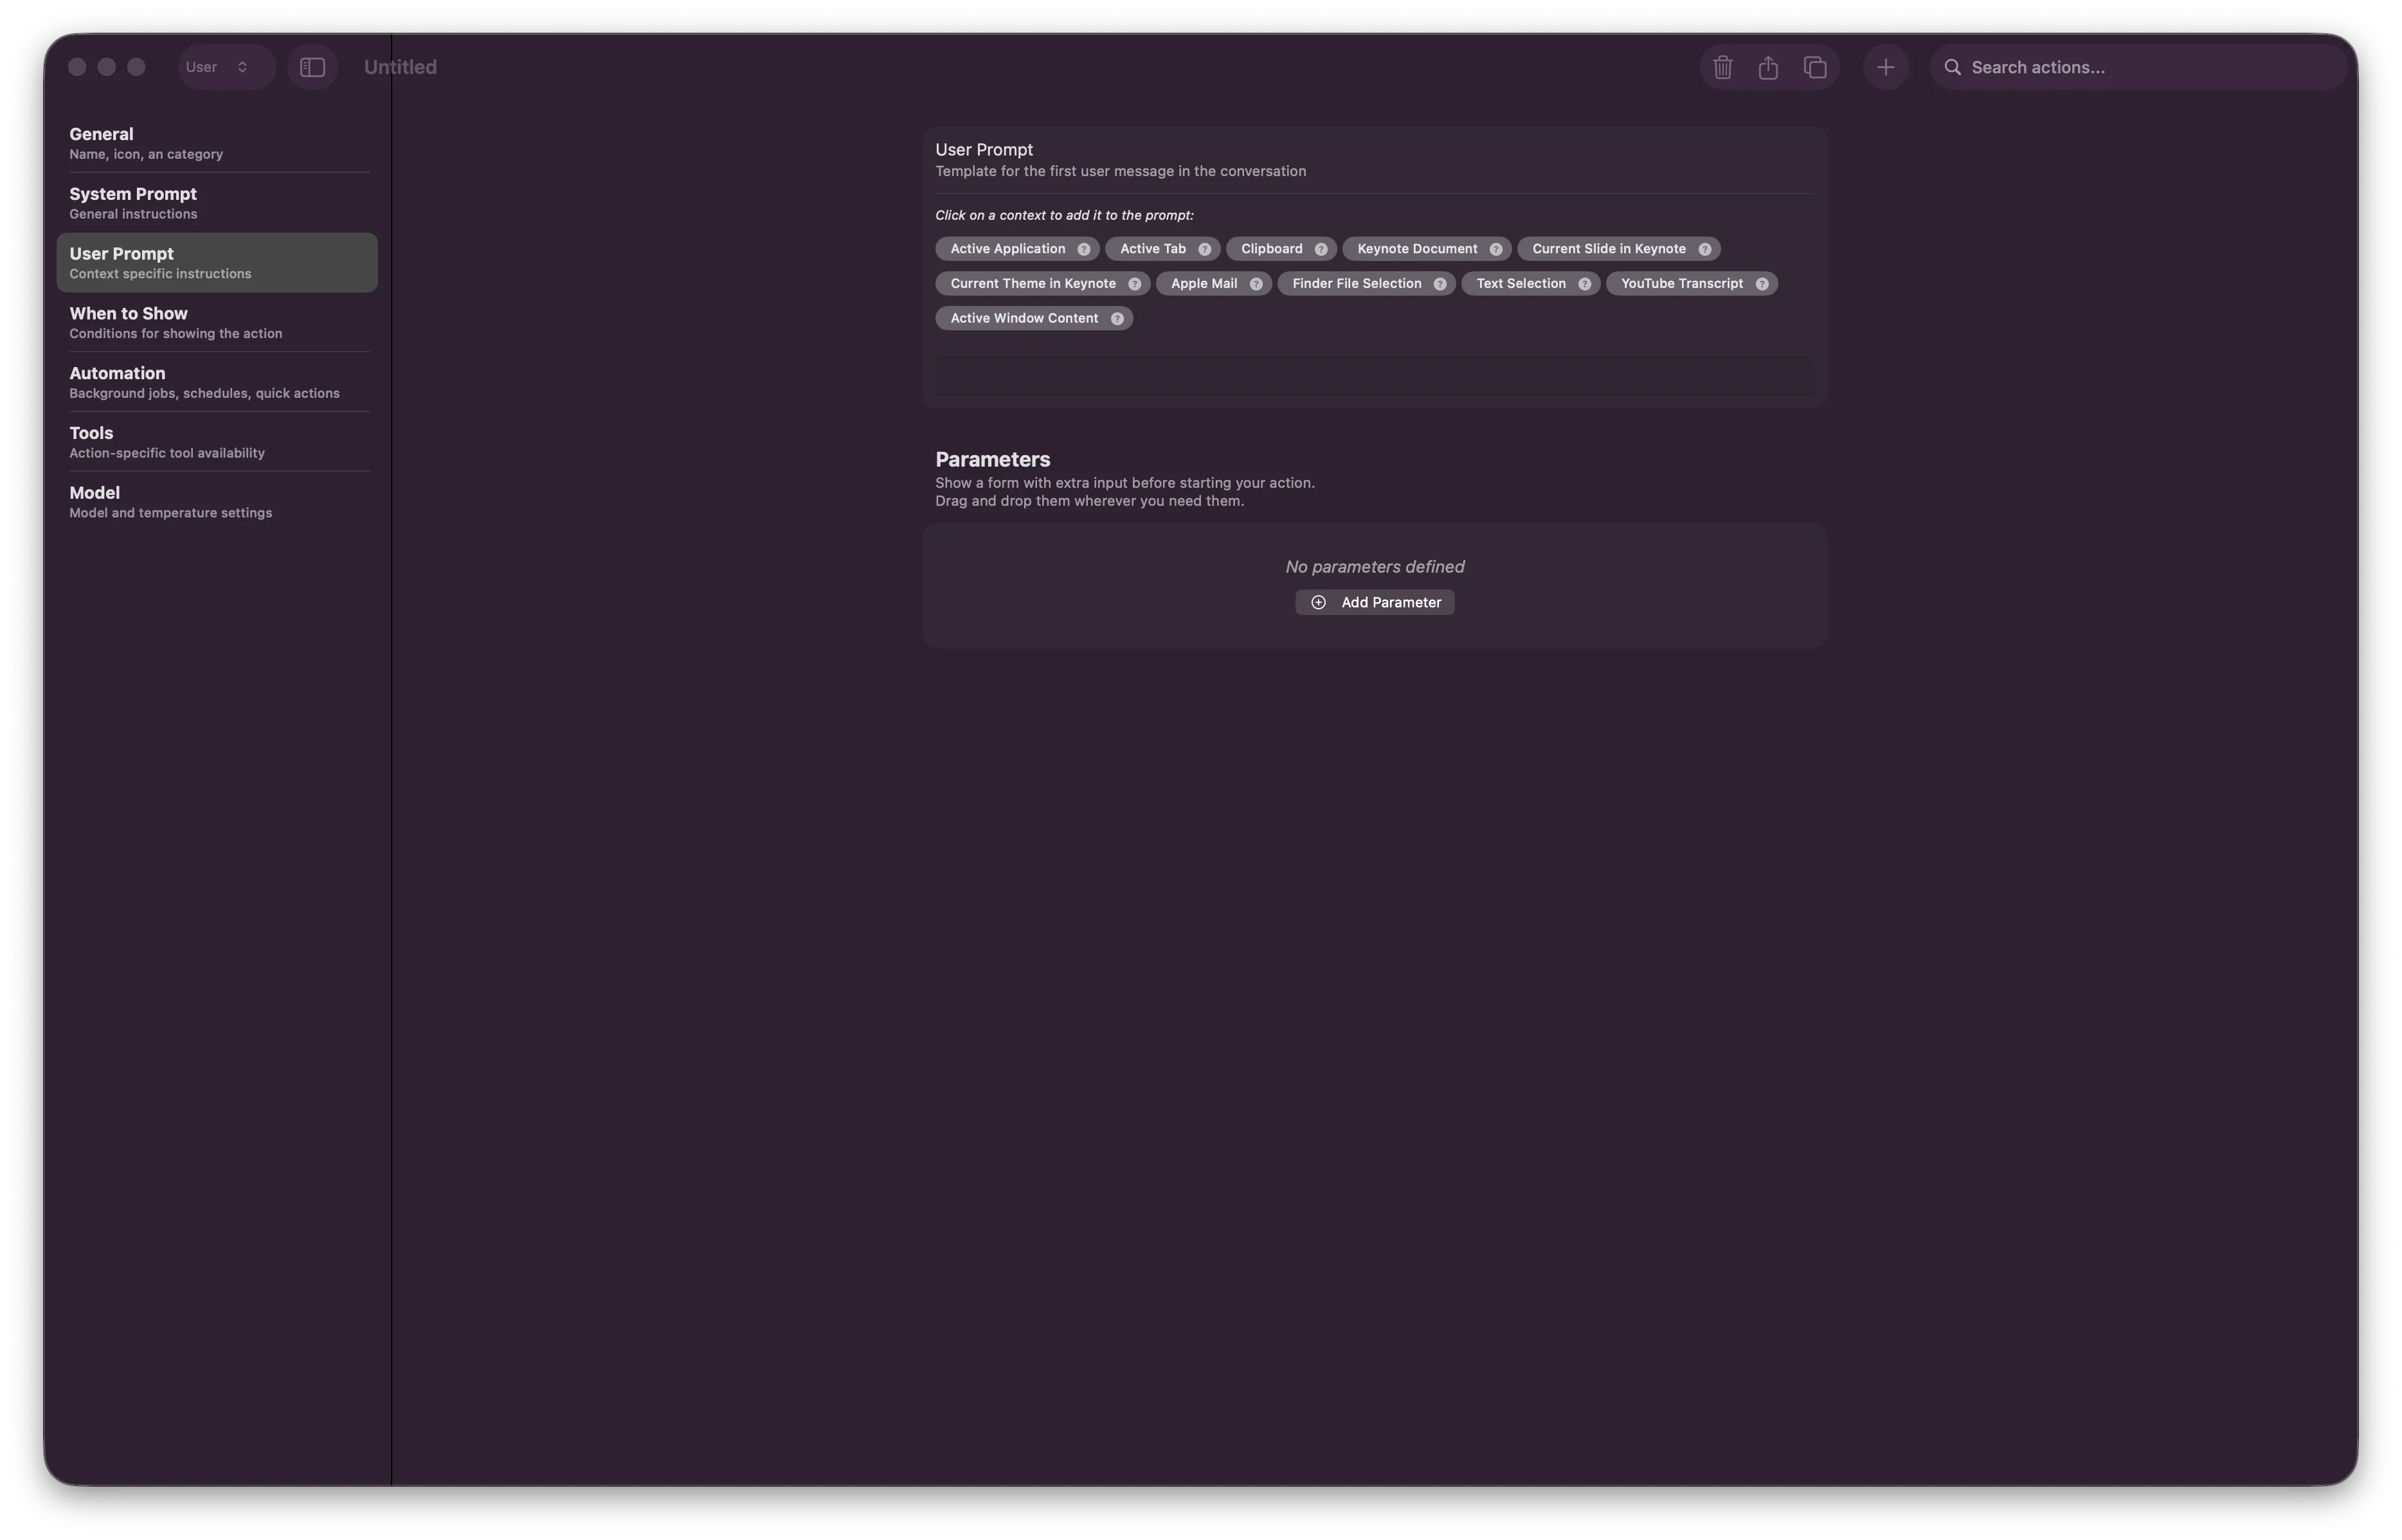 **Using Context Variables:**
Wrap variables in `{{ }}` to insert dynamic content:
```
Please explain this code:
{{ textSelection }}
Explanation detail: {{ detailLevel }};
```
**Available Context Variables:**
* `{{ textSelection }}` - Currently selected text
* `{{ filePath }}` - Path to selected file
* `{{ clipboard }}` - Clipboard contents
* Custom parameters you defined in System Prompt
### 4. When to Show
Control when and where this action appears.
**Using Context Variables:**
Wrap variables in `{{ }}` to insert dynamic content:
```
Please explain this code:
{{ textSelection }}
Explanation detail: {{ detailLevel }};
```
**Available Context Variables:**
* `{{ textSelection }}` - Currently selected text
* `{{ filePath }}` - Path to selected file
* `{{ clipboard }}` - Clipboard contents
* Custom parameters you defined in System Prompt
### 4. When to Show
Control when and where this action appears.
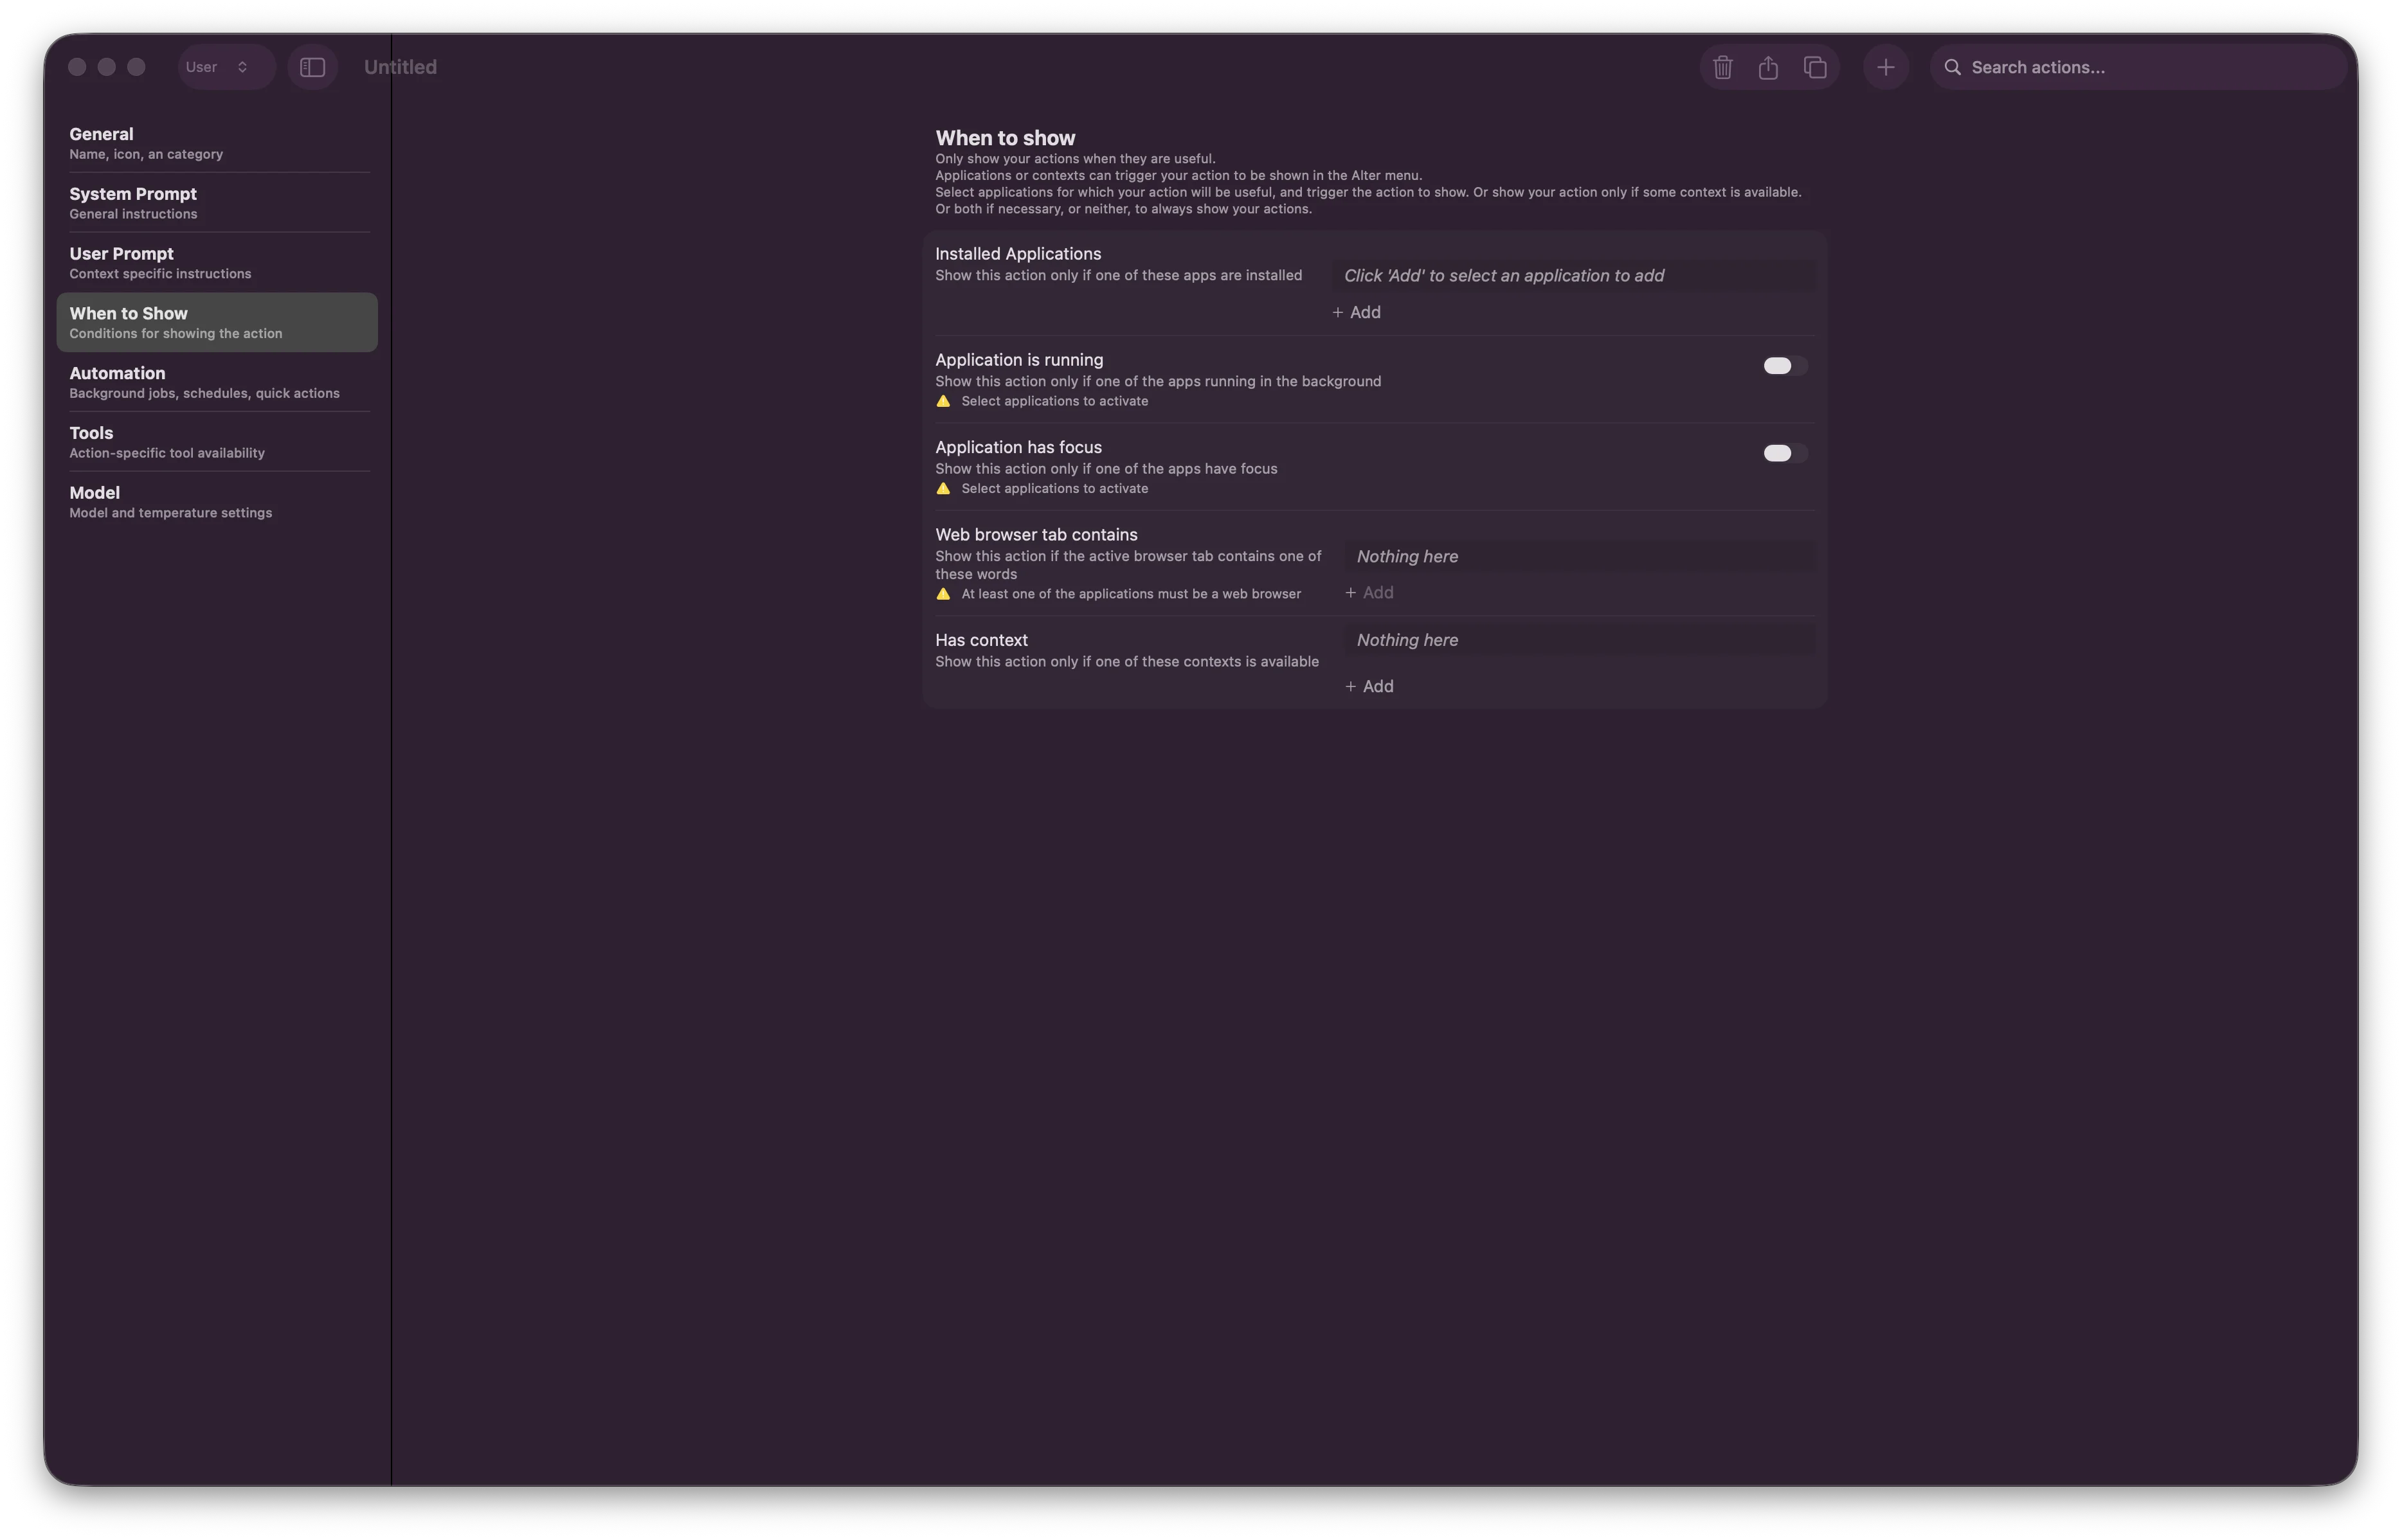 **Visibility Conditions:**
* **Installed Applications** - Show action only in specific apps (VSCode, Xcode, Safari, etc.)
* **Application is running** - Action requires the app to be running
* **Application has focus** - Action only works when app is in foreground
* **Web browser tab contains** - Show action when browsing specific domains
* **Has content** - Show action only when context is available
### 5. Automation
Configure execution behavior, schedules, and background processing.
**Visibility Conditions:**
* **Installed Applications** - Show action only in specific apps (VSCode, Xcode, Safari, etc.)
* **Application is running** - Action requires the app to be running
* **Application has focus** - Action only works when app is in foreground
* **Web browser tab contains** - Show action when browsing specific domains
* **Has content** - Show action only when context is available
### 5. Automation
Configure execution behavior, schedules, and background processing.
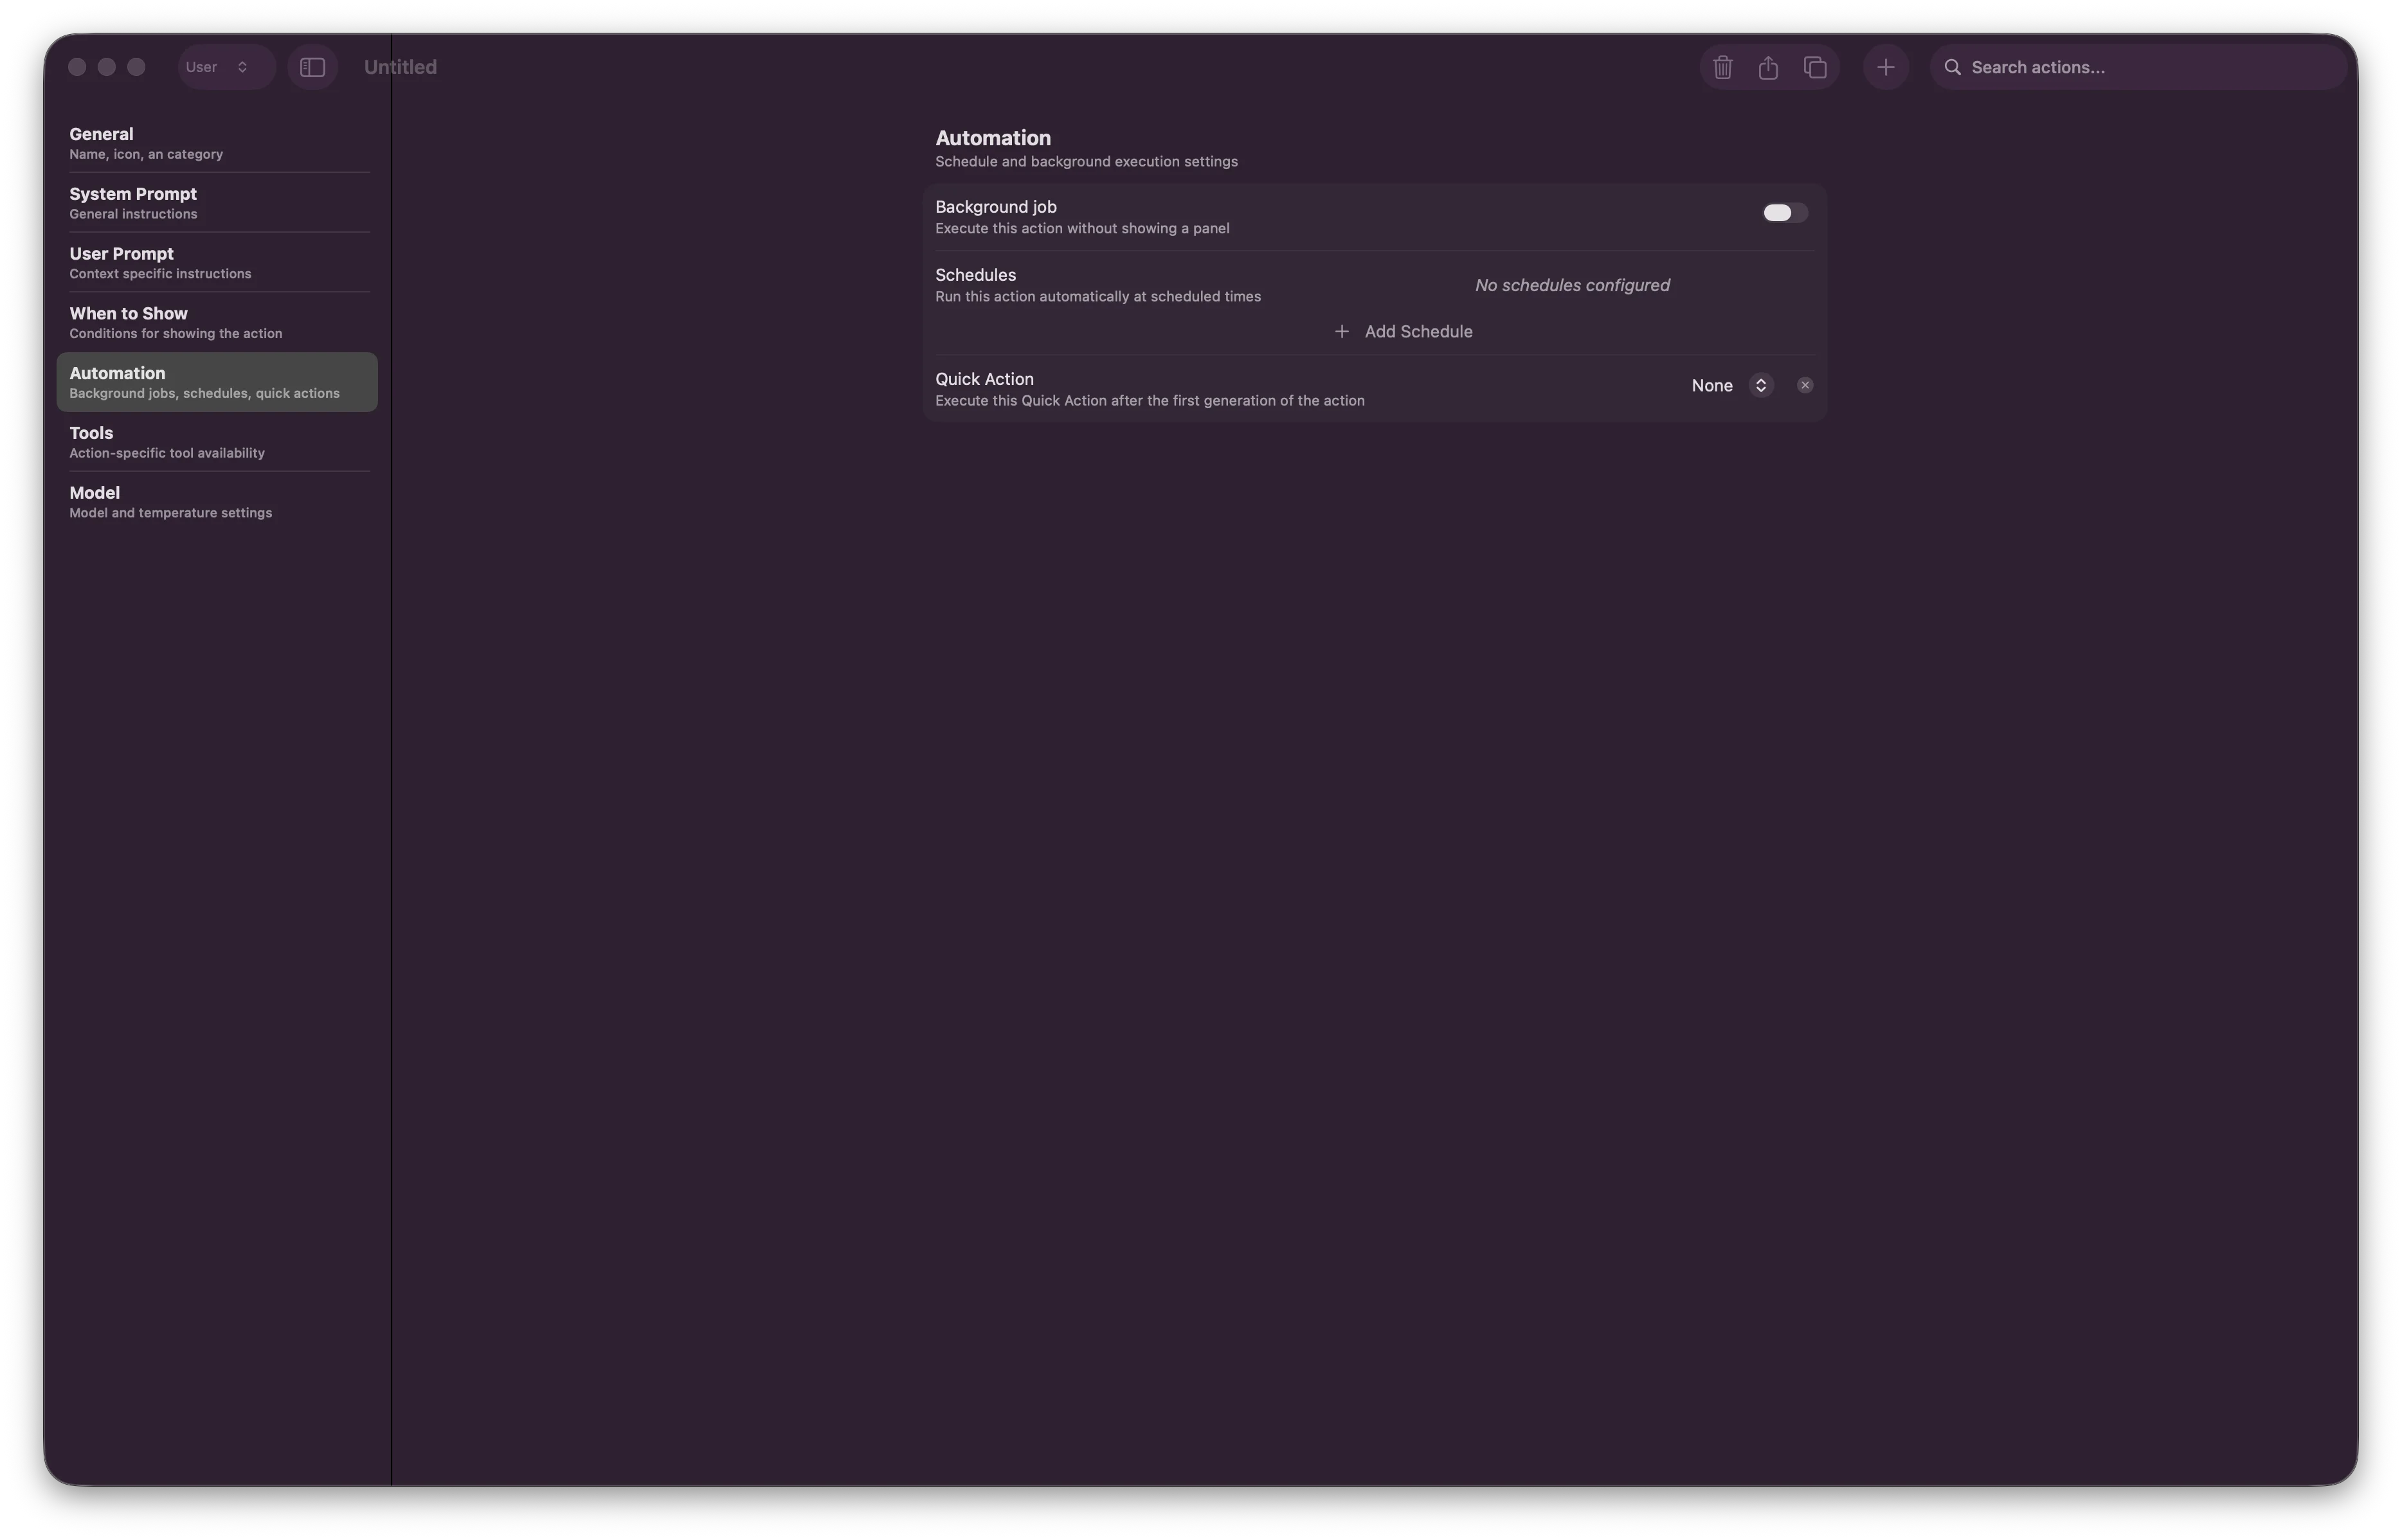 **Fields:**
* **Background Job** - Run action in background without showing UI
* **Schedules** - Execute action at specific times (e.g., "Every Monday at 9 AM")
* **Quick Action** - Execute the next "Quick Action" automatically after this completes
Use this for action chaining: first action → output → next action executes automatically.
### 6. Tools
Scope which tools are available for this action.
**Fields:**
* **Background Job** - Run action in background without showing UI
* **Schedules** - Execute action at specific times (e.g., "Every Monday at 9 AM")
* **Quick Action** - Execute the next "Quick Action" automatically after this completes
Use this for action chaining: first action → output → next action executes automatically.
### 6. Tools
Scope which tools are available for this action.
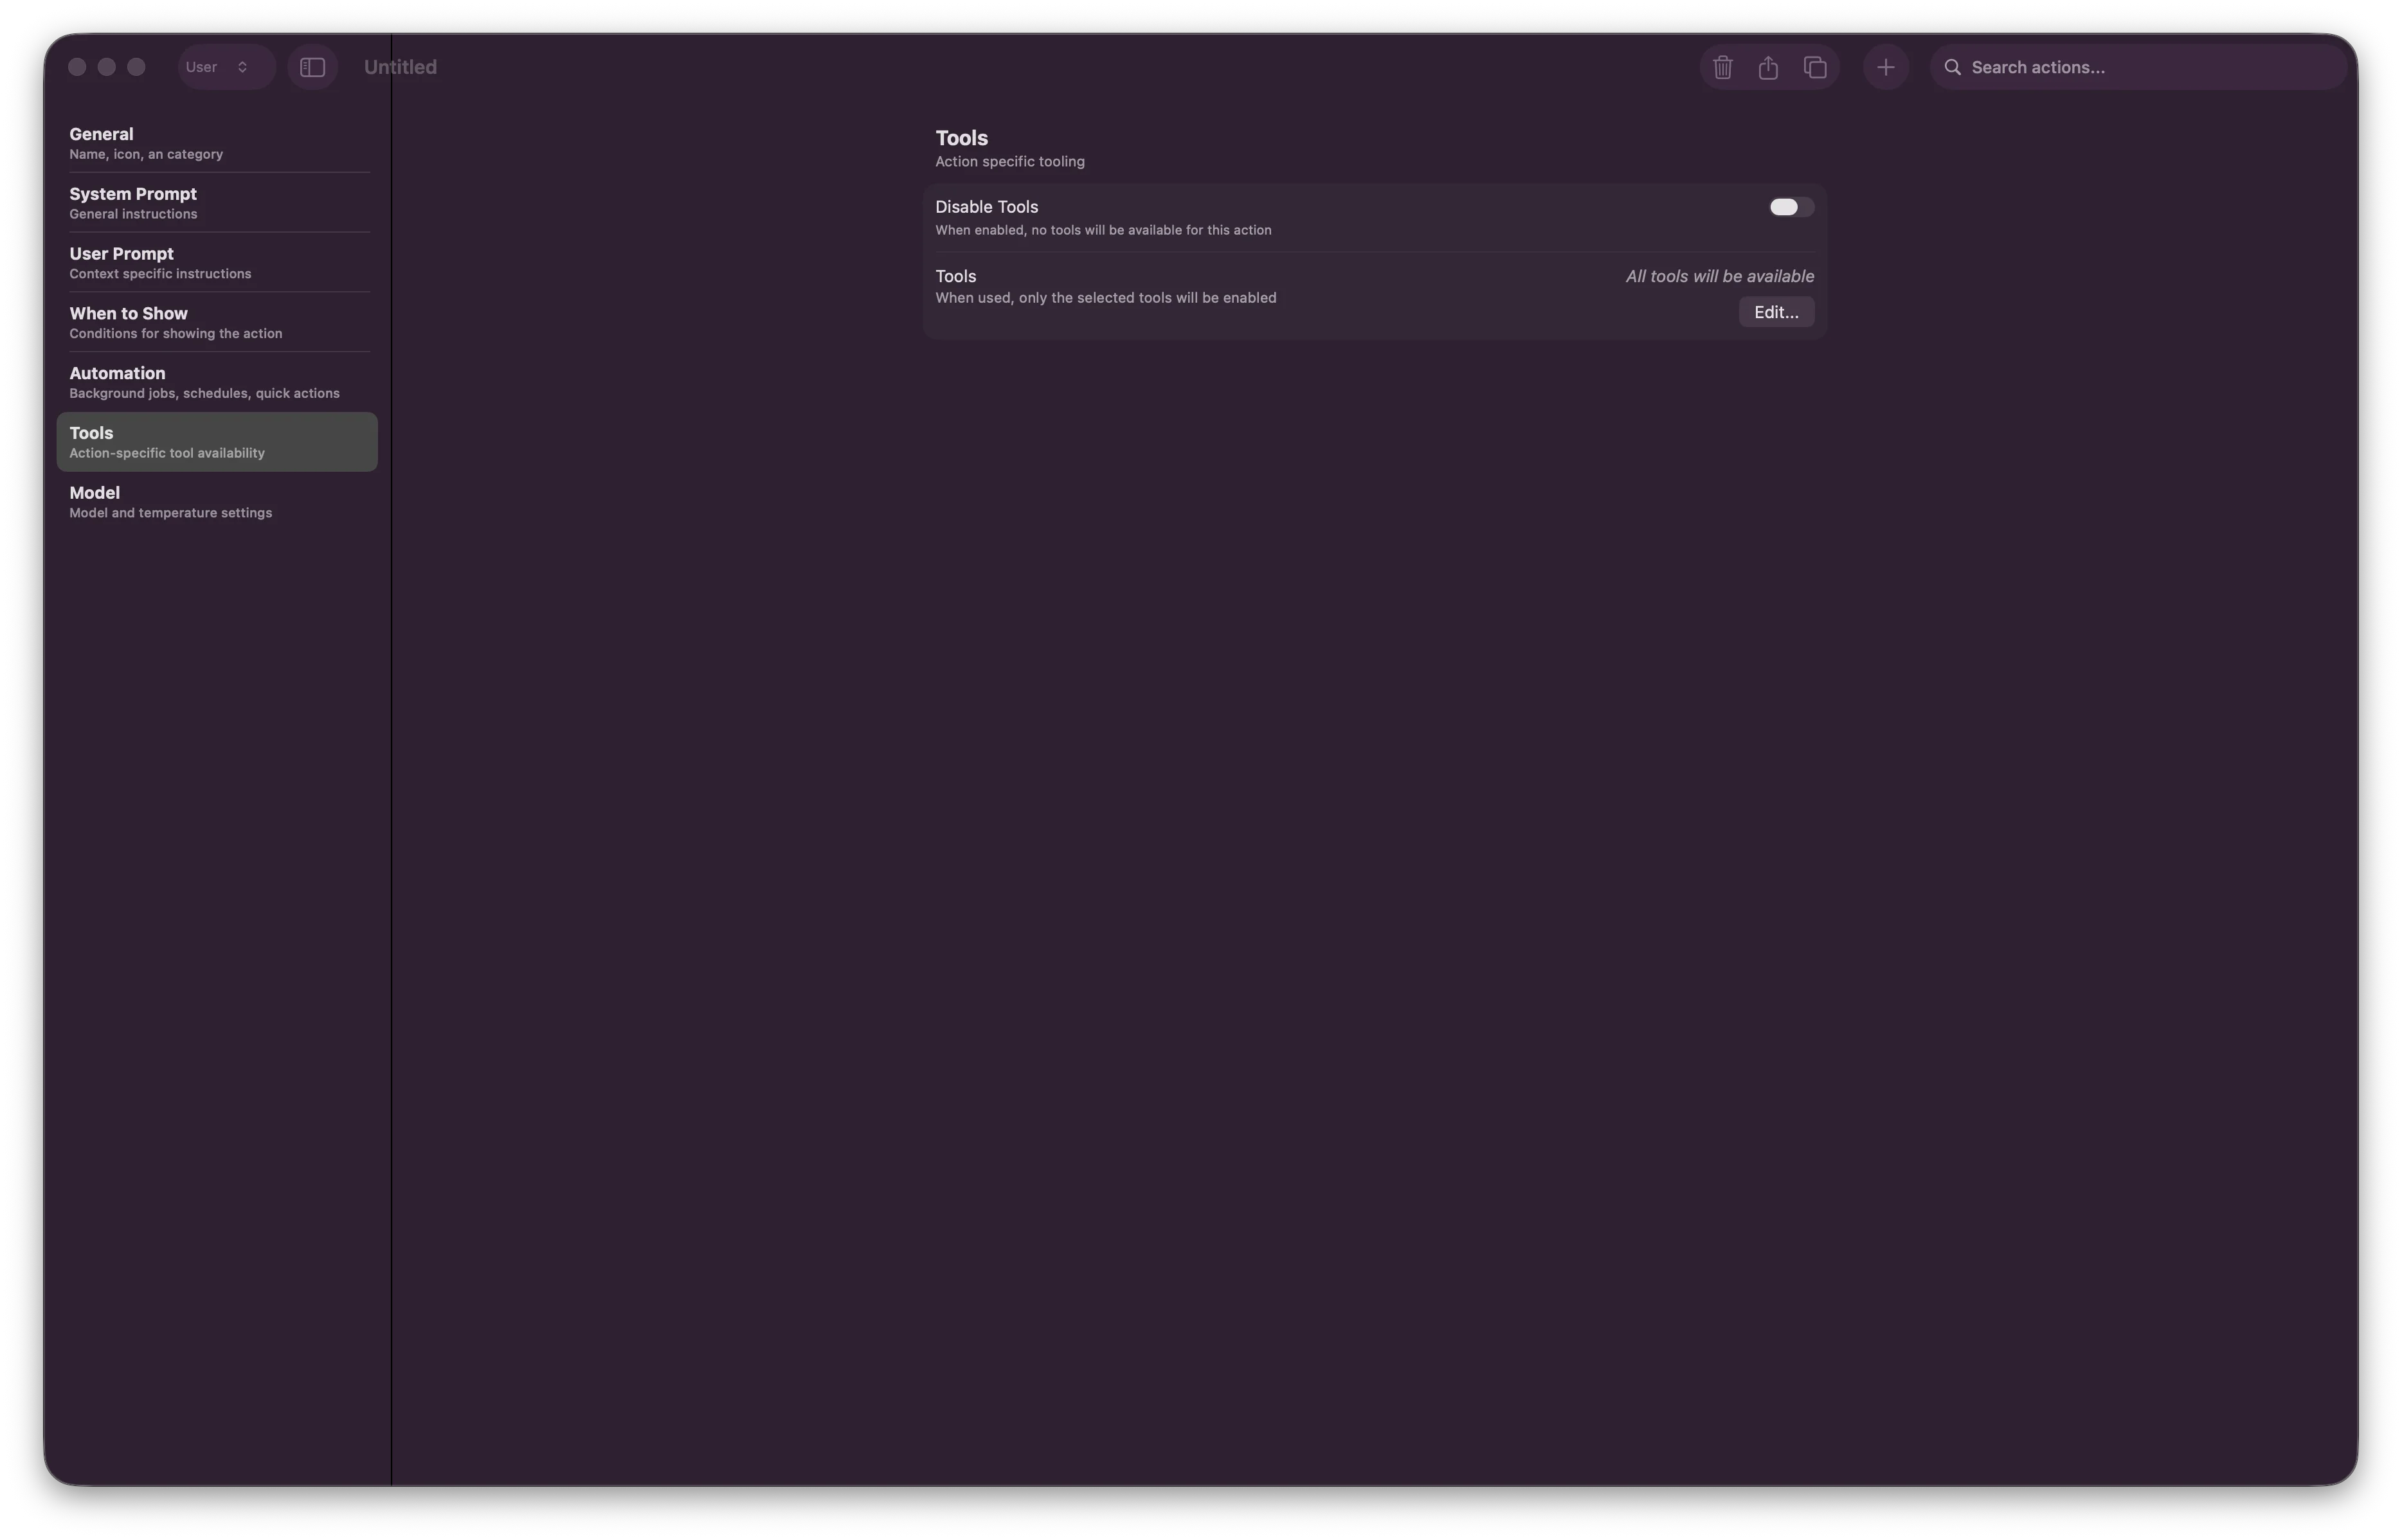 **Tool Configuration:**
* **Disable Tools** - Toggle off individual tools to restrict functionality
* When empty: All tools are available
* When configured: Only selected tools are available
**Why Scope Tools?**
* Reduce AI decision overhead (focus on relevant tools)
* Speed up action execution
* Improve security (limit what actions can access)
### 7. Model
Select AI model and adjust creativity level.
**Tool Configuration:**
* **Disable Tools** - Toggle off individual tools to restrict functionality
* When empty: All tools are available
* When configured: Only selected tools are available
**Why Scope Tools?**
* Reduce AI decision overhead (focus on relevant tools)
* Speed up action execution
* Improve security (limit what actions can access)
### 7. Model
Select AI model and adjust creativity level.
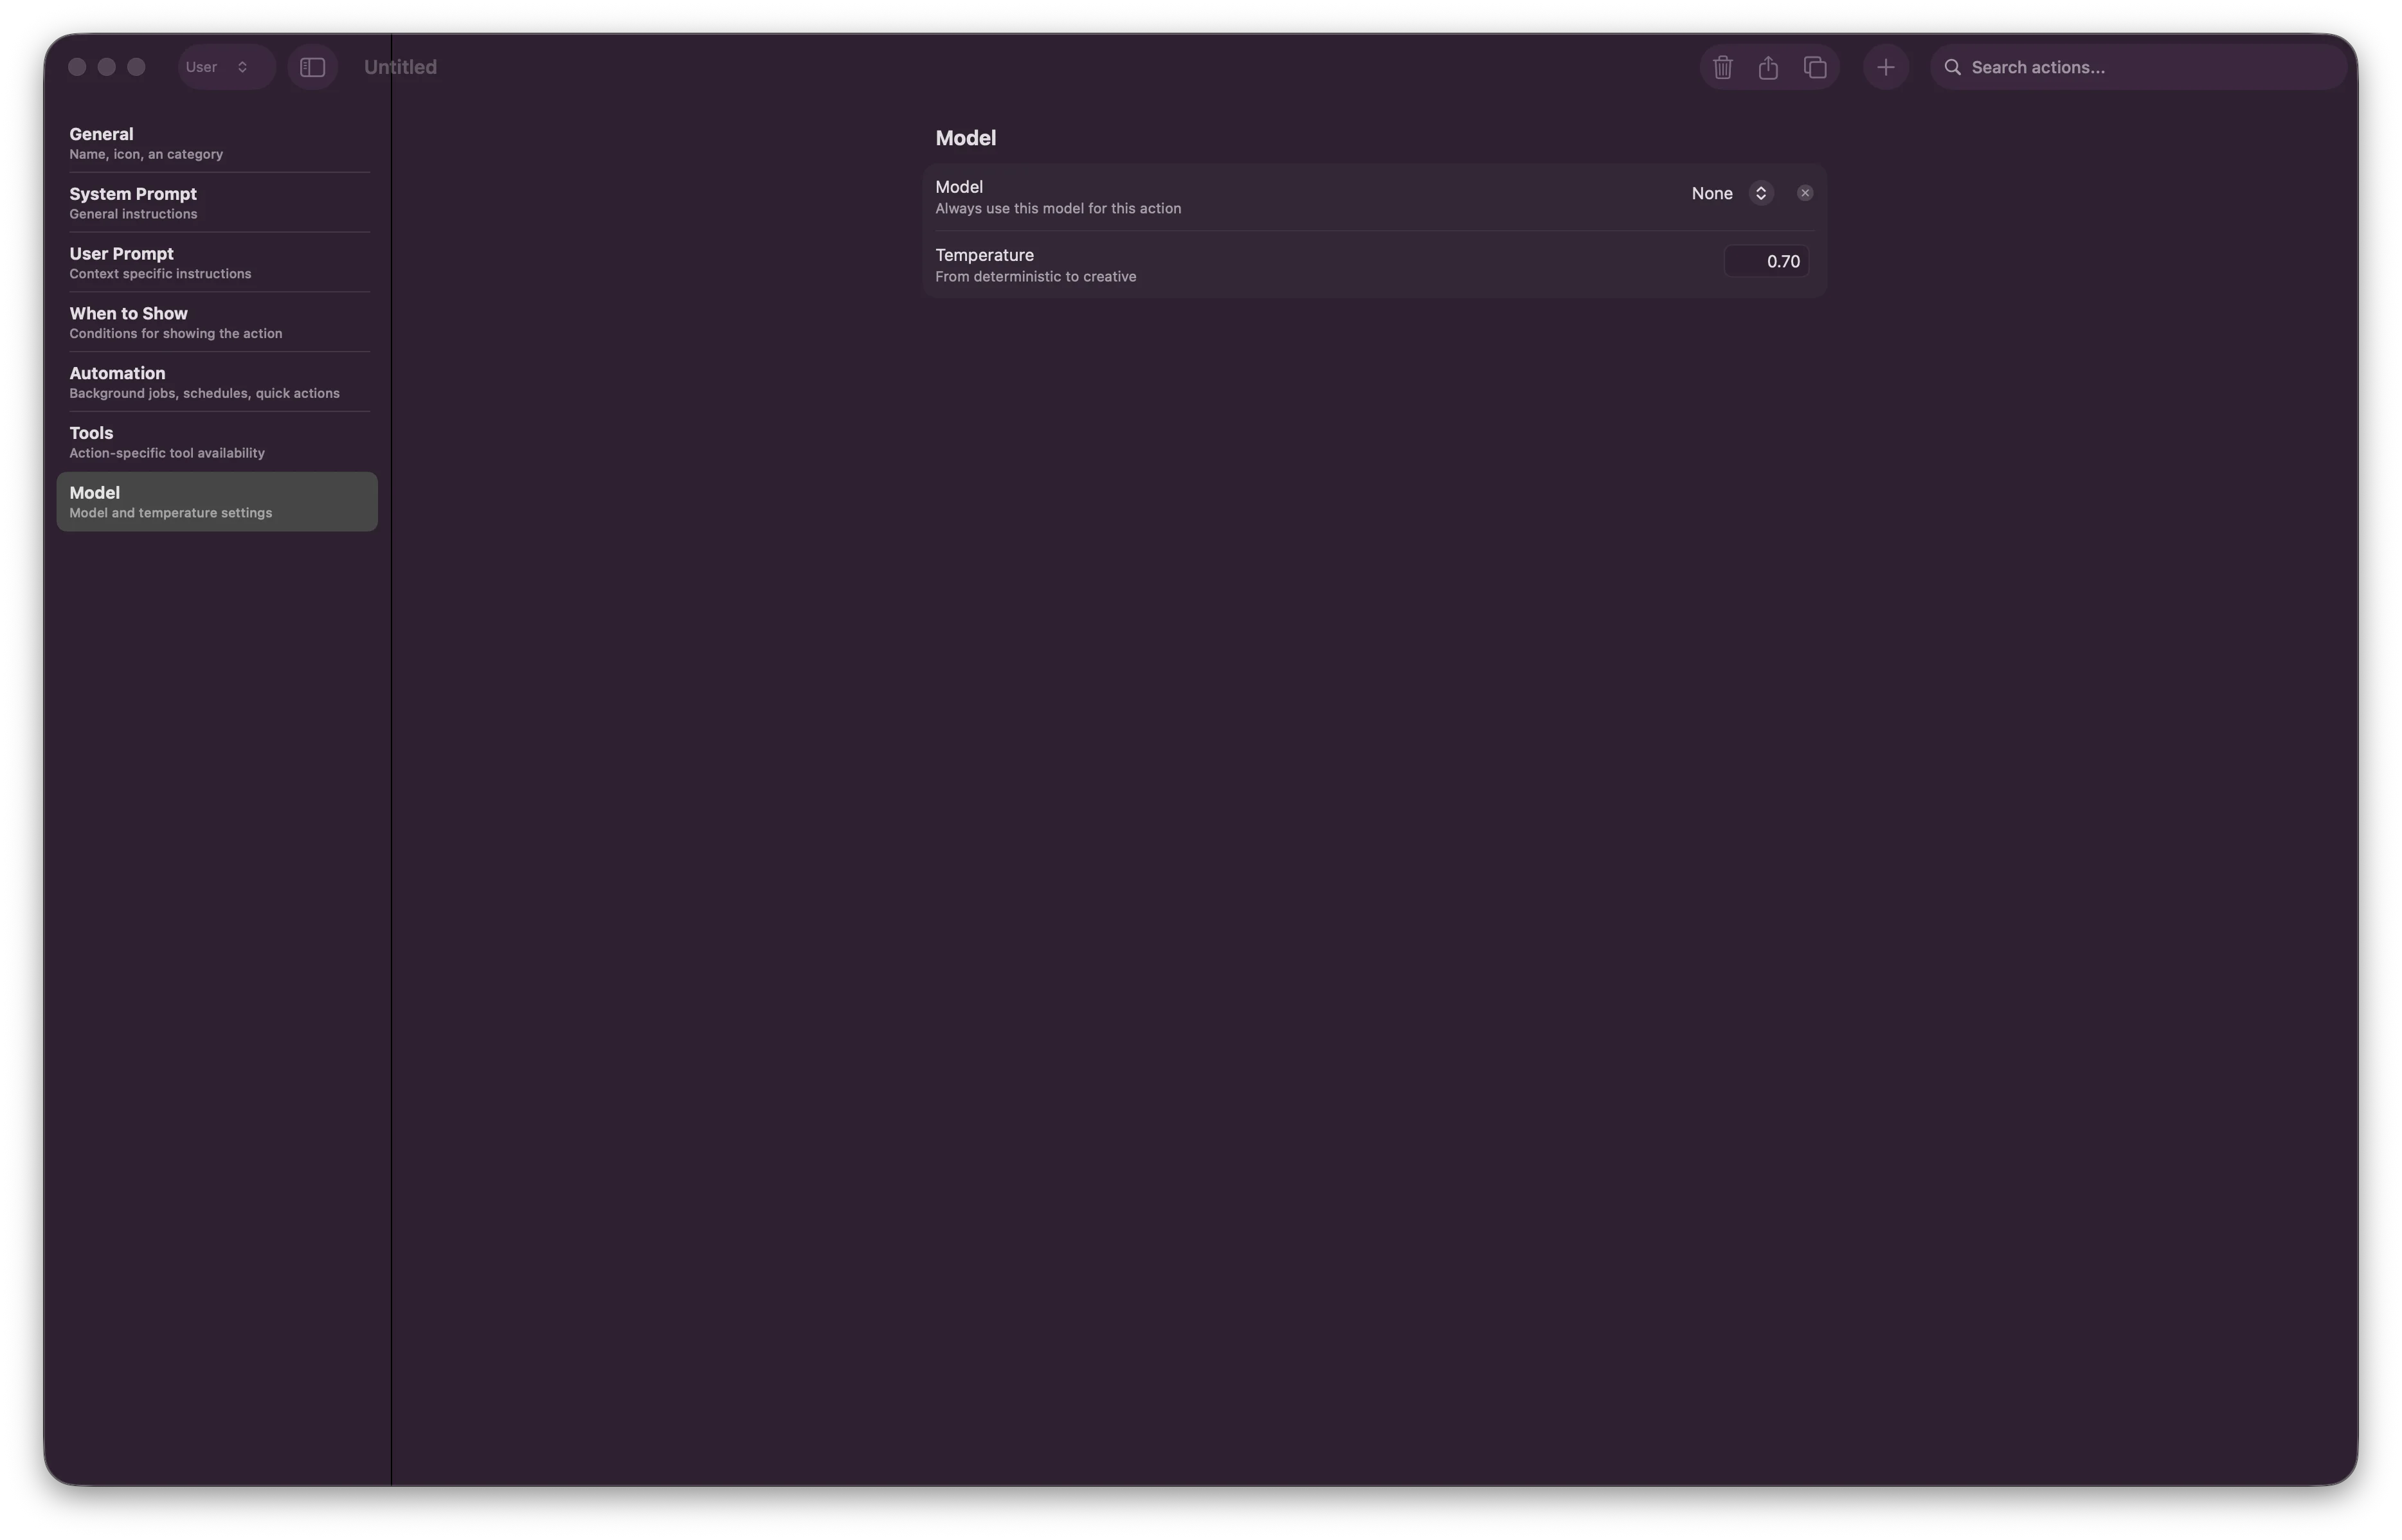 **Fields:**
* **Model** - Choose specific AI model for this action
* Leave empty to use user's default model setting
* Or select: Claude, GPT-4, local model, etc.
* **Temperature** - Adjust creativity vs. precision
* **0.0** - Deterministic (consistent, predictable)
* **0.5** - Balanced (default)
* **1.0** - Creative (unpredictable, exploratory)
## Best Practices
"Code Explainer" describes what it does. Avoid generic names like "Action 1".
Be detailed with AI instructions. Generic prompts produce generic outputs.
Enable only the tools your action needs. Reduces overhead and improves speed.
`{{ textSelection }}` always works. Manual copy/paste is error-prone.
"Code Explainer" only in VSCode + Xcode reduces menu clutter.
Test with real data before deploying to your team.
## Common Action Examples
### Example 1: Code Explainer
**Setup:**
* **Name:** Explain Code
* **Category:** code
* **Installed Apps:** VSCode, Xcode
* **System Prompt:** You are an expert programmer who explains code clearly
* **User Prompt:** `Please explain this code:\n\n{{ textSelection }}`
* **Consumer:** markdown
* **Temperature:** 0.5
### Example 2: Email Draft Creator
**Setup:**
* **Name:** Draft Email
* **Category:** productivity
* **When to Show:** Mail app active
* **System Prompt:** You are a professional business communicator
* **User Prompt:** `Transform this into a professional email:\n\n{{ textSelection }}`
* **Tools:** Enable only Mail
* **Consumer:** in-place
* **Temperature:** 0.6
### Example 3: Scheduled Daily Brief
**Setup:**
* **Name:** Daily Brief
* **Category:** productivity
* **Automation:** Schedule for 9:00 AM daily
* **Background Job:** Enabled
* **System Prompt:** Generate a daily brief of priorities
## Voice Triggers
Assign voice hotkeys to trigger actions hands-free:
Go to **Settings > Voice Triggers**
Click **+ Add Trigger**
Choose action from dropdown
Enter trigger phrase (e.g., "explain" for Code Explainer)
Click Save and you're ready
**Usage:** Hold voice hotkey + say trigger phrase → Action executes with current context
## x-callback-url Integration
Trigger Alter actions from **any application** using special URLs. This enables powerful cross-app automation workflows.
### What is x-callback-url?
x-callback-url is an inter-app communication protocol that lets applications trigger actions in each other through formatted URLs.
* **Inbound** - Trigger Alter actions from other apps (Shortcuts, Notes, Safari, etc.)
* **Outbound** - Create links in Alter that open other apps (Bear, OmniFocus, Drafts, etc.)
### Getting Your Action's Callback URL
Press **⌘ E**
Choose the action you want to expose
Navigate to General tab
Look for "URL Callback" section
Copy the `alter://` URL
**Format:**
```
alter://action/{action-id}?input=VALUE¶m2=VALUE
```
### Triggering Alter Actions from Other Apps
**Example 1: Web Search from Safari**
```
alter://action/ask-web?input=What+is+Alter+MacOS
```
**Example 2: Code Explainer with Input**
```
alter://action/explain-code?input=const+hello+%3D+%28%29+%3D%3E+%7B%7D
```
**Example 3: Using in Apple Shortcuts**
1. Create a new Shortcut
2. Add "Open URL" action
3. Paste your `alter://` URL
4. Run the shortcut to trigger the action
### Use Cases
Trigger action from Calendar → Generate meeting notes → Create email draft
Notion button → Trigger Alter action → Update task status
Copy text → Trigger action with callback → Open result in external app (no manual copying needed)
## Keyboard Shortcuts
| Action | Shortcut |
| ------------------ | -------------------------- |
| Open Action Editor | `⌘ E` |
| New Action | `Cmd + N` (in editor) |
| Save Action | `Cmd + S` (in editor) |
| Delete Action | `Cmd + Delete` (in editor) |
| Search Actions | `Cmd + F` (in editor) |
## Troubleshooting
* Check **When to Show** settings
* Verify app is running/active (if configured)
* Ensure action is **enabled**
* Review **System Prompt** — be more specific
* Adjust **Temperature** (lower for precision, higher for creativity)
* Check **User Prompt** — ensure variables are correct
* Verify hotkey is configured in Settings
* Check microphone permissions
* Test with manual trigger first
* Go to **Tools** tab
* Verify tools aren't disabled
* Check system permissions for the tool
## Related Guides
* [Tools & Integrations](/apps-tools/integrations-overview) — Available tools for your actions
* [URL Callbacks](/workflows/url-callbacks) — Deep dive into x-callback-url automation
* [Voice & Dictation](/workflows/dictation) — Set up voice triggers
* [Settings](/how-to/settings-guide) — Configure global model and voice settings
***
**Ready to build?** Open Alter, press `⌘ E`, and start creating your first action!
**Want to automate across apps?** Use x-callback-urls to trigger actions from Safari, Shortcuts, Notes, or any app that supports URL schemes.
**Fields:**
* **Model** - Choose specific AI model for this action
* Leave empty to use user's default model setting
* Or select: Claude, GPT-4, local model, etc.
* **Temperature** - Adjust creativity vs. precision
* **0.0** - Deterministic (consistent, predictable)
* **0.5** - Balanced (default)
* **1.0** - Creative (unpredictable, exploratory)
## Best Practices
"Code Explainer" describes what it does. Avoid generic names like "Action 1".
Be detailed with AI instructions. Generic prompts produce generic outputs.
Enable only the tools your action needs. Reduces overhead and improves speed.
`{{ textSelection }}` always works. Manual copy/paste is error-prone.
"Code Explainer" only in VSCode + Xcode reduces menu clutter.
Test with real data before deploying to your team.
## Common Action Examples
### Example 1: Code Explainer
**Setup:**
* **Name:** Explain Code
* **Category:** code
* **Installed Apps:** VSCode, Xcode
* **System Prompt:** You are an expert programmer who explains code clearly
* **User Prompt:** `Please explain this code:\n\n{{ textSelection }}`
* **Consumer:** markdown
* **Temperature:** 0.5
### Example 2: Email Draft Creator
**Setup:**
* **Name:** Draft Email
* **Category:** productivity
* **When to Show:** Mail app active
* **System Prompt:** You are a professional business communicator
* **User Prompt:** `Transform this into a professional email:\n\n{{ textSelection }}`
* **Tools:** Enable only Mail
* **Consumer:** in-place
* **Temperature:** 0.6
### Example 3: Scheduled Daily Brief
**Setup:**
* **Name:** Daily Brief
* **Category:** productivity
* **Automation:** Schedule for 9:00 AM daily
* **Background Job:** Enabled
* **System Prompt:** Generate a daily brief of priorities
## Voice Triggers
Assign voice hotkeys to trigger actions hands-free:
Go to **Settings > Voice Triggers**
Click **+ Add Trigger**
Choose action from dropdown
Enter trigger phrase (e.g., "explain" for Code Explainer)
Click Save and you're ready
**Usage:** Hold voice hotkey + say trigger phrase → Action executes with current context
## x-callback-url Integration
Trigger Alter actions from **any application** using special URLs. This enables powerful cross-app automation workflows.
### What is x-callback-url?
x-callback-url is an inter-app communication protocol that lets applications trigger actions in each other through formatted URLs.
* **Inbound** - Trigger Alter actions from other apps (Shortcuts, Notes, Safari, etc.)
* **Outbound** - Create links in Alter that open other apps (Bear, OmniFocus, Drafts, etc.)
### Getting Your Action's Callback URL
Press **⌘ E**
Choose the action you want to expose
Navigate to General tab
Look for "URL Callback" section
Copy the `alter://` URL
**Format:**
```
alter://action/{action-id}?input=VALUE¶m2=VALUE
```
### Triggering Alter Actions from Other Apps
**Example 1: Web Search from Safari**
```
alter://action/ask-web?input=What+is+Alter+MacOS
```
**Example 2: Code Explainer with Input**
```
alter://action/explain-code?input=const+hello+%3D+%28%29+%3D%3E+%7B%7D
```
**Example 3: Using in Apple Shortcuts**
1. Create a new Shortcut
2. Add "Open URL" action
3. Paste your `alter://` URL
4. Run the shortcut to trigger the action
### Use Cases
Trigger action from Calendar → Generate meeting notes → Create email draft
Notion button → Trigger Alter action → Update task status
Copy text → Trigger action with callback → Open result in external app (no manual copying needed)
## Keyboard Shortcuts
| Action | Shortcut |
| ------------------ | -------------------------- |
| Open Action Editor | `⌘ E` |
| New Action | `Cmd + N` (in editor) |
| Save Action | `Cmd + S` (in editor) |
| Delete Action | `Cmd + Delete` (in editor) |
| Search Actions | `Cmd + F` (in editor) |
## Troubleshooting
* Check **When to Show** settings
* Verify app is running/active (if configured)
* Ensure action is **enabled**
* Review **System Prompt** — be more specific
* Adjust **Temperature** (lower for precision, higher for creativity)
* Check **User Prompt** — ensure variables are correct
* Verify hotkey is configured in Settings
* Check microphone permissions
* Test with manual trigger first
* Go to **Tools** tab
* Verify tools aren't disabled
* Check system permissions for the tool
## Related Guides
* [Tools & Integrations](/apps-tools/integrations-overview) — Available tools for your actions
* [URL Callbacks](/workflows/url-callbacks) — Deep dive into x-callback-url automation
* [Voice & Dictation](/workflows/dictation) — Set up voice triggers
* [Settings](/how-to/settings-guide) — Configure global model and voice settings
***
**Ready to build?** Open Alter, press `⌘ E`, and start creating your first action!
**Want to automate across apps?** Use x-callback-urls to trigger actions from Safari, Shortcuts, Notes, or any app that supports URL schemes.