> ## Documentation Index
> Fetch the complete documentation index at: https://docs.alterhq.com/llms.txt
> Use this file to discover all available pages before exploring further.
# Telegram gateway を設定
> BotFather で Telegram ボットを作成し、Alter Gateways に接続する
このガイドを使用して、**BotFather** を通じて Telegram ボットを作成し、そのトークンをコピーして、**設定 → Integrations → Gateways** で接続します。
Alter connects to Telegram with a **bot token** from [@BotFather](https://t.me/BotFather). Alter uses long polling on your Mac — you do not configure webhooks or a public URL.
## 始める前に
* Telegram アカウント。
* **Alter** が Mac にインストールされ、実行されています。
* Telegram アプリまたは [Telegram Web](https://web.telegram.org/)。
公式参考文献:
* Telegram の [@BotFather](https://t.me/BotFather)
* [Telegram Bots — Features and BotFather](https://core.telegram.org/bots/features#botfather)
* [Telegram Bot API tutorial](https://core.telegram.org/bots/tutorial)
* [Bot FAQ — groups and privacy](https://core.telegram.org/bots/faq#what-messages-will-my-bot-get)
## ステップ 1 — BotFather でボットを作成する
In Telegram, open [@BotFather](https://t.me/BotFather) and tap **Start** (or send `/start`).
 *Source: [kitob-bot README](https://github.com/ytsshinobi/kitob-bot)*
Send `/newbot`. BotFather asks for a **display name** (shown in contacts) and a **username** (must end in `bot`, for example `MyAlterHelperBot`).
*Source: [kitob-bot README](https://github.com/ytsshinobi/kitob-bot)*
Send `/newbot`. BotFather asks for a **display name** (shown in contacts) and a **username** (must end in `bot`, for example `MyAlterHelperBot`).
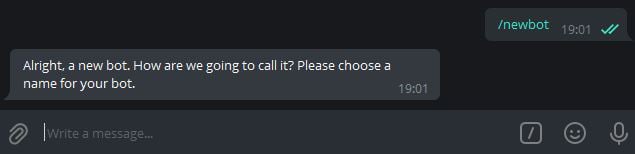
 *Source: [kitob-bot README](https://github.com/ytsshinobi/kitob-bot)*
When creation succeeds, BotFather sends a message containing your **token** (format like `123456789:ABCdefGHIjklMNOpqrsTUVwxyz`). Copy the full string.
Telegram documents this flow in the [Bot tutorial — Obtain your bot token](https://core.telegram.org/bots/tutorial#obtain-your-bot-token).
*Source: [kitob-bot README](https://github.com/ytsshinobi/kitob-bot)*
When creation succeeds, BotFather sends a message containing your **token** (format like `123456789:ABCdefGHIjklMNOpqrsTUVwxyz`). Copy the full string.
Telegram documents this flow in the [Bot tutorial — Obtain your bot token](https://core.telegram.org/bots/tutorial#obtain-your-bot-token).
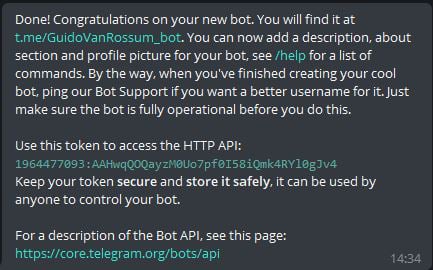 *Source: [kitob-bot README](https://github.com/ytsshinobi/kitob-bot). The token shown is from a public tutorial repo — treat your own token like a password.*
Treat the token like a password. If it is exposed, open BotFather and send `/revoke` for that bot, then paste the new token into Alter.
### オプションの BotFather 設定
| Command | When to use |
| ----------------- | --------------------------------------------------- |
| `/setdescription` | Short description users see before starting the bot |
| `/setabouttext` | About text on the bot profile |
| `/setuserpic` | Bot avatar |
| `/token` | Retrieve the token again for an existing bot |
## ステップ 2 — ボットとのチャットを開始する
Tap the link BotFather provides (for example `t.me/YourBotName`) or search for your bot's username in Telegram. The success message in **Step 1** includes this link.
Send `/start` so Telegram opens a conversation. You need an active chat before testing Alter.
## ステップ 3 — オプション: グループでボットを使用する
Alter は、グループ チャットだけでなくプライベート チャットからもメッセージを受信できます。
In your group, add the bot as a member (you may need admin permission to add bots).
By default, Telegram bots in groups may only see commands and @mentions. For broader group access, open [@BotFather](https://t.me/BotFather) → `/mybots` → your bot → **Bot Settings** → **Group Privacy** → **Turn off**.
See [Bot FAQ — privacy mode](https://core.telegram.org/bots/faq#what-messages-will-my-bot-get).
If the bot should only respond to certain people or groups, see [Secure access — allowlists and IDs](#secure-access--allowlists-and-ids) below and fill in **許可された Telegram ユーザーまたはチャット ID** when you connect Alter.
## 安全なアクセス — ホワイトリストと ID
**設定 → Integrations → Gateways** の **許可された Telegram ユーザーまたはチャット ID** を使用して、Telegram ゲートウェイを使用できる人を制限します。 Alter は、アクションを実行する前に、すべての受信メッセージとそのリストに対するインライン ボタンのタップをチェックします。
Alter matches **user IDs**, **chat IDs**, and `@usernames` (case-insensitive). Leave the field **empty** to allow anyone who can message the bot. Enter `*` to allow everyone explicitly. Messages from users or chats not on the list are **silently ignored** — Alter does not reply with an error.
### ユーザー ID とチャット ID
Telegram は人物と会話の両方に数値 ID を使用します。
| ID type | Typical format | When to use in Alter |
| ----------- | -------------------------------------------------------------------------------------------------- | ------------------------------------------------- |
| **User ID** | Positive number (for example `123456789`) | Allow a specific person in DMs or in a group |
| **Chat ID** | Positive for private chats; **negative** for groups and supergroups (for example `-1001234567890`) | Allow an entire group, or a specific private chat |
ボットとの **private chat** では、チャット ID は通常、ユーザー ID と同じです。グループ内の全員を許可したい場合は、**group** でグループのチャット ID を追加します ([Group Privacy](#step-3--optional-use-the-bot-in-a-group) 設定に従います)。
Alter は、その人が公開ユーザー名を持っている場合、`@username` 値 (例: `@sam`) も受け入れます。
### Telegram ユーザー ID を確認する方法
In Telegram, open [@userinfobot](https://t.me/userinfobot) or [@getidsbot](https://t.me/getidsbot) and tap **Start**. The bot replies with your numeric **Id** — that is your **user ID**.
Copy the number (digits only, no `@`) into **許可された Telegram ユーザーまたはチャット ID**.
To identify someone else, forward one of their messages to [@userinfobot](https://t.me/userinfobot) or [@getidsbot](https://t.me/getidsbot). The bot reports the sender's user ID.
Only forward messages in contexts where you are comfortable sharing metadata with a third-party bot. For sensitive groups, prefer the Bot API method below or add the whole group by chat ID instead.
### チャット ID の確認方法
Your user ID from **Step 1** above is usually enough — private chat IDs match the user's ID.
To confirm, message your bot, then call Telegram's [`getUpdates`](https://core.telegram.org/bots/api#getupdates) method with your bot token and look for `"chat": {"id": …}` and `"from": {"id": …}` in the JSON. See [Telegram Bot API — Chat](https://core.telegram.org/bots/api#chat) and [User](https://core.telegram.org/bots/api#user).
Add [@getidsbot](https://t.me/getidsbot) to the group temporarily (or use [@RawDataBot](https://t.me/RawDataBot)), send any message in the group, and copy the **Chat ID** from the bot's reply. Group IDs are negative numbers.
Remove the ID bot from the group when you are done if you do not need it there permanently.
With your bot token, open this URL in a browser (replace `TOKEN` with your token):
`https://api.telegram.org/botTOKEN/getUpdates`
Send a test message in the chat you want to identify, refresh the page, and read `message.chat.id` (chat ID) and `message.from.id` (sender user ID) from the latest entry.
Treat the URL like a password — anyone with it can control your bot. Close the tab when finished and never share the link.
Alter's `/status` command shows the default action and whether a conversation is selected — it does **not** print user or chat IDs. Use the methods above when building an allowlist.
### Alter で許可リストを構成します
Gather comma-separated user IDs, chat IDs, and/or `@usernames` for everyone (or every group) that should be able to use the bot.
Open **設定 → Integrations → Gateways**, edit your Telegram gateway, and enter the values in **許可された Telegram ユーザーまたはチャット ID** (for example `123456789, -1001234567890, @sam`).
Click **保存して再起動**. Message the bot from an allowed account or group — you should get a reply. Messages from IDs not on the list are ignored with no response.
### セキュリティのベスト プラクティス
* **Treat the bot token like a password.** Alter (Keychain) にのみ保管してください。漏洩した場合は、[@BotFather](https://t.me/BotFather) で`/revoke` を使用してトークンを取り消し、新しいトークンをAlter に貼り付けます。
* **Use an allowlist for personal bots.** 空の許可リストは、Alter の実行中にボットを発見した人は誰でもメッセージを送信できることを意味します。
* **Prefer numeric IDs over `@username`.** ユーザー名は変更できます。数値 ID は安定しています。
* **Limit group exposure.** ボットがすべてのグループ メッセージを読み取る必要がある場合を除き、BotFather で [Group Privacy](#step-3--optional-use-the-bot-in-a-group) をオンにします。信頼できるグループのみを追加し、ボットが複数のグループに属している場合はグループ チャット ID を許可リストに登録します。
* **Be cautious with third-party ID bots.** 転送されたメッセージとグループのメタデータを確認できます。不要になった場合は、機密グループから削除してください。
## Alter に接続します
Open **設定** (⌘,) → **Integrations** → **Gateways**.
Click **Gateway を追加** → **Telegram**.
| Field | What to enter |
| --------------------------------- | ----------------------------------------------------------------------------------------------------------------------------------------------- |
| **名前** | A label you will recognize (for example `Telegram — Personal`). |
| **Bot トークン** | The token from BotFather (**Step 1**). |
| **許可された Telegram ユーザーまたはチャット ID** | Comma-separated user IDs, chat IDs, or `@usernames`. Leave empty to allow anyone who can message the bot. Use `*` to allow everyone explicitly. |
**Ask Anything** がデフォルトで、Telegram ですぐ使えます。カスタム Action には **Action Editor → Gateways** で **可用性** を **Telegram** または **すべて** に設定します。
Turn **有効** on, then click **保存して再起動**. Wait for **接続済み @your\_bot\_username**.
接続に失敗する場合は、[Gateways troubleshooting](/apps-tools/gateways#troubleshooting)をご覧ください。
## ボットをテストする
Gateways only work while Alter is open on your Mac.
In your Telegram chat with the bot, send `/help`. The bot should list commands.
Send a normal message. Alter should show **Thinking…**, then stream the reply. In private chats, Alter uses Telegram's native draft preview when available; otherwise it edits a regular message (rich replies can be up to about 32,000 characters).
Send `/help` and use the **New chat**, **Choose action**, or **Past chats** buttons. While Alter is responding in a group, tap **Stop** or send `/stop` to cancel the current turn.
Send a photo or document. Alter downloads supported attachments for the turn and can upload output files from tool runs when the action produces them.
Send a **voice message** or audio file. Alter transcribes it with your selected voice processor (**設定 → Voice**) and sends the text to the active action. Audio-only messages work as chat turns even without typed text.
## 関連ページ
* [Gateways overview](/apps-tools/gateways)
* [Set up a Discord gateway](/apps-tools/gateways-discord)
* [Alter Actions — Gateway 可用性](/workflows/alter-actions#gateways)
* [Alter Settings](/how-to/settings-guide)
*Source: [kitob-bot README](https://github.com/ytsshinobi/kitob-bot). The token shown is from a public tutorial repo — treat your own token like a password.*
Treat the token like a password. If it is exposed, open BotFather and send `/revoke` for that bot, then paste the new token into Alter.
### オプションの BotFather 設定
| Command | When to use |
| ----------------- | --------------------------------------------------- |
| `/setdescription` | Short description users see before starting the bot |
| `/setabouttext` | About text on the bot profile |
| `/setuserpic` | Bot avatar |
| `/token` | Retrieve the token again for an existing bot |
## ステップ 2 — ボットとのチャットを開始する
Tap the link BotFather provides (for example `t.me/YourBotName`) or search for your bot's username in Telegram. The success message in **Step 1** includes this link.
Send `/start` so Telegram opens a conversation. You need an active chat before testing Alter.
## ステップ 3 — オプション: グループでボットを使用する
Alter は、グループ チャットだけでなくプライベート チャットからもメッセージを受信できます。
In your group, add the bot as a member (you may need admin permission to add bots).
By default, Telegram bots in groups may only see commands and @mentions. For broader group access, open [@BotFather](https://t.me/BotFather) → `/mybots` → your bot → **Bot Settings** → **Group Privacy** → **Turn off**.
See [Bot FAQ — privacy mode](https://core.telegram.org/bots/faq#what-messages-will-my-bot-get).
If the bot should only respond to certain people or groups, see [Secure access — allowlists and IDs](#secure-access--allowlists-and-ids) below and fill in **許可された Telegram ユーザーまたはチャット ID** when you connect Alter.
## 安全なアクセス — ホワイトリストと ID
**設定 → Integrations → Gateways** の **許可された Telegram ユーザーまたはチャット ID** を使用して、Telegram ゲートウェイを使用できる人を制限します。 Alter は、アクションを実行する前に、すべての受信メッセージとそのリストに対するインライン ボタンのタップをチェックします。
Alter matches **user IDs**, **chat IDs**, and `@usernames` (case-insensitive). Leave the field **empty** to allow anyone who can message the bot. Enter `*` to allow everyone explicitly. Messages from users or chats not on the list are **silently ignored** — Alter does not reply with an error.
### ユーザー ID とチャット ID
Telegram は人物と会話の両方に数値 ID を使用します。
| ID type | Typical format | When to use in Alter |
| ----------- | -------------------------------------------------------------------------------------------------- | ------------------------------------------------- |
| **User ID** | Positive number (for example `123456789`) | Allow a specific person in DMs or in a group |
| **Chat ID** | Positive for private chats; **negative** for groups and supergroups (for example `-1001234567890`) | Allow an entire group, or a specific private chat |
ボットとの **private chat** では、チャット ID は通常、ユーザー ID と同じです。グループ内の全員を許可したい場合は、**group** でグループのチャット ID を追加します ([Group Privacy](#step-3--optional-use-the-bot-in-a-group) 設定に従います)。
Alter は、その人が公開ユーザー名を持っている場合、`@username` 値 (例: `@sam`) も受け入れます。
### Telegram ユーザー ID を確認する方法
In Telegram, open [@userinfobot](https://t.me/userinfobot) or [@getidsbot](https://t.me/getidsbot) and tap **Start**. The bot replies with your numeric **Id** — that is your **user ID**.
Copy the number (digits only, no `@`) into **許可された Telegram ユーザーまたはチャット ID**.
To identify someone else, forward one of their messages to [@userinfobot](https://t.me/userinfobot) or [@getidsbot](https://t.me/getidsbot). The bot reports the sender's user ID.
Only forward messages in contexts where you are comfortable sharing metadata with a third-party bot. For sensitive groups, prefer the Bot API method below or add the whole group by chat ID instead.
### チャット ID の確認方法
Your user ID from **Step 1** above is usually enough — private chat IDs match the user's ID.
To confirm, message your bot, then call Telegram's [`getUpdates`](https://core.telegram.org/bots/api#getupdates) method with your bot token and look for `"chat": {"id": …}` and `"from": {"id": …}` in the JSON. See [Telegram Bot API — Chat](https://core.telegram.org/bots/api#chat) and [User](https://core.telegram.org/bots/api#user).
Add [@getidsbot](https://t.me/getidsbot) to the group temporarily (or use [@RawDataBot](https://t.me/RawDataBot)), send any message in the group, and copy the **Chat ID** from the bot's reply. Group IDs are negative numbers.
Remove the ID bot from the group when you are done if you do not need it there permanently.
With your bot token, open this URL in a browser (replace `TOKEN` with your token):
`https://api.telegram.org/botTOKEN/getUpdates`
Send a test message in the chat you want to identify, refresh the page, and read `message.chat.id` (chat ID) and `message.from.id` (sender user ID) from the latest entry.
Treat the URL like a password — anyone with it can control your bot. Close the tab when finished and never share the link.
Alter's `/status` command shows the default action and whether a conversation is selected — it does **not** print user or chat IDs. Use the methods above when building an allowlist.
### Alter で許可リストを構成します
Gather comma-separated user IDs, chat IDs, and/or `@usernames` for everyone (or every group) that should be able to use the bot.
Open **設定 → Integrations → Gateways**, edit your Telegram gateway, and enter the values in **許可された Telegram ユーザーまたはチャット ID** (for example `123456789, -1001234567890, @sam`).
Click **保存して再起動**. Message the bot from an allowed account or group — you should get a reply. Messages from IDs not on the list are ignored with no response.
### セキュリティのベスト プラクティス
* **Treat the bot token like a password.** Alter (Keychain) にのみ保管してください。漏洩した場合は、[@BotFather](https://t.me/BotFather) で`/revoke` を使用してトークンを取り消し、新しいトークンをAlter に貼り付けます。
* **Use an allowlist for personal bots.** 空の許可リストは、Alter の実行中にボットを発見した人は誰でもメッセージを送信できることを意味します。
* **Prefer numeric IDs over `@username`.** ユーザー名は変更できます。数値 ID は安定しています。
* **Limit group exposure.** ボットがすべてのグループ メッセージを読み取る必要がある場合を除き、BotFather で [Group Privacy](#step-3--optional-use-the-bot-in-a-group) をオンにします。信頼できるグループのみを追加し、ボットが複数のグループに属している場合はグループ チャット ID を許可リストに登録します。
* **Be cautious with third-party ID bots.** 転送されたメッセージとグループのメタデータを確認できます。不要になった場合は、機密グループから削除してください。
## Alter に接続します
Open **設定** (⌘,) → **Integrations** → **Gateways**.
Click **Gateway を追加** → **Telegram**.
| Field | What to enter |
| --------------------------------- | ----------------------------------------------------------------------------------------------------------------------------------------------- |
| **名前** | A label you will recognize (for example `Telegram — Personal`). |
| **Bot トークン** | The token from BotFather (**Step 1**). |
| **許可された Telegram ユーザーまたはチャット ID** | Comma-separated user IDs, chat IDs, or `@usernames`. Leave empty to allow anyone who can message the bot. Use `*` to allow everyone explicitly. |
**Ask Anything** がデフォルトで、Telegram ですぐ使えます。カスタム Action には **Action Editor → Gateways** で **可用性** を **Telegram** または **すべて** に設定します。
Turn **有効** on, then click **保存して再起動**. Wait for **接続済み @your\_bot\_username**.
接続に失敗する場合は、[Gateways troubleshooting](/apps-tools/gateways#troubleshooting)をご覧ください。
## ボットをテストする
Gateways only work while Alter is open on your Mac.
In your Telegram chat with the bot, send `/help`. The bot should list commands.
Send a normal message. Alter should show **Thinking…**, then stream the reply. In private chats, Alter uses Telegram's native draft preview when available; otherwise it edits a regular message (rich replies can be up to about 32,000 characters).
Send `/help` and use the **New chat**, **Choose action**, or **Past chats** buttons. While Alter is responding in a group, tap **Stop** or send `/stop` to cancel the current turn.
Send a photo or document. Alter downloads supported attachments for the turn and can upload output files from tool runs when the action produces them.
Send a **voice message** or audio file. Alter transcribes it with your selected voice processor (**設定 → Voice**) and sends the text to the active action. Audio-only messages work as chat turns even without typed text.
## 関連ページ
* [Gateways overview](/apps-tools/gateways)
* [Set up a Discord gateway](/apps-tools/gateways-discord)
* [Alter Actions — Gateway 可用性](/workflows/alter-actions#gateways)
* [Alter Settings](/how-to/settings-guide)