> ## Documentation Index
> Fetch the complete documentation index at: https://docs.alterhq.com/llms.txt
> Use this file to discover all available pages before exploring further.
# Discord gateway を設定
> Discord ボットを作成し、Alter Gateways に接続する
このガイドを使用して、Discord ボットを作成し、Alter に必要な権限を付与し、**設定 → Integrations → Gateways** で接続します。
Alter connects to Discord as a **bot** using a **bot token**. You create the bot in the [Discord Developer Portal](https://discord.com/developers/applications); Alter does not generate an invite URL for you — you add the bot to your server from the portal.
## 始める前に
* アプリケーションを作成する (およびターゲット サーバーにボットを追加する) 権限を持つ Discord アカウント。
* **Alter** が Mac にインストールされ、実行されています。
* トークンと ID をコピーするのに数分 — ボット トークンをパスワードのように扱います。
公式参考文献:
* [Discord Developer Portal](https://discord.com/developers/applications)
* [Discord quick start — overview of apps](https://discord.com/developers/docs/quick-start/overview-of-apps)
## ステップ 1 — Discord アプリケーションを作成する
Go to [discord.com/developers/applications](https://discord.com/developers/applications) and sign in.
Click **New Application**, choose a name (for example `Alter`), and confirm.
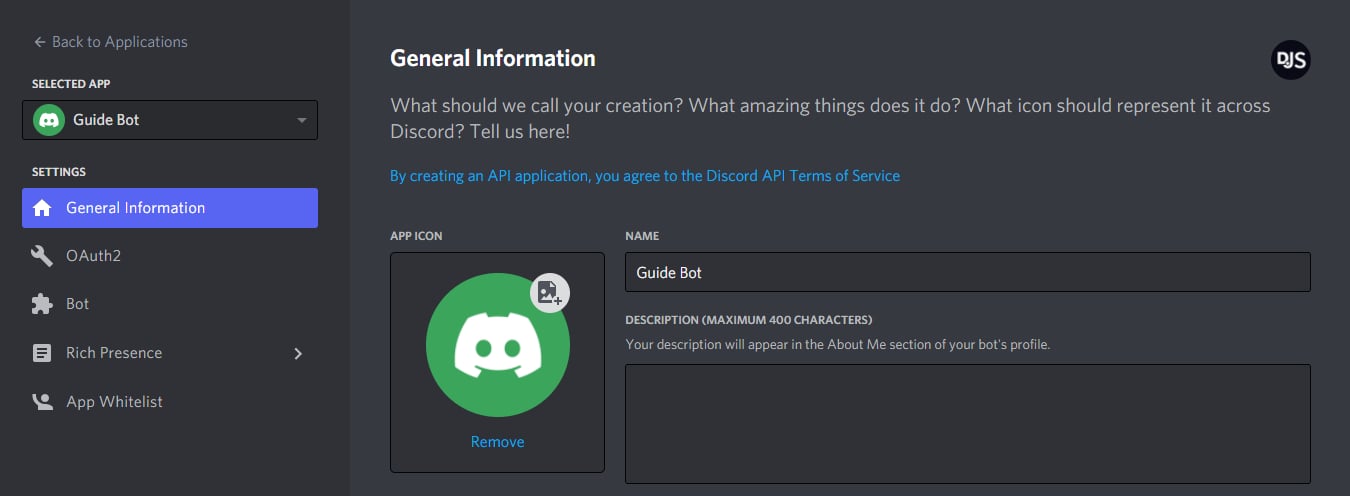 *Source: [discord.js guide — Application Setup](https://discordjs.guide/preparations/app-setup)*
In the left sidebar, select **Bot**, then click **Add Bot** (or **Reset Token** if you already created one).
*Source: [discord.js guide — Application Setup](https://discordjs.guide/preparations/app-setup)*
In the left sidebar, select **Bot**, then click **Add Bot** (or **Reset Token** if you already created one).
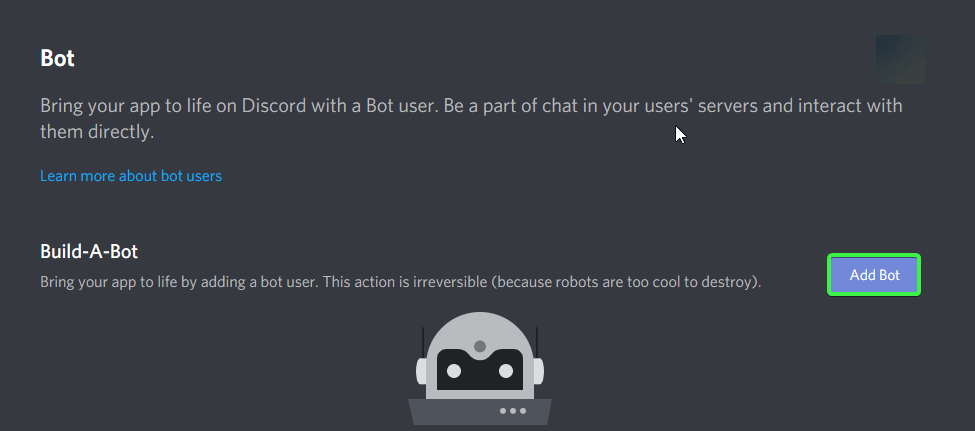 *Source: [Stack Overflow — permanent OAuth invite for a Discord bot](https://stackoverflow.com/questions/68218211/how-do-you-create-a-permanent-oauth-invite-for-your-discord-bot)*
## ステップ 2 — Message Content Intent を有効にする
Alter はサーバーと DM のメッセージ テキストを読み取る必要があります。 Discord では、Developer Portal でこれを明示的にオンにする必要があります。
In your application, go to **Bot**.
Under **Privileged Gateway Intents**, turn on **Message Content Intent**.
*Source: [Stack Overflow — permanent OAuth invite for a Discord bot](https://stackoverflow.com/questions/68218211/how-do-you-create-a-permanent-oauth-invite-for-your-discord-bot)*
## ステップ 2 — Message Content Intent を有効にする
Alter はサーバーと DM のメッセージ テキストを読み取る必要があります。 Discord では、Developer Portal でこれを明示的にオンにする必要があります。
In your application, go to **Bot**.
Under **Privileged Gateway Intents**, turn on **Message Content Intent**.
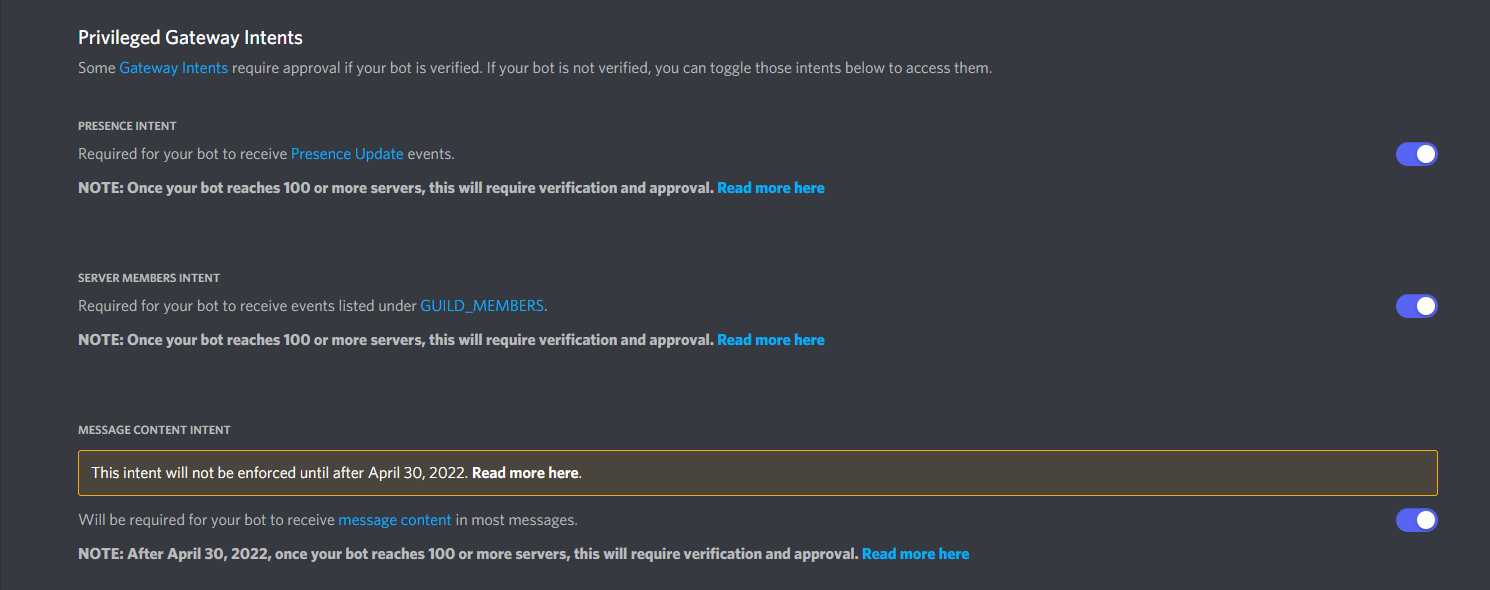 *Source: [PyCord docs — Gateway Intents](https://docs.pycord.dev/en/master/intents.html)*
Confirm any prompts. Without this intent, Alter cannot read messages and shows an error such as *Enable Message Content Intent for this bot*.
## ステップ 3 — ボット トークンをコピーする
On the **Bot** page, click **Reset Token** (first-time setup) or **Copy** under **Token**.
*Source: [PyCord docs — Gateway Intents](https://docs.pycord.dev/en/master/intents.html)*
Confirm any prompts. Without this intent, Alter cannot read messages and shows an error such as *Enable Message Content Intent for this bot*.
## ステップ 3 — ボット トークンをコピーする
On the **Bot** page, click **Reset Token** (first-time setup) or **Copy** under **Token**.
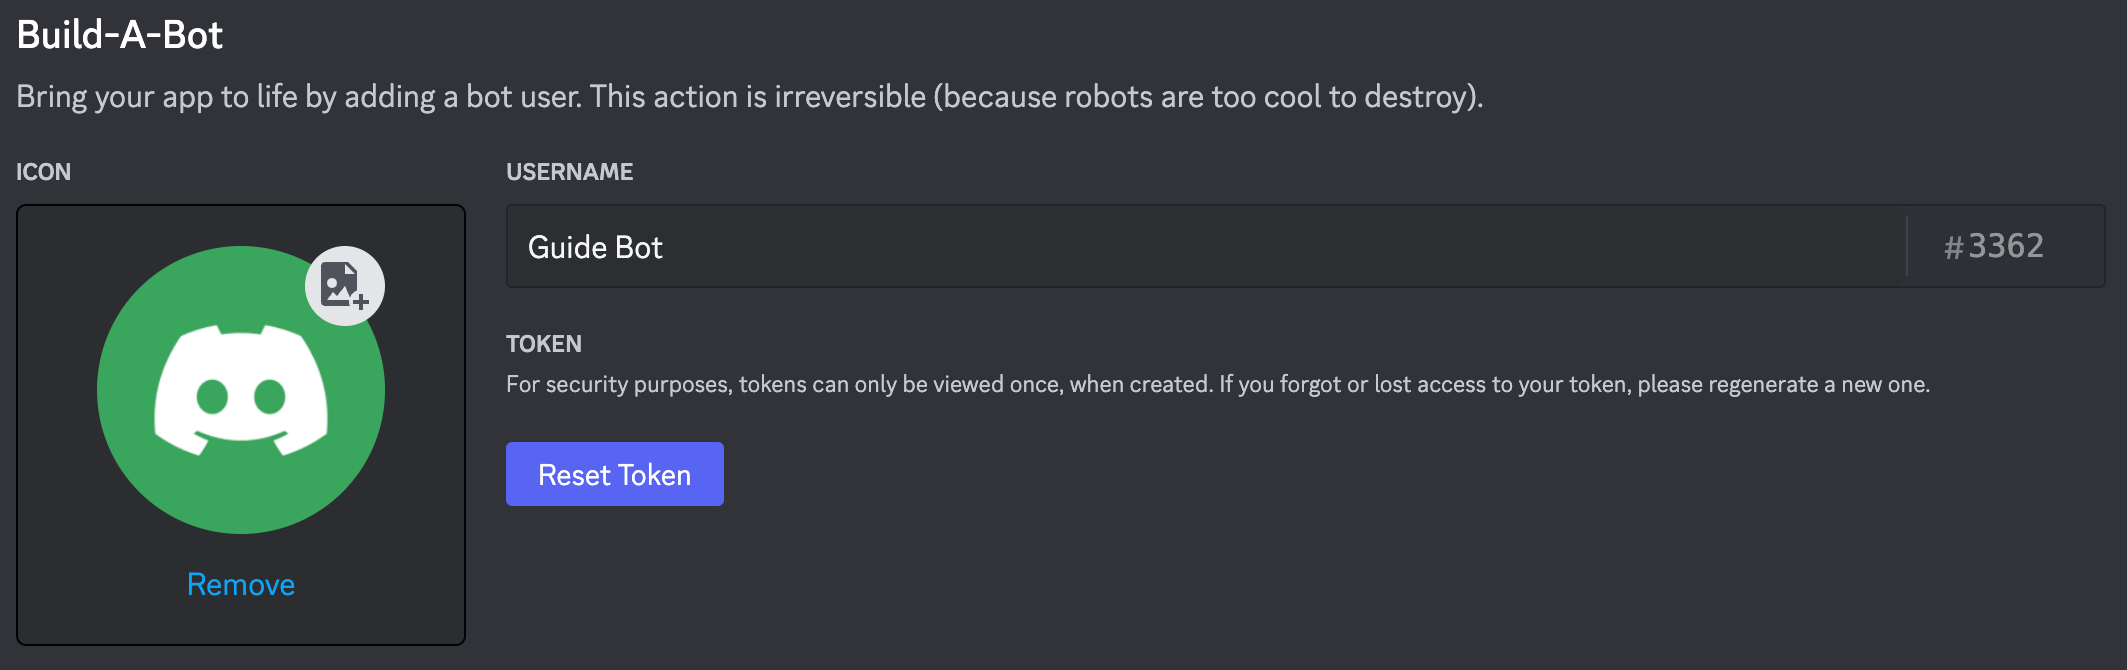 *Source: [discord.js guide — Application Setup](https://discordjs.guide/preparations/app-setup)*
Paste the token somewhere safe temporarily — you will enter it in Alter in a later step. If it leaks, use **Reset Token** in the portal and update Alter.
Never commit or share your bot token. Anyone with the token can control your bot.
## ステップ 4 — ボットをサーバーに招待する
Alter はアプリ内に招待リンクを構築しません。 Developer Portal で 1 つを生成します。
In your application sidebar, go to **OAuth2** → **URL Generator**.
Under **Scopes**, check **bot**.
*Source: [discord.js guide — Application Setup](https://discordjs.guide/preparations/app-setup)*
Paste the token somewhere safe temporarily — you will enter it in Alter in a later step. If it leaks, use **Reset Token** in the portal and update Alter.
Never commit or share your bot token. Anyone with the token can control your bot.
## ステップ 4 — ボットをサーバーに招待する
Alter はアプリ内に招待リンクを構築しません。 Developer Portal で 1 つを生成します。
In your application sidebar, go to **OAuth2** → **URL Generator**.
Under **Scopes**, check **bot**.
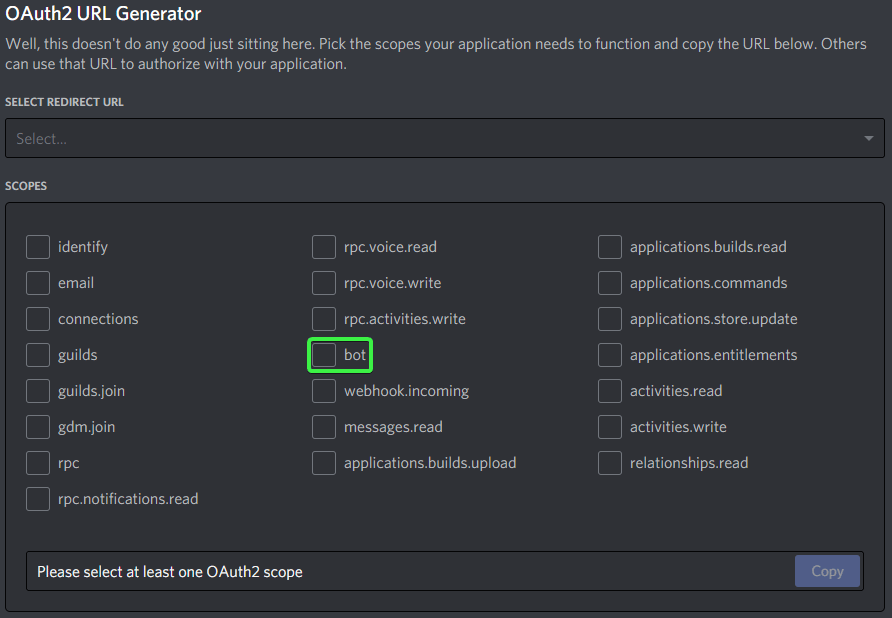 *Source: [Stack Overflow — permanent OAuth invite for a Discord bot](https://stackoverflow.com/questions/68218211/how-do-you-create-a-permanent-oauth-invite-for-your-discord-bot)*
Under **Bot Permissions**, enable:
* **View Channels**
* **Send Messages**
* **Read Message History**
* **Attach Files**
* **Create Public Threads** and **Send Messages in Threads** (optional — only needed if you enable **サーバーでの議論をスレッドで開始** in Alter)
These let Alter read your messages, reply, send file outputs from tool runs, and optionally create discussion threads in server channels.
*Source: [Stack Overflow — permanent OAuth invite for a Discord bot](https://stackoverflow.com/questions/68218211/how-do-you-create-a-permanent-oauth-invite-for-your-discord-bot)*
Under **Bot Permissions**, enable:
* **View Channels**
* **Send Messages**
* **Read Message History**
* **Attach Files**
* **Create Public Threads** and **Send Messages in Threads** (optional — only needed if you enable **サーバーでの議論をスレッドで開始** in Alter)
These let Alter read your messages, reply, send file outputs from tool runs, and optionally create discussion threads in server channels.
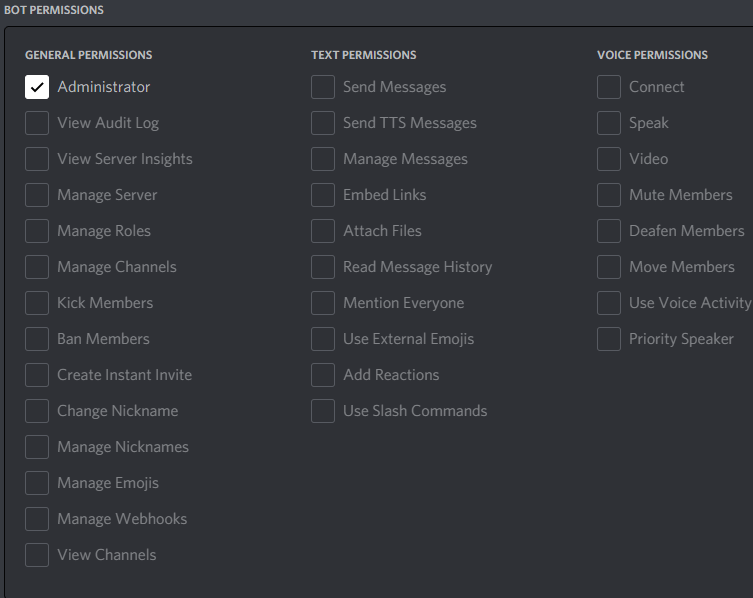 *Source: [Stack Overflow — permanent OAuth invite for a Discord bot](https://stackoverflow.com/questions/68218211/how-do-you-create-a-permanent-oauth-invite-for-your-discord-bot). Select the permissions listed above — not Administrator.*
Copy the URL at the bottom, open it in your browser, choose your server, and authorize the bot.
Discord documents this flow in [Adding bots to servers](https://discord.com/developers/docs/topics/oauth2#bot-authorization-flow).
*Source: [Stack Overflow — permanent OAuth invite for a Discord bot](https://stackoverflow.com/questions/68218211/how-do-you-create-a-permanent-oauth-invite-for-your-discord-bot). Select the permissions listed above — not Administrator.*
Copy the URL at the bottom, open it in your browser, choose your server, and authorize the bot.
Discord documents this flow in [Adding bots to servers](https://discord.com/developers/docs/topics/oauth2#bot-authorization-flow).
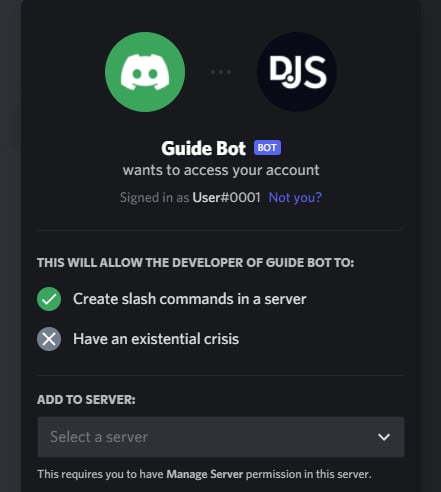 *Source: [discord.js guide — Adding Your App](https://discordjs.guide/preparations/adding-your-app)*
You need **Manage Server** (or equivalent) on the target Discord server to complete the invite.
## ステップ 5 — オプション: サーバー ID とユーザー ID をコピーします
Alter と通信できるサーバーまたはユーザーを制限したい場合は、これらを使用します。
In the Discord client: **User Settings → Advanced → Developer Mode** → on.
See [Discord's ID documentation](https://support.discord.com/hc/en-us/articles/206346498-Where-can-I-find-my-User-Server-Message-ID).
Right-click your server icon → **Copy Server ID**. Paste this into Alter's **サーバー ID(任意)** field to ignore messages from other servers.
Right-click a user → **Copy User ID**. Use comma-separated IDs in **許可された Discord ユーザー ID** to allow only those people.
ボットにメッセージを送信できる人を許可するには、**Server ID** と **許可された Discord ユーザー ID** を空のままにしておきます (Discord チャネルの権限に従う)。
## Alter で接続
**設定** (⌘,) → **Integrations** → **Gateways** を開きます。他の開き方は [Gateways 概要](/apps-tools/gateways#open-gateways-settings) を参照してください。
**Gateway を追加** → **Discord** をクリックします。Alter がリストに新しい Gateway エントリを作成します。
| フィールド | 入力内容 |
| ------------------------- | -------------------------------------------------------------------------------------------- |
| **名前** | 識別しやすいラベル(例:`Discord — 仕事用サーバー`)。 |
| **Bot トークン** | **ステップ 3** のトークン。先頭の `Bot ` プレフィックスの有無どちらも Alter は受け付けます。 |
| **サーバー ID(任意)** | **ステップ 5** の guild ID、または bot が参加している任意のサーバー向けに空のまま。設定すると Alter はそのサーバー専用に slash コマンドを登録します。 |
| **準備完了メッセージチャンネル ID(任意)** | 接続成功後に Alter が「Hey, I'm up and running.»を投稿するチャンネル ID。 |
| **許可された Discord ユーザー ID** | カンマ区切りのユーザー ID、または空でオープンアクセス。`*` で全員を明示的に許可。 |
| **サーバーでメンションを必須にする** | オンの場合、サーバーチャンネルでは `@mention` 時のみ応答します。DM は変わりません。 |
Connection セクション下部の **Discord Gateway セットアップガイド** リンクで、このページをブラウザで開けます。
**Ask Anything** がデフォルトで、Discord ですぐ使えます。カスタム Action には **Action Editor → Gateways** で **可用性** を **Discord** または **すべて** に設定します。
**動作** では、新しい Discord Gateway では **サーバーでの議論をスレッドで開始** が**デフォルトでオン** — 各新しいサーバートップレベルメッセージに専用 Discord スレッドと Alter チャットが付きます。既存スレッド内のメッセージはそのチャットを継続します。DM は変わりません。メインチャンネルで返信したい場合はオフにしてください。オンのまま使う場合は、ボット招待時(**ステップ 4**)に **Create Public Threads** と **Send Messages in Threads** を付与してください。
**有効** をオンにし、**保存して再起動** をクリックします。**接続済み bot …** や **@… として接続済み** などのステータスを待ちます。
接続に失敗する場合は [Gateways トラブルシューティング](/apps-tools/gateways#troubleshooting) を参照してください。
## ボットをテスト
Gateways は Alter が Mac 上で開いている間のみ動作します。
DM またはサーバーチャンネルで `/help` を送信(または Discord の `/help` slash コマンドを使用)。bot がコマンドを一覧表示し、**New chat**、**Choose action**、**Past chats** ボタンを表示するはずです。
通常メッセージを送信(**サーバーでメンションを必須にする** がオンのサーバーでは bot を `@mention`)。Alter は 👀 で反応し、**Thinking…** を表示してから回答をストリームし、完了時に ✅ または ❌ で反応します。
`/new` で **デフォルト Action** の新しい会話を開始、または `/new ask-anything` で特定の Action ID を指定。
Discord **ボイスメッセージ** を送るか、音声ファイルを添付します。Alter は選択した音声プロセッサ(**設定 → Voice**)で文字起こしし、テキストをアクティブ Action に送ります。
## 関連ページ
* [Gateways overview](/apps-tools/gateways)
* [Set up a Telegram gateway](/apps-tools/gateways-telegram)
* [Alter Actions — Gateway 可用性](/workflows/alter-actions#gateways)
* [Alter Settings](/how-to/settings-guide)
*Source: [discord.js guide — Adding Your App](https://discordjs.guide/preparations/adding-your-app)*
You need **Manage Server** (or equivalent) on the target Discord server to complete the invite.
## ステップ 5 — オプション: サーバー ID とユーザー ID をコピーします
Alter と通信できるサーバーまたはユーザーを制限したい場合は、これらを使用します。
In the Discord client: **User Settings → Advanced → Developer Mode** → on.
See [Discord's ID documentation](https://support.discord.com/hc/en-us/articles/206346498-Where-can-I-find-my-User-Server-Message-ID).
Right-click your server icon → **Copy Server ID**. Paste this into Alter's **サーバー ID(任意)** field to ignore messages from other servers.
Right-click a user → **Copy User ID**. Use comma-separated IDs in **許可された Discord ユーザー ID** to allow only those people.
ボットにメッセージを送信できる人を許可するには、**Server ID** と **許可された Discord ユーザー ID** を空のままにしておきます (Discord チャネルの権限に従う)。
## Alter で接続
**設定** (⌘,) → **Integrations** → **Gateways** を開きます。他の開き方は [Gateways 概要](/apps-tools/gateways#open-gateways-settings) を参照してください。
**Gateway を追加** → **Discord** をクリックします。Alter がリストに新しい Gateway エントリを作成します。
| フィールド | 入力内容 |
| ------------------------- | -------------------------------------------------------------------------------------------- |
| **名前** | 識別しやすいラベル(例:`Discord — 仕事用サーバー`)。 |
| **Bot トークン** | **ステップ 3** のトークン。先頭の `Bot ` プレフィックスの有無どちらも Alter は受け付けます。 |
| **サーバー ID(任意)** | **ステップ 5** の guild ID、または bot が参加している任意のサーバー向けに空のまま。設定すると Alter はそのサーバー専用に slash コマンドを登録します。 |
| **準備完了メッセージチャンネル ID(任意)** | 接続成功後に Alter が「Hey, I'm up and running.»を投稿するチャンネル ID。 |
| **許可された Discord ユーザー ID** | カンマ区切りのユーザー ID、または空でオープンアクセス。`*` で全員を明示的に許可。 |
| **サーバーでメンションを必須にする** | オンの場合、サーバーチャンネルでは `@mention` 時のみ応答します。DM は変わりません。 |
Connection セクション下部の **Discord Gateway セットアップガイド** リンクで、このページをブラウザで開けます。
**Ask Anything** がデフォルトで、Discord ですぐ使えます。カスタム Action には **Action Editor → Gateways** で **可用性** を **Discord** または **すべて** に設定します。
**動作** では、新しい Discord Gateway では **サーバーでの議論をスレッドで開始** が**デフォルトでオン** — 各新しいサーバートップレベルメッセージに専用 Discord スレッドと Alter チャットが付きます。既存スレッド内のメッセージはそのチャットを継続します。DM は変わりません。メインチャンネルで返信したい場合はオフにしてください。オンのまま使う場合は、ボット招待時(**ステップ 4**)に **Create Public Threads** と **Send Messages in Threads** を付与してください。
**有効** をオンにし、**保存して再起動** をクリックします。**接続済み bot …** や **@… として接続済み** などのステータスを待ちます。
接続に失敗する場合は [Gateways トラブルシューティング](/apps-tools/gateways#troubleshooting) を参照してください。
## ボットをテスト
Gateways は Alter が Mac 上で開いている間のみ動作します。
DM またはサーバーチャンネルで `/help` を送信(または Discord の `/help` slash コマンドを使用)。bot がコマンドを一覧表示し、**New chat**、**Choose action**、**Past chats** ボタンを表示するはずです。
通常メッセージを送信(**サーバーでメンションを必須にする** がオンのサーバーでは bot を `@mention`)。Alter は 👀 で反応し、**Thinking…** を表示してから回答をストリームし、完了時に ✅ または ❌ で反応します。
`/new` で **デフォルト Action** の新しい会話を開始、または `/new ask-anything` で特定の Action ID を指定。
Discord **ボイスメッセージ** を送るか、音声ファイルを添付します。Alter は選択した音声プロセッサ(**設定 → Voice**)で文字起こしし、テキストをアクティブ Action に送ります。
## 関連ページ
* [Gateways overview](/apps-tools/gateways)
* [Set up a Telegram gateway](/apps-tools/gateways-telegram)
* [Alter Actions — Gateway 可用性](/workflows/alter-actions#gateways)
* [Alter Settings](/how-to/settings-guide)