> ## Documentation Index
> Fetch the complete documentation index at: https://docs.alterhq.com/llms.txt
> Use this file to discover all available pages before exploring further.
# Configurer un Telegram gateway
> Créez un bot Telegram avec BotFather et connectez-le aux Gateways Alter
Utilisez ce guide pour créer un bot Telegram via **BotFather**, copiez son jeton et connectez-le sous **Préférences → Intégrations → Gateways**.
Alter se connecte à Telegram avec un **bot token** de [@BotFather](https://t.me/BotFather). Alter utilise le long polling sur votre Mac — vous n'avez pas à configurer de webhooks ni d'URL publique.
## Avant de commencer
* Un compte Telegram.
* **Alter** installé et exécuté sur votre Mac.
* L'application Telegram ou [Telegram Web](https://web.telegram.org/).
Références officielles :
* [@BotFather](https://t.me/BotFather) sur Telegram
* [Telegram Bots — Features and BotFather](https://core.telegram.org/bots/features#botfather)
* [Telegram Bot API tutorial](https://core.telegram.org/bots/tutorial)
* [Bot FAQ — groups and privacy](https://core.telegram.org/bots/faq#what-messages-will-my-bot-get)
## Étape 1 — Créez un bot avec BotFather
Dans Telegram, ouvrez [@BotFather](https://t.me/BotFather) et appuyez sur **Start** (ou envoyez `/start`).
 *Source: [kitob-bot README](https://github.com/ytsshinobi/kitob-bot)*
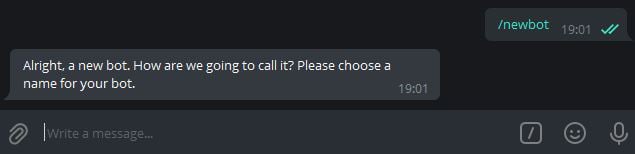
Envoyez `/newbot`. BotFather demande un **nom d'affichage** (visible dans les contacts) et un **nom d'utilisateur** (doit se terminer par `bot`, par exemple `MyAlterHelperBot`).
*Source: [kitob-bot README](https://github.com/ytsshinobi/kitob-bot)*
Envoyez `/newbot`. BotFather demande un **nom d'affichage** (visible dans les contacts) et un **nom d'utilisateur** (doit se terminer par `bot`, par exemple `MyAlterHelperBot`).
 *Source: [kitob-bot README](https://github.com/ytsshinobi/kitob-bot)*
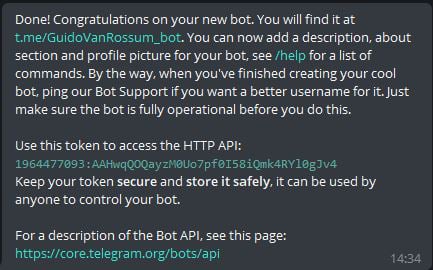
Une fois la création réussie, BotFather envoie un message contenant votre **token** (format du type `123456789:ABCdefGHIjklMNOpqrsTUVwxyz`). Copiez la chaîne complète.
Telegram documente ce flux dans le [tutoriel Bot — Obtain your bot token](https://core.telegram.org/bots/tutorial#obtain-your-bot-token).
*Source: [kitob-bot README](https://github.com/ytsshinobi/kitob-bot)*
Une fois la création réussie, BotFather envoie un message contenant votre **token** (format du type `123456789:ABCdefGHIjklMNOpqrsTUVwxyz`). Copiez la chaîne complète.
Telegram documente ce flux dans le [tutoriel Bot — Obtain your bot token](https://core.telegram.org/bots/tutorial#obtain-your-bot-token).
 *Source: [kitob-bot README](https://github.com/ytsshinobi/kitob-bot). The token shown is from a public tutorial repo — treat your own token like a password.*
Treat the token like a password. If it is exposed, open BotFather and send `/revoke` for that bot, then paste the new token into Alter.
### Paramètres BotFather facultatifs
| Commande | Quand l'utiliser |
| ----------------- | --------------------------------------------------- |
| `/setdescription` | Short description users see before starting the bot |
| `/setabouttext` | About text on the bot profile |
| `/setuserpic` | Bot avatar |
| `/token` | Retrieve the token again for an existing bot |
## Étape 2 — Démarrez une discussion avec votre bot
Tap the link BotFather provides (for example `t.me/YourBotName`) or search for your bot's username in Telegram. The success message in **Step 1** includes this link.
Send `/start` so Telegram opens a conversation. You need an active chat before testing Alter.
## Étape 3 — Facultatif : utilisez le bot en groupe
Alter peut recevoir des messages de discussions de groupe ainsi que de discussions privées.
In your group, add the bot as a member (you may need admin permission to add bots).
By default, Telegram bots in groups may only see commands and @mentions. For broader group access, open [@BotFather](https://t.me/BotFather) → `/mybots` → your bot → **Bot Settings** → **Group Privacy** → **Turn off**.
See [Bot FAQ — privacy mode](https://core.telegram.org/bots/faq#what-messages-will-my-bot-get).
If the bot should only respond to certain people or groups, see [Secure access — allowlists and IDs](#secure-access--allowlists-and-ids) below and fill in **ID utilisateur ou chat Telegram autorisés** when you connect Alter.
## Accès sécurisé – listes autorisées et identifiants
Limitez qui peut utiliser votre passerelle Telegram avec **ID utilisateur ou chat Telegram autorisés** dans **Préférences → Intégrations → Gateways**. Alter vérifie chaque message entrant et chaque pression sur un bouton en ligne par rapport à cette liste avant d'exécuter une action.
Alter matches **user IDs**, **chat IDs**, and `@usernames` (case-insensitive). Leave the field **empty** to allow anyone who can message the bot. Enter `*` to allow everyone explicitly. Messages from users or chats not on the list are **silently ignored** — Alter does not reply with an error.
### ID utilisateur vs ID de chat
Telegram utilise des identifiants numériques pour les personnes et les conversations :
| ID type | Typical format | When to use in Alter |
| ----------- | -------------------------------------------------------------------------------------------------- | ------------------------------------------------- |
| **User ID** | Positive number (for example `123456789`) | Allow a specific person in DMs or in a group |
| **Chat ID** | Positive for private chats; **negative** for groups and supergroups (for example `-1001234567890`) | Allow an entire group, or a specific private chat |
Dans un **private chat** avec votre bot, l'ID de chat est généralement le même que votre ID utilisateur. Dans un **group**, ajoutez l'ID de discussion du groupe si vous souhaitez que tous les membres de ce groupe soient autorisés (sous réserve des paramètres [Group Privacy](#step-3--optional-use-the-bot-in-a-group)).
Alter accepte également les valeurs `@username` (par exemple `@sam`) si la personne a un nom d'utilisateur public.
### Comment trouver votre identifiant Telegram
In Telegram, open [@userinfobot](https://t.me/userinfobot) or [@getidsbot](https://t.me/getidsbot) and tap **Start**. The bot replies with your numeric **Id** — that is your **user ID**.
Copy the number (digits only, no `@`) into **ID utilisateur ou chat Telegram autorisés**.
To identify someone else, forward one of their messages to [@userinfobot](https://t.me/userinfobot) or [@getidsbot](https://t.me/getidsbot). The bot reports the sender's user ID.
Only forward messages in contexts where you are comfortable sharing metadata with a third-party bot. For sensitive groups, prefer the Bot API method below or add the whole group by chat ID instead.
### Comment trouver un identifiant de chat
Your user ID from **Step 1** above is usually enough — private chat IDs match the user's ID.
To confirm, message your bot, then call Telegram's [`getUpdates`](https://core.telegram.org/bots/api#getupdates) method with your bot token and look for `"chat": {"id": …}` and `"from": {"id": …}` in the JSON. See [Telegram Bot API — Chat](https://core.telegram.org/bots/api#chat) and [User](https://core.telegram.org/bots/api#user).
Add [@getidsbot](https://t.me/getidsbot) to the group temporarily (or use [@RawDataBot](https://t.me/RawDataBot)), send any message in the group, and copy the **Chat ID** from the bot's reply. Group IDs are negative numbers.
Remove the ID bot from the group when you are done if you do not need it there permanently.
With your bot token, open this URL in a browser (replace `TOKEN` with your token):
`https://api.telegram.org/botTOKEN/getUpdates`
Send a test message in the chat you want to identify, refresh the page, and read `message.chat.id` (chat ID) and `message.from.id` (sender user ID) from the latest entry.
Treat the URL like a password — anyone with it can control your bot. Close the tab when finished and never share the link.
Alter's `/status` command shows the default action and whether a conversation is selected — it does **not** print user or chat IDs. Use the methods above when building an allowlist.
### Configurez la liste blanche dans Alter
Gather comma-separated user IDs, chat IDs, and/or `@usernames` for everyone (or every group) that should be able to use the bot.
Open **Préférences → Intégrations → Gateways**, edit your Telegram gateway, and enter the values in **ID utilisateur ou chat Telegram autorisés** (for example `123456789, -1001234567890, @sam`).
Click **Enregistrer et redémarrer**. Message the bot from an allowed account or group — you should get a reply. Messages from IDs not on the list are ignored with no response.
### Bonnes pratiques de sécurité
* **Treat the bot token like a password.** Stockez-le uniquement dans Alter (Keychain). S'il fuit, révoquez-le dans [@BotFather](https://t.me/BotFather) avec `/revoke` et collez le nouveau jeton dans Alter.
* **Use an allowlist for personal bots.** Une liste blanche vide signifie que toute personne qui découvre votre bot peut lui envoyer un message pendant que Alter est en cours d'exécution.
* **Prefer numeric IDs over `@username`.** Les noms d'utilisateur peuvent changer ; les identifiants numériques sont stables.
* **Limit group exposure.** Activez [Group Privacy](#step-3--optional-use-the-bot-in-a-group) dans BotFather sauf si le bot doit lire tous les messages du groupe. Ajoutez uniquement des groupes de confiance et ajoutez l'ID de discussion de groupe à la liste verte si le bot fait partie de plusieurs groupes.
* **Be cautious with third-party ID bots.** Ils peuvent voir les messages transférés et les métadonnées du groupe. Supprimez-les des groupes sensibles lorsque vous n’en avez plus besoin.
## Connect in Alter
Ouvrez **Préférences** (⌘,) → **Intégrations** → **Gateways**.
Cliquez **Ajouter un Gateway** → **Telegram**.
| Champ | Quoi saisir |
| --------------------------------------------- | ------------------------------------------------------------------------------------------------------------------------------------------------------------------------------- |
| **Nom** | Un libellé reconnaissable (par exemple `Telegram — Personal`). |
| **Jeton du bot** | Le token de BotFather (**Étape 1**). |
| **ID utilisateur ou chat Telegram autorisés** | User IDs, chat IDs ou `@usernames` séparés par des virgules. Laissez vide pour autoriser quiconque peut écrire au bot. Utilisez `*` pour autoriser tout le monde explicitement. |
**Ask Anything** est la valeur par défaut et fonctionne sur Telegram immédiatement. Pour une action personnalisée, définissez **Disponibilité** sur **Telegram** ou **Tous** sous **Action Editor → Gateways**.
Activez **Activé**, puis cliquez **Enregistrer et redémarrer**. Attendez **Connecté en tant que @your\_bot\_username**.
Si la connexion échoue, voir [Dépannage Gateways](/apps-tools/gateways#troubleshooting).
## Tester le bot
Les Gateways ne fonctionnent que tant qu'Alter est ouvert sur votre Mac.
Dans votre chat Telegram avec le bot, envoyez `/help`. Le bot doit lister les commandes.
Envoyez un message normal. Alter doit afficher **Thinking…**, puis diffuser la réponse. En chat privé, Alter utilise l'aperçu brouillon natif de Telegram lorsque disponible ; sinon il modifie un message normal (les réponses riches peuvent atteindre environ 32 000 caractères).
Envoyez `/help` et utilisez les boutons **New chat**, **Choose action** ou **Past chats**. Pendant qu'Alter répond dans un groupe, appuyez sur **Stop** ou envoyez `/stop` pour annuler le tour en cours.
Envoyez une photo ou un document. Alter télécharge les pièces jointes prises en charge pour le tour et peut envoyer les fichiers de sortie des outils lorsque l'action en produit.
Envoyez un **voice message** ou un fichier audio. Alter le transcrit avec votre processeur vocal sélectionné (**Préférences → Voice**) et envoie le texte à l'action active. Les messages audio seuls fonctionnent comme tours de chat même sans texte saisi.
## Pages connexes
* [Vue d'ensemble Gateways](/apps-tools/gateways)
* [Configurer un Discord gateway](/apps-tools/gateways-discord)
* [Alter Actions — Disponibilité des Gateways](/workflows/alter-actions#gateways)
* [Alter Settings](/how-to/settings-guide)
*Source: [kitob-bot README](https://github.com/ytsshinobi/kitob-bot). The token shown is from a public tutorial repo — treat your own token like a password.*
Treat the token like a password. If it is exposed, open BotFather and send `/revoke` for that bot, then paste the new token into Alter.
### Paramètres BotFather facultatifs
| Commande | Quand l'utiliser |
| ----------------- | --------------------------------------------------- |
| `/setdescription` | Short description users see before starting the bot |
| `/setabouttext` | About text on the bot profile |
| `/setuserpic` | Bot avatar |
| `/token` | Retrieve the token again for an existing bot |
## Étape 2 — Démarrez une discussion avec votre bot
Tap the link BotFather provides (for example `t.me/YourBotName`) or search for your bot's username in Telegram. The success message in **Step 1** includes this link.
Send `/start` so Telegram opens a conversation. You need an active chat before testing Alter.
## Étape 3 — Facultatif : utilisez le bot en groupe
Alter peut recevoir des messages de discussions de groupe ainsi que de discussions privées.
In your group, add the bot as a member (you may need admin permission to add bots).
By default, Telegram bots in groups may only see commands and @mentions. For broader group access, open [@BotFather](https://t.me/BotFather) → `/mybots` → your bot → **Bot Settings** → **Group Privacy** → **Turn off**.
See [Bot FAQ — privacy mode](https://core.telegram.org/bots/faq#what-messages-will-my-bot-get).
If the bot should only respond to certain people or groups, see [Secure access — allowlists and IDs](#secure-access--allowlists-and-ids) below and fill in **ID utilisateur ou chat Telegram autorisés** when you connect Alter.
## Accès sécurisé – listes autorisées et identifiants
Limitez qui peut utiliser votre passerelle Telegram avec **ID utilisateur ou chat Telegram autorisés** dans **Préférences → Intégrations → Gateways**. Alter vérifie chaque message entrant et chaque pression sur un bouton en ligne par rapport à cette liste avant d'exécuter une action.
Alter matches **user IDs**, **chat IDs**, and `@usernames` (case-insensitive). Leave the field **empty** to allow anyone who can message the bot. Enter `*` to allow everyone explicitly. Messages from users or chats not on the list are **silently ignored** — Alter does not reply with an error.
### ID utilisateur vs ID de chat
Telegram utilise des identifiants numériques pour les personnes et les conversations :
| ID type | Typical format | When to use in Alter |
| ----------- | -------------------------------------------------------------------------------------------------- | ------------------------------------------------- |
| **User ID** | Positive number (for example `123456789`) | Allow a specific person in DMs or in a group |
| **Chat ID** | Positive for private chats; **negative** for groups and supergroups (for example `-1001234567890`) | Allow an entire group, or a specific private chat |
Dans un **private chat** avec votre bot, l'ID de chat est généralement le même que votre ID utilisateur. Dans un **group**, ajoutez l'ID de discussion du groupe si vous souhaitez que tous les membres de ce groupe soient autorisés (sous réserve des paramètres [Group Privacy](#step-3--optional-use-the-bot-in-a-group)).
Alter accepte également les valeurs `@username` (par exemple `@sam`) si la personne a un nom d'utilisateur public.
### Comment trouver votre identifiant Telegram
In Telegram, open [@userinfobot](https://t.me/userinfobot) or [@getidsbot](https://t.me/getidsbot) and tap **Start**. The bot replies with your numeric **Id** — that is your **user ID**.
Copy the number (digits only, no `@`) into **ID utilisateur ou chat Telegram autorisés**.
To identify someone else, forward one of their messages to [@userinfobot](https://t.me/userinfobot) or [@getidsbot](https://t.me/getidsbot). The bot reports the sender's user ID.
Only forward messages in contexts where you are comfortable sharing metadata with a third-party bot. For sensitive groups, prefer the Bot API method below or add the whole group by chat ID instead.
### Comment trouver un identifiant de chat
Your user ID from **Step 1** above is usually enough — private chat IDs match the user's ID.
To confirm, message your bot, then call Telegram's [`getUpdates`](https://core.telegram.org/bots/api#getupdates) method with your bot token and look for `"chat": {"id": …}` and `"from": {"id": …}` in the JSON. See [Telegram Bot API — Chat](https://core.telegram.org/bots/api#chat) and [User](https://core.telegram.org/bots/api#user).
Add [@getidsbot](https://t.me/getidsbot) to the group temporarily (or use [@RawDataBot](https://t.me/RawDataBot)), send any message in the group, and copy the **Chat ID** from the bot's reply. Group IDs are negative numbers.
Remove the ID bot from the group when you are done if you do not need it there permanently.
With your bot token, open this URL in a browser (replace `TOKEN` with your token):
`https://api.telegram.org/botTOKEN/getUpdates`
Send a test message in the chat you want to identify, refresh the page, and read `message.chat.id` (chat ID) and `message.from.id` (sender user ID) from the latest entry.
Treat the URL like a password — anyone with it can control your bot. Close the tab when finished and never share the link.
Alter's `/status` command shows the default action and whether a conversation is selected — it does **not** print user or chat IDs. Use the methods above when building an allowlist.
### Configurez la liste blanche dans Alter
Gather comma-separated user IDs, chat IDs, and/or `@usernames` for everyone (or every group) that should be able to use the bot.
Open **Préférences → Intégrations → Gateways**, edit your Telegram gateway, and enter the values in **ID utilisateur ou chat Telegram autorisés** (for example `123456789, -1001234567890, @sam`).
Click **Enregistrer et redémarrer**. Message the bot from an allowed account or group — you should get a reply. Messages from IDs not on the list are ignored with no response.
### Bonnes pratiques de sécurité
* **Treat the bot token like a password.** Stockez-le uniquement dans Alter (Keychain). S'il fuit, révoquez-le dans [@BotFather](https://t.me/BotFather) avec `/revoke` et collez le nouveau jeton dans Alter.
* **Use an allowlist for personal bots.** Une liste blanche vide signifie que toute personne qui découvre votre bot peut lui envoyer un message pendant que Alter est en cours d'exécution.
* **Prefer numeric IDs over `@username`.** Les noms d'utilisateur peuvent changer ; les identifiants numériques sont stables.
* **Limit group exposure.** Activez [Group Privacy](#step-3--optional-use-the-bot-in-a-group) dans BotFather sauf si le bot doit lire tous les messages du groupe. Ajoutez uniquement des groupes de confiance et ajoutez l'ID de discussion de groupe à la liste verte si le bot fait partie de plusieurs groupes.
* **Be cautious with third-party ID bots.** Ils peuvent voir les messages transférés et les métadonnées du groupe. Supprimez-les des groupes sensibles lorsque vous n’en avez plus besoin.
## Connect in Alter
Ouvrez **Préférences** (⌘,) → **Intégrations** → **Gateways**.
Cliquez **Ajouter un Gateway** → **Telegram**.
| Champ | Quoi saisir |
| --------------------------------------------- | ------------------------------------------------------------------------------------------------------------------------------------------------------------------------------- |
| **Nom** | Un libellé reconnaissable (par exemple `Telegram — Personal`). |
| **Jeton du bot** | Le token de BotFather (**Étape 1**). |
| **ID utilisateur ou chat Telegram autorisés** | User IDs, chat IDs ou `@usernames` séparés par des virgules. Laissez vide pour autoriser quiconque peut écrire au bot. Utilisez `*` pour autoriser tout le monde explicitement. |
**Ask Anything** est la valeur par défaut et fonctionne sur Telegram immédiatement. Pour une action personnalisée, définissez **Disponibilité** sur **Telegram** ou **Tous** sous **Action Editor → Gateways**.
Activez **Activé**, puis cliquez **Enregistrer et redémarrer**. Attendez **Connecté en tant que @your\_bot\_username**.
Si la connexion échoue, voir [Dépannage Gateways](/apps-tools/gateways#troubleshooting).
## Tester le bot
Les Gateways ne fonctionnent que tant qu'Alter est ouvert sur votre Mac.
Dans votre chat Telegram avec le bot, envoyez `/help`. Le bot doit lister les commandes.
Envoyez un message normal. Alter doit afficher **Thinking…**, puis diffuser la réponse. En chat privé, Alter utilise l'aperçu brouillon natif de Telegram lorsque disponible ; sinon il modifie un message normal (les réponses riches peuvent atteindre environ 32 000 caractères).
Envoyez `/help` et utilisez les boutons **New chat**, **Choose action** ou **Past chats**. Pendant qu'Alter répond dans un groupe, appuyez sur **Stop** ou envoyez `/stop` pour annuler le tour en cours.
Envoyez une photo ou un document. Alter télécharge les pièces jointes prises en charge pour le tour et peut envoyer les fichiers de sortie des outils lorsque l'action en produit.
Envoyez un **voice message** ou un fichier audio. Alter le transcrit avec votre processeur vocal sélectionné (**Préférences → Voice**) et envoie le texte à l'action active. Les messages audio seuls fonctionnent comme tours de chat même sans texte saisi.
## Pages connexes
* [Vue d'ensemble Gateways](/apps-tools/gateways)
* [Configurer un Discord gateway](/apps-tools/gateways-discord)
* [Alter Actions — Disponibilité des Gateways](/workflows/alter-actions#gateways)
* [Alter Settings](/how-to/settings-guide)