> ## Documentation Index
> Fetch the complete documentation index at: https://docs.alterhq.com/llms.txt
> Use this file to discover all available pages before exploring further.
# Telegram gateway einrichten
> Erstellen Sie einen Telegram-Bot mit BotFather und verbinden Sie ihn mit Alter Gateways
Verwenden Sie diese Anleitung, um einen Telegram-Bot über **BotFather** zu erstellen, seinen Token zu kopieren und ihn unter **Einstellungen → Integrationen → Gateways** zu verbinden.
Alter connects to Telegram with a **bot token** from [@BotFather](https://t.me/BotFather). Alter uses long polling on your Mac — you do not configure webhooks or a public URL.
## Bevor Sie beginnen
* Ein Telegram-Konto.
* **Alter** ist auf Ihrem Mac installiert und läuft.
* Die Telegram-App oder [Telegram Web](https://web.telegram.org/).
Offizielle Referenzen:
* [@BotFather](https://t.me/BotFather) auf Telegram
* [Telegram Bots — Features and BotFather](https://core.telegram.org/bots/features#botfather)
* [Telegram Bot API tutorial](https://core.telegram.org/bots/tutorial)
* [Bot FAQ — groups and privacy](https://core.telegram.org/bots/faq#what-messages-will-my-bot-get)
## Schritt 1 – Erstellen Sie einen Bot mit BotFather
In Telegram, open [@BotFather](https://t.me/BotFather) and tap **Start** (or send `/start`).
 *Source: [kitob-bot README](https://github.com/ytsshinobi/kitob-bot)*
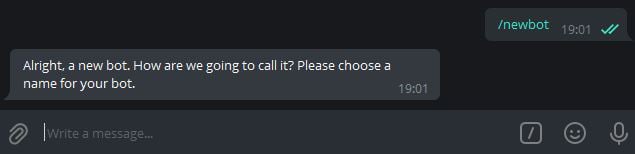
Send `/newbot`. BotFather asks for a **display name** (shown in contacts) and a **username** (must end in `bot`, for example `MyAlterHelperBot`).
*Source: [kitob-bot README](https://github.com/ytsshinobi/kitob-bot)*
Send `/newbot`. BotFather asks for a **display name** (shown in contacts) and a **username** (must end in `bot`, for example `MyAlterHelperBot`).
 *Source: [kitob-bot README](https://github.com/ytsshinobi/kitob-bot)*
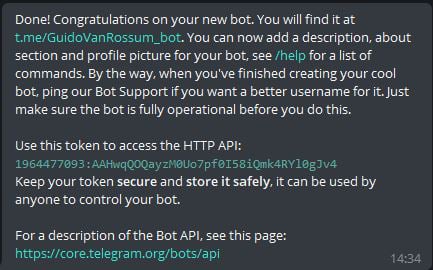
When creation succeeds, BotFather sends a message containing your **token** (format like `123456789:ABCdefGHIjklMNOpqrsTUVwxyz`). Copy the full string.
Telegram documents this flow in the [Bot tutorial — Obtain your bot token](https://core.telegram.org/bots/tutorial#obtain-your-bot-token).
*Source: [kitob-bot README](https://github.com/ytsshinobi/kitob-bot)*
When creation succeeds, BotFather sends a message containing your **token** (format like `123456789:ABCdefGHIjklMNOpqrsTUVwxyz`). Copy the full string.
Telegram documents this flow in the [Bot tutorial — Obtain your bot token](https://core.telegram.org/bots/tutorial#obtain-your-bot-token).
 *Source: [kitob-bot README](https://github.com/ytsshinobi/kitob-bot). The token shown is from a public tutorial repo — treat your own token like a password.*
Treat the token like a password. If it is exposed, open BotFather and send `/revoke` for that bot, then paste the new token into Alter.
### Optionale BotFather-Einstellungen
| Command | When to use |
| ----------------- | --------------------------------------------------- |
| `/setdescription` | Short description users see before starting the bot |
| `/setabouttext` | About text on the bot profile |
| `/setuserpic` | Bot avatar |
| `/token` | Retrieve the token again for an existing bot |
## Schritt 2 – Starten Sie einen Chat mit Ihrem Bot
Tap the link BotFather provides (for example `t.me/YourBotName`) or search for your bot's username in Telegram. The success message in **Step 1** includes this link.
Send `/start` so Telegram opens a conversation. You need an active chat before testing Alter.
## Schritt 3 – Optional: Verwenden Sie den Bot in einer Gruppe
Alter kann sowohl Nachrichten aus Gruppenchats als auch aus privaten Chats empfangen.
In your group, add the bot as a member (you may need admin permission to add bots).
By default, Telegram bots in groups may only see commands and @mentions. For broader group access, open [@BotFather](https://t.me/BotFather) → `/mybots` → your bot → **Bot Settings** → **Group Privacy** → **Turn off**.
See [Bot FAQ — privacy mode](https://core.telegram.org/bots/faq#what-messages-will-my-bot-get).
If the bot should only respond to certain people or groups, see [Secure access — allowlists and IDs](#secure-access--allowlists-and-ids) below and fill in **Erlaubte Telegram-Benutzer- oder Chat-IDs** when you connect Alter.
## Sicherer Zugriff – Zulassungslisten und IDs
Beschränken Sie, wer Ihr Telegram-Gateway mit **Erlaubte Telegram-Benutzer- oder Chat-IDs** in **Einstellungen → Integrationen → Gateways** verwenden kann. Alter prüft jede eingehende Nachricht und jeden Inline-Schaltflächentipp anhand dieser Liste, bevor eine Aktion ausgeführt wird.
Alter matches **user IDs**, **chat IDs**, and `@usernames` (case-insensitive). Leave the field **empty** to allow anyone who can message the bot. Enter `*` to allow everyone explicitly. Messages from users or chats not on the list are **silently ignored** — Alter does not reply with an error.
### Benutzer-ID vs. Chat-ID
Telegram verwendet numerische IDs sowohl für Personen als auch für Konversationen:
| ID type | Typical format | When to use in Alter |
| ----------- | -------------------------------------------------------------------------------------------------- | ------------------------------------------------- |
| **User ID** | Positive number (for example `123456789`) | Allow a specific person in DMs or in a group |
| **Chat ID** | Positive for private chats; **negative** for groups and supergroups (for example `-1001234567890`) | Allow an entire group, or a specific private chat |
Bei einem **private chat** mit Ihrem Bot ist die Chat-ID normalerweise dieselbe wie Ihre Benutzer-ID. Fügen Sie in einem **group** die Chat-ID der Gruppe hinzu, wenn Sie möchten, dass jeder in dieser Gruppe zugelassen wird (vorbehaltlich der [Group Privacy](#step-3--optional-use-the-bot-in-a-group)-Einstellungen).
Alter akzeptiert auch `@username`-Werte (zum Beispiel `@sam`), wenn die Person einen öffentlichen Benutzernamen hat.
### So finden Sie Ihre Telegram-Benutzer-ID
In Telegram, open [@userinfobot](https://t.me/userinfobot) or [@getidsbot](https://t.me/getidsbot) and tap **Start**. The bot replies with your numeric **Id** — that is your **user ID**.
Copy the number (digits only, no `@`) into **Erlaubte Telegram-Benutzer- oder Chat-IDs**.
To identify someone else, forward one of their messages to [@userinfobot](https://t.me/userinfobot) or [@getidsbot](https://t.me/getidsbot). The bot reports the sender's user ID.
Only forward messages in contexts where you are comfortable sharing metadata with a third-party bot. For sensitive groups, prefer the Bot API method below or add the whole group by chat ID instead.
### So finden Sie eine Chat-ID
Your user ID from **Step 1** above is usually enough — private chat IDs match the user's ID.
To confirm, message your bot, then call Telegram's [`getUpdates`](https://core.telegram.org/bots/api#getupdates) method with your bot token and look for `"chat": {"id": …}` and `"from": {"id": …}` in the JSON. See [Telegram Bot API — Chat](https://core.telegram.org/bots/api#chat) and [User](https://core.telegram.org/bots/api#user).
Add [@getidsbot](https://t.me/getidsbot) to the group temporarily (or use [@RawDataBot](https://t.me/RawDataBot)), send any message in the group, and copy the **Chat ID** from the bot's reply. Group IDs are negative numbers.
Remove the ID bot from the group when you are done if you do not need it there permanently.
With your bot token, open this URL in a browser (replace `TOKEN` with your token):
`https://api.telegram.org/botTOKEN/getUpdates`
Send a test message in the chat you want to identify, refresh the page, and read `message.chat.id` (chat ID) and `message.from.id` (sender user ID) from the latest entry.
Treat the URL like a password — anyone with it can control your bot. Close the tab when finished and never share the link.
Alter's `/status` command shows the default action and whether a conversation is selected — it does **not** print user or chat IDs. Use the methods above when building an allowlist.
### Konfigurieren Sie die Zulassungsliste in Alter
Gather comma-separated user IDs, chat IDs, and/or `@usernames` for everyone (or every group) that should be able to use the bot.
Open **Einstellungen → Integrationen → Gateways**, edit your Telegram gateway, and enter the values in **Erlaubte Telegram-Benutzer- oder Chat-IDs** (for example `123456789, -1001234567890, @sam`).
Click **Speichern und neu starten**. Message the bot from an allowed account or group — you should get a reply. Messages from IDs not on the list are ignored with no response.
### Best Practices für die Sicherheit
* **Treat the bot token like a password.** Speichern Sie es nur in Alter (Keychain). Wenn es undicht ist, widerrufen Sie es in [@BotFather](https://t.me/BotFather) mit `/revoke` und fügen Sie den neuen Token in Alter ein.
* **Use an allowlist for personal bots.** Eine leere Zulassungsliste bedeutet, dass jeder, der Ihren Bot entdeckt, ihm eine Nachricht senden kann, während Alter ausgeführt wird.
* **Prefer numeric IDs over `@username`.** Benutzernamen können sich ändern; Numerische IDs sind stabil.
* **Limit group exposure.** Schalten Sie [Group Privacy](#step-3--optional-use-the-bot-in-a-group) in BotFather ein, es sei denn, der Bot muss alle Gruppennachrichten lesen. Fügen Sie nur vertrauenswürdige Gruppen hinzu und setzen Sie die Gruppenchat-ID auf die Zulassungsliste, wenn sich der Bot in mehreren Gruppen befindet.
* **Be cautious with third-party ID bots.** Sie können weitergeleitete Nachrichten und Gruppenmetadaten sehen. Entfernen Sie sie aus sensiblen Gruppen, wenn Sie sie nicht mehr benötigen.
## Verbinden Sie sich in Alter
Open **Einstellungen** (⌘,) → **Integrationen** → **Gateways**.
Click **Gateway hinzufügen** → **Telegram**.
| Field | What to enter |
| --------------------------------------------- | ----------------------------------------------------------------------------------------------------------------------------------------------- |
| **Name** | A label you will recognize (for example `Telegram — Personal`). |
| **Bot-Token** | The token from BotFather (**Step 1**). |
| **Erlaubte Telegram-Benutzer- oder Chat-IDs** | Comma-separated user IDs, chat IDs, or `@usernames`. Leave empty to allow anyone who can message the bot. Use `*` to allow everyone explicitly. |
**Ask Anything** ist die Voreinstellung und funktioniert sofort auf Telegram. Für eine benutzerdefinierte Action setzen Sie **Verfügbarkeit** auf **Telegram** oder **Alle** unter **Action Editor → Gateways**.
Turn **Aktiviert** on, then click **Speichern und neu starten**. Wait for **Verbunden als @your\_bot\_username**.
Wenn die Verbindung fehlschlägt, siehe [Gateways troubleshooting](/apps-tools/gateways#troubleshooting).
## Testen Sie den Bot
Gateways only work while Alter is open on your Mac.
In your Telegram chat with the bot, send `/help`. The bot should list commands.
Send a normal message. Alter should show **Thinking…**, then stream the reply. In private chats, Alter uses Telegram's native draft preview when available; otherwise it edits a regular message (rich replies can be up to about 32,000 characters).
Send `/help` and use the **New chat**, **Choose action**, or **Past chats** buttons. While Alter is responding in a group, tap **Stop** or send `/stop` to cancel the current turn.
Send a photo or document. Alter downloads supported attachments for the turn and can upload output files from tool runs when the action produces them.
Send a **voice message** or audio file. Alter transcribes it with your selected voice processor (**Einstellungen → Voice**) and sends the text to the active action. Audio-only messages work as chat turns even without typed text.
## Verwandte Seiten
* [Gateways overview](/apps-tools/gateways)
* [Set up a Discord gateway](/apps-tools/gateways-discord)
* [Alter Actions — Gateway-Verfügbarkeit](/workflows/alter-actions#gateways)
* [Alter Settings](/how-to/settings-guide)
*Source: [kitob-bot README](https://github.com/ytsshinobi/kitob-bot). The token shown is from a public tutorial repo — treat your own token like a password.*
Treat the token like a password. If it is exposed, open BotFather and send `/revoke` for that bot, then paste the new token into Alter.
### Optionale BotFather-Einstellungen
| Command | When to use |
| ----------------- | --------------------------------------------------- |
| `/setdescription` | Short description users see before starting the bot |
| `/setabouttext` | About text on the bot profile |
| `/setuserpic` | Bot avatar |
| `/token` | Retrieve the token again for an existing bot |
## Schritt 2 – Starten Sie einen Chat mit Ihrem Bot
Tap the link BotFather provides (for example `t.me/YourBotName`) or search for your bot's username in Telegram. The success message in **Step 1** includes this link.
Send `/start` so Telegram opens a conversation. You need an active chat before testing Alter.
## Schritt 3 – Optional: Verwenden Sie den Bot in einer Gruppe
Alter kann sowohl Nachrichten aus Gruppenchats als auch aus privaten Chats empfangen.
In your group, add the bot as a member (you may need admin permission to add bots).
By default, Telegram bots in groups may only see commands and @mentions. For broader group access, open [@BotFather](https://t.me/BotFather) → `/mybots` → your bot → **Bot Settings** → **Group Privacy** → **Turn off**.
See [Bot FAQ — privacy mode](https://core.telegram.org/bots/faq#what-messages-will-my-bot-get).
If the bot should only respond to certain people or groups, see [Secure access — allowlists and IDs](#secure-access--allowlists-and-ids) below and fill in **Erlaubte Telegram-Benutzer- oder Chat-IDs** when you connect Alter.
## Sicherer Zugriff – Zulassungslisten und IDs
Beschränken Sie, wer Ihr Telegram-Gateway mit **Erlaubte Telegram-Benutzer- oder Chat-IDs** in **Einstellungen → Integrationen → Gateways** verwenden kann. Alter prüft jede eingehende Nachricht und jeden Inline-Schaltflächentipp anhand dieser Liste, bevor eine Aktion ausgeführt wird.
Alter matches **user IDs**, **chat IDs**, and `@usernames` (case-insensitive). Leave the field **empty** to allow anyone who can message the bot. Enter `*` to allow everyone explicitly. Messages from users or chats not on the list are **silently ignored** — Alter does not reply with an error.
### Benutzer-ID vs. Chat-ID
Telegram verwendet numerische IDs sowohl für Personen als auch für Konversationen:
| ID type | Typical format | When to use in Alter |
| ----------- | -------------------------------------------------------------------------------------------------- | ------------------------------------------------- |
| **User ID** | Positive number (for example `123456789`) | Allow a specific person in DMs or in a group |
| **Chat ID** | Positive for private chats; **negative** for groups and supergroups (for example `-1001234567890`) | Allow an entire group, or a specific private chat |
Bei einem **private chat** mit Ihrem Bot ist die Chat-ID normalerweise dieselbe wie Ihre Benutzer-ID. Fügen Sie in einem **group** die Chat-ID der Gruppe hinzu, wenn Sie möchten, dass jeder in dieser Gruppe zugelassen wird (vorbehaltlich der [Group Privacy](#step-3--optional-use-the-bot-in-a-group)-Einstellungen).
Alter akzeptiert auch `@username`-Werte (zum Beispiel `@sam`), wenn die Person einen öffentlichen Benutzernamen hat.
### So finden Sie Ihre Telegram-Benutzer-ID
In Telegram, open [@userinfobot](https://t.me/userinfobot) or [@getidsbot](https://t.me/getidsbot) and tap **Start**. The bot replies with your numeric **Id** — that is your **user ID**.
Copy the number (digits only, no `@`) into **Erlaubte Telegram-Benutzer- oder Chat-IDs**.
To identify someone else, forward one of their messages to [@userinfobot](https://t.me/userinfobot) or [@getidsbot](https://t.me/getidsbot). The bot reports the sender's user ID.
Only forward messages in contexts where you are comfortable sharing metadata with a third-party bot. For sensitive groups, prefer the Bot API method below or add the whole group by chat ID instead.
### So finden Sie eine Chat-ID
Your user ID from **Step 1** above is usually enough — private chat IDs match the user's ID.
To confirm, message your bot, then call Telegram's [`getUpdates`](https://core.telegram.org/bots/api#getupdates) method with your bot token and look for `"chat": {"id": …}` and `"from": {"id": …}` in the JSON. See [Telegram Bot API — Chat](https://core.telegram.org/bots/api#chat) and [User](https://core.telegram.org/bots/api#user).
Add [@getidsbot](https://t.me/getidsbot) to the group temporarily (or use [@RawDataBot](https://t.me/RawDataBot)), send any message in the group, and copy the **Chat ID** from the bot's reply. Group IDs are negative numbers.
Remove the ID bot from the group when you are done if you do not need it there permanently.
With your bot token, open this URL in a browser (replace `TOKEN` with your token):
`https://api.telegram.org/botTOKEN/getUpdates`
Send a test message in the chat you want to identify, refresh the page, and read `message.chat.id` (chat ID) and `message.from.id` (sender user ID) from the latest entry.
Treat the URL like a password — anyone with it can control your bot. Close the tab when finished and never share the link.
Alter's `/status` command shows the default action and whether a conversation is selected — it does **not** print user or chat IDs. Use the methods above when building an allowlist.
### Konfigurieren Sie die Zulassungsliste in Alter
Gather comma-separated user IDs, chat IDs, and/or `@usernames` for everyone (or every group) that should be able to use the bot.
Open **Einstellungen → Integrationen → Gateways**, edit your Telegram gateway, and enter the values in **Erlaubte Telegram-Benutzer- oder Chat-IDs** (for example `123456789, -1001234567890, @sam`).
Click **Speichern und neu starten**. Message the bot from an allowed account or group — you should get a reply. Messages from IDs not on the list are ignored with no response.
### Best Practices für die Sicherheit
* **Treat the bot token like a password.** Speichern Sie es nur in Alter (Keychain). Wenn es undicht ist, widerrufen Sie es in [@BotFather](https://t.me/BotFather) mit `/revoke` und fügen Sie den neuen Token in Alter ein.
* **Use an allowlist for personal bots.** Eine leere Zulassungsliste bedeutet, dass jeder, der Ihren Bot entdeckt, ihm eine Nachricht senden kann, während Alter ausgeführt wird.
* **Prefer numeric IDs over `@username`.** Benutzernamen können sich ändern; Numerische IDs sind stabil.
* **Limit group exposure.** Schalten Sie [Group Privacy](#step-3--optional-use-the-bot-in-a-group) in BotFather ein, es sei denn, der Bot muss alle Gruppennachrichten lesen. Fügen Sie nur vertrauenswürdige Gruppen hinzu und setzen Sie die Gruppenchat-ID auf die Zulassungsliste, wenn sich der Bot in mehreren Gruppen befindet.
* **Be cautious with third-party ID bots.** Sie können weitergeleitete Nachrichten und Gruppenmetadaten sehen. Entfernen Sie sie aus sensiblen Gruppen, wenn Sie sie nicht mehr benötigen.
## Verbinden Sie sich in Alter
Open **Einstellungen** (⌘,) → **Integrationen** → **Gateways**.
Click **Gateway hinzufügen** → **Telegram**.
| Field | What to enter |
| --------------------------------------------- | ----------------------------------------------------------------------------------------------------------------------------------------------- |
| **Name** | A label you will recognize (for example `Telegram — Personal`). |
| **Bot-Token** | The token from BotFather (**Step 1**). |
| **Erlaubte Telegram-Benutzer- oder Chat-IDs** | Comma-separated user IDs, chat IDs, or `@usernames`. Leave empty to allow anyone who can message the bot. Use `*` to allow everyone explicitly. |
**Ask Anything** ist die Voreinstellung und funktioniert sofort auf Telegram. Für eine benutzerdefinierte Action setzen Sie **Verfügbarkeit** auf **Telegram** oder **Alle** unter **Action Editor → Gateways**.
Turn **Aktiviert** on, then click **Speichern und neu starten**. Wait for **Verbunden als @your\_bot\_username**.
Wenn die Verbindung fehlschlägt, siehe [Gateways troubleshooting](/apps-tools/gateways#troubleshooting).
## Testen Sie den Bot
Gateways only work while Alter is open on your Mac.
In your Telegram chat with the bot, send `/help`. The bot should list commands.
Send a normal message. Alter should show **Thinking…**, then stream the reply. In private chats, Alter uses Telegram's native draft preview when available; otherwise it edits a regular message (rich replies can be up to about 32,000 characters).
Send `/help` and use the **New chat**, **Choose action**, or **Past chats** buttons. While Alter is responding in a group, tap **Stop** or send `/stop` to cancel the current turn.
Send a photo or document. Alter downloads supported attachments for the turn and can upload output files from tool runs when the action produces them.
Send a **voice message** or audio file. Alter transcribes it with your selected voice processor (**Einstellungen → Voice**) and sends the text to the active action. Audio-only messages work as chat turns even without typed text.
## Verwandte Seiten
* [Gateways overview](/apps-tools/gateways)
* [Set up a Discord gateway](/apps-tools/gateways-discord)
* [Alter Actions — Gateway-Verfügbarkeit](/workflows/alter-actions#gateways)
* [Alter Settings](/how-to/settings-guide)