> ## Documentation Index
> Fetch the complete documentation index at: https://docs.alterhq.com/llms.txt
> Use this file to discover all available pages before exploring further.
# Set up a Discord gateway
> Create a Discord bot and connect it to Alter Gateways
Use this guide to create a Discord bot, grant the permissions Alter needs, and connect it under **Settings → Integrations → Gateways**.
Alter connects to Discord as a **bot** using a **bot token**. You create the bot in the [Discord Developer Portal](https://discord.com/developers/applications); Alter does not generate an invite URL for you — you add the bot to your server from the portal.
## Before you start
* A Discord account with permission to create applications (and to add bots to your target server).
* **Alter** installed and running on your Mac.
* A few minutes to copy tokens and IDs — treat bot tokens like passwords.
Official references:
* [Discord Developer Portal](https://discord.com/developers/applications)
* [Discord quick start — overview of apps](https://discord.com/developers/docs/quick-start/overview-of-apps)
## Step 1 — Create a Discord application
Go to [discord.com/developers/applications](https://discord.com/developers/applications) and sign in.
Click **New Application**, choose a name (for example `Alter`), and confirm.
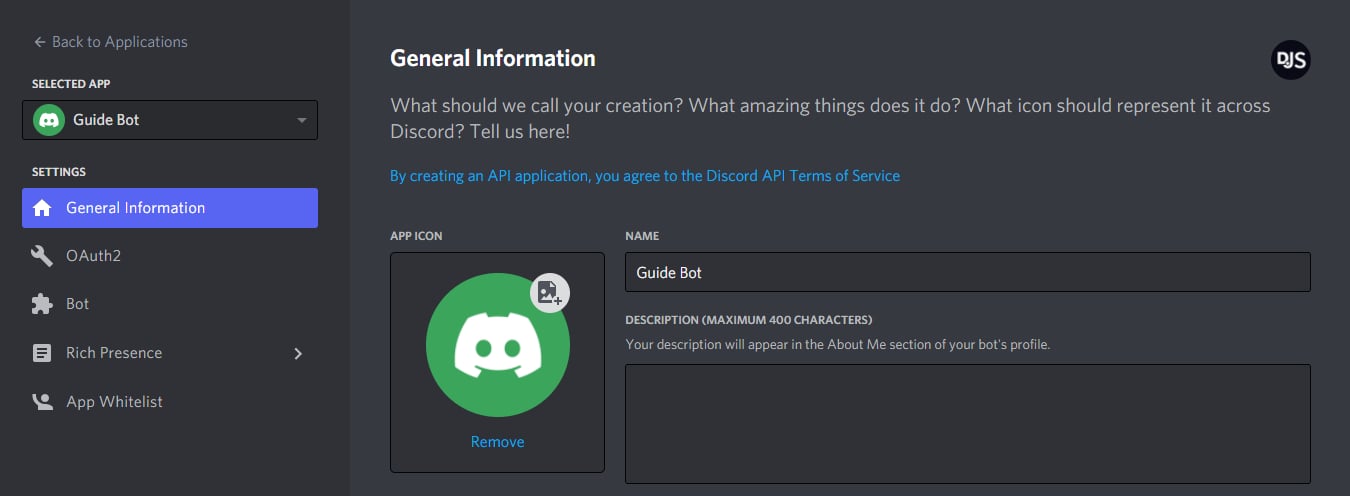 *Source: [discord.js guide — Application Setup](https://discordjs.guide/preparations/app-setup)*
In the left sidebar, select **Bot**, then click **Add Bot** (or **Reset Token** if you already created one).
*Source: [discord.js guide — Application Setup](https://discordjs.guide/preparations/app-setup)*
In the left sidebar, select **Bot**, then click **Add Bot** (or **Reset Token** if you already created one).
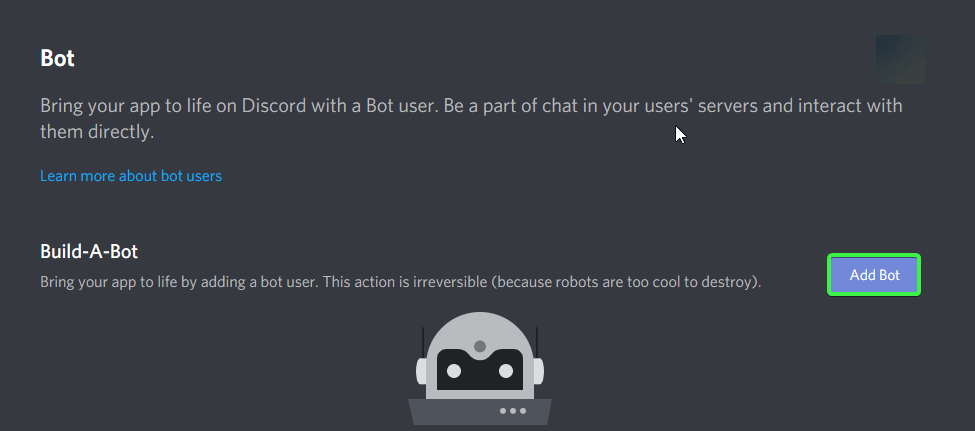 *Source: [Stack Overflow — permanent OAuth invite for a Discord bot](https://stackoverflow.com/questions/68218211/how-do-you-create-a-permanent-oauth-invite-for-your-discord-bot)*
## Step 2 — Enable Message Content Intent
Alter must read message text in servers and DMs. Discord requires you to turn this on explicitly in the Developer Portal.
In your application, go to **Bot**.
Under **Privileged Gateway Intents**, turn on **Message Content Intent**.
*Source: [Stack Overflow — permanent OAuth invite for a Discord bot](https://stackoverflow.com/questions/68218211/how-do-you-create-a-permanent-oauth-invite-for-your-discord-bot)*
## Step 2 — Enable Message Content Intent
Alter must read message text in servers and DMs. Discord requires you to turn this on explicitly in the Developer Portal.
In your application, go to **Bot**.
Under **Privileged Gateway Intents**, turn on **Message Content Intent**.
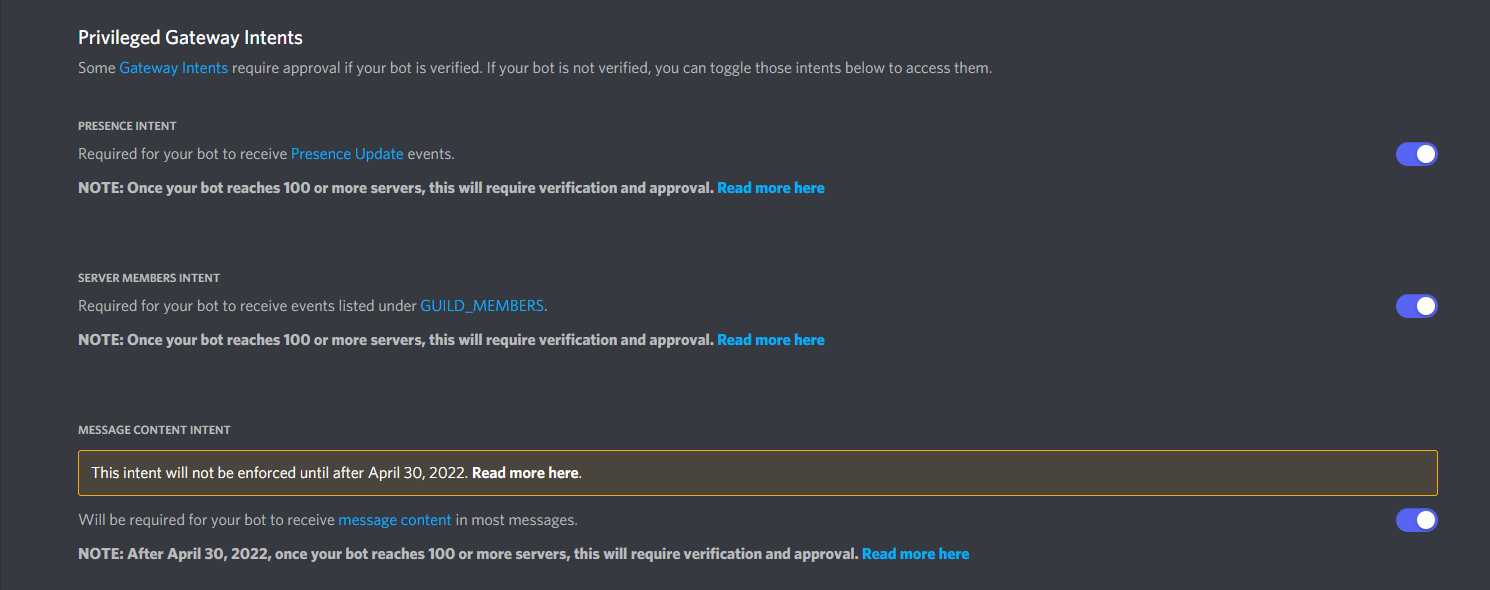 *Source: [PyCord docs — Gateway Intents](https://docs.pycord.dev/en/master/intents.html)*
Confirm any prompts. Without this intent, Alter cannot read messages and shows an error such as *Enable Message Content Intent for this bot*.
## Step 3 — Copy the bot token
On the **Bot** page, click **Reset Token** (first-time setup) or **Copy** under **Token**.
*Source: [PyCord docs — Gateway Intents](https://docs.pycord.dev/en/master/intents.html)*
Confirm any prompts. Without this intent, Alter cannot read messages and shows an error such as *Enable Message Content Intent for this bot*.
## Step 3 — Copy the bot token
On the **Bot** page, click **Reset Token** (first-time setup) or **Copy** under **Token**.
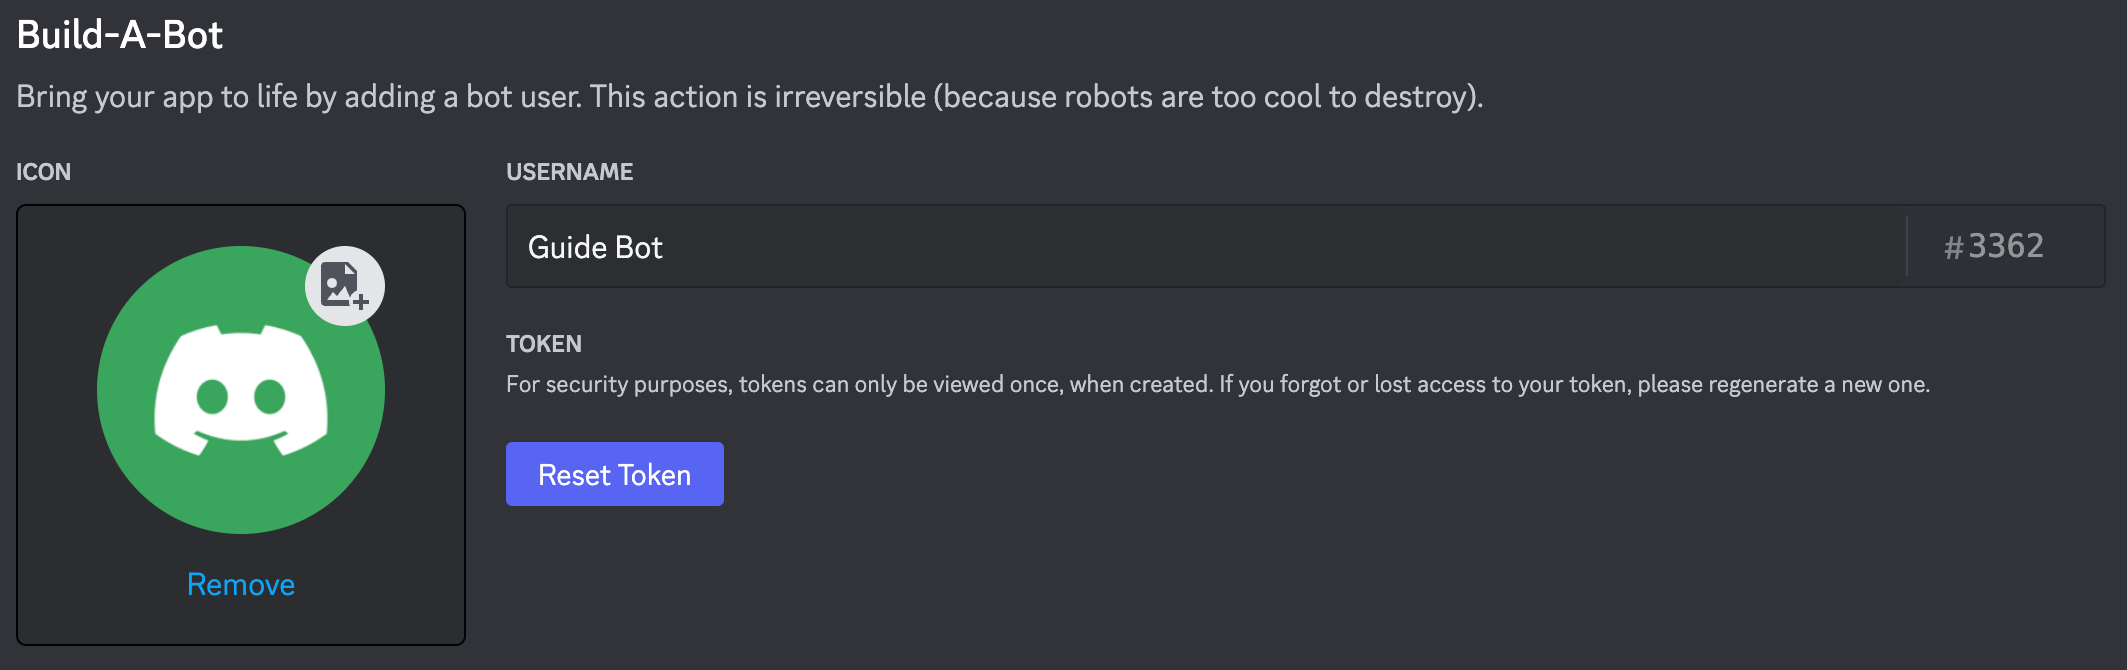 *Source: [discord.js guide — Application Setup](https://discordjs.guide/preparations/app-setup)*
Paste the token somewhere safe temporarily — you will enter it in Alter in a later step. If it leaks, use **Reset Token** in the portal and update Alter.
Never commit or share your bot token. Anyone with the token can control your bot.
## Step 4 — Invite the bot to your server
Alter does not build an invite link inside the app. Generate one in the Developer Portal:
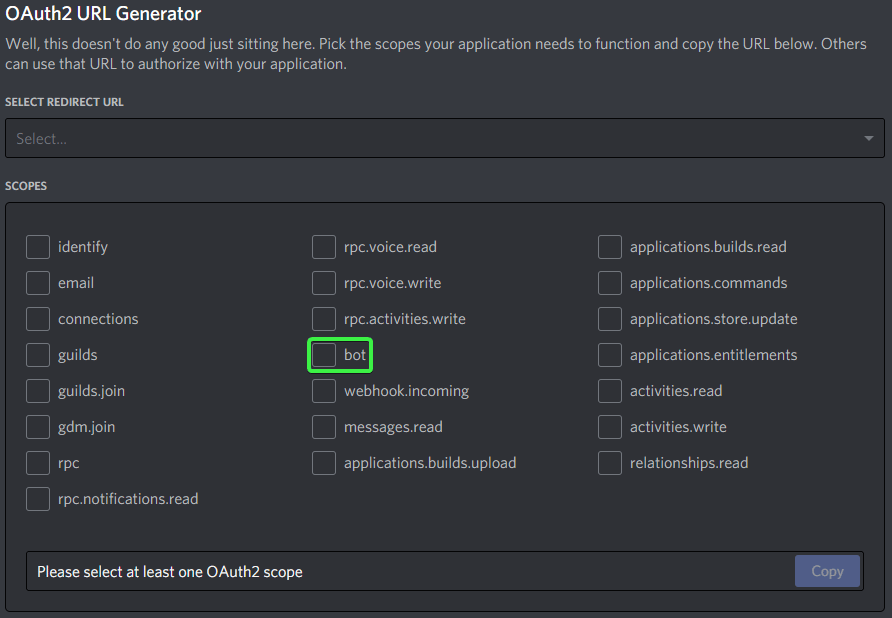
In your application sidebar, go to **OAuth2** → **URL Generator**.
Under **Scopes**, check **bot**.
*Source: [discord.js guide — Application Setup](https://discordjs.guide/preparations/app-setup)*
Paste the token somewhere safe temporarily — you will enter it in Alter in a later step. If it leaks, use **Reset Token** in the portal and update Alter.
Never commit or share your bot token. Anyone with the token can control your bot.
## Step 4 — Invite the bot to your server
Alter does not build an invite link inside the app. Generate one in the Developer Portal:
In your application sidebar, go to **OAuth2** → **URL Generator**.
Under **Scopes**, check **bot**.
 *Source: [Stack Overflow — permanent OAuth invite for a Discord bot](https://stackoverflow.com/questions/68218211/how-do-you-create-a-permanent-oauth-invite-for-your-discord-bot)*
Under **Bot Permissions**, enable:
* **View Channels**
* **Send Messages**
* **Read Message History**
* **Attach Files**
* **Create Public Threads** and **Send Messages in Threads** (optional — only needed if you enable **Start server discussions in threads** in Alter)
These let Alter read your messages, reply, send file outputs from tool runs, and optionally create discussion threads in server channels.
*Source: [Stack Overflow — permanent OAuth invite for a Discord bot](https://stackoverflow.com/questions/68218211/how-do-you-create-a-permanent-oauth-invite-for-your-discord-bot)*
Under **Bot Permissions**, enable:
* **View Channels**
* **Send Messages**
* **Read Message History**
* **Attach Files**
* **Create Public Threads** and **Send Messages in Threads** (optional — only needed if you enable **Start server discussions in threads** in Alter)
These let Alter read your messages, reply, send file outputs from tool runs, and optionally create discussion threads in server channels.
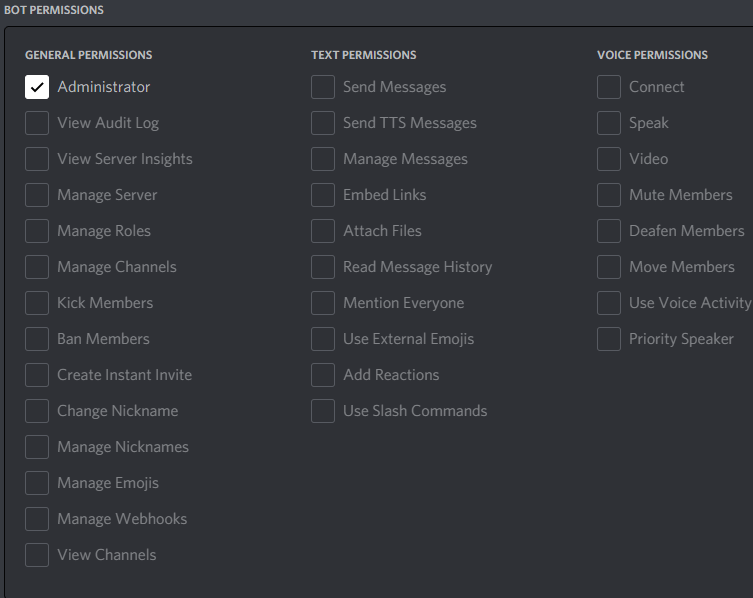 *Source: [Stack Overflow — permanent OAuth invite for a Discord bot](https://stackoverflow.com/questions/68218211/how-do-you-create-a-permanent-oauth-invite-for-your-discord-bot). Select the permissions listed above — not Administrator.*
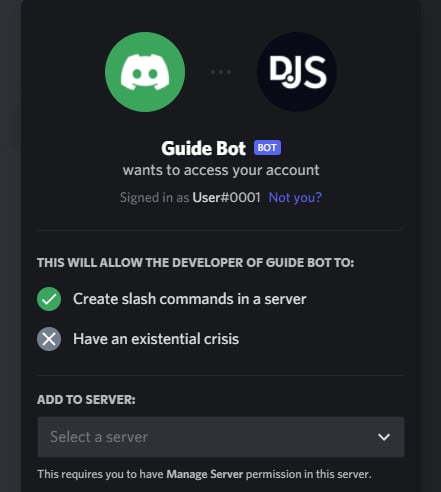
Copy the URL at the bottom, open it in your browser, choose your server, and authorize the bot.
Discord documents this flow in [Adding bots to servers](https://discord.com/developers/docs/topics/oauth2#bot-authorization-flow).
*Source: [Stack Overflow — permanent OAuth invite for a Discord bot](https://stackoverflow.com/questions/68218211/how-do-you-create-a-permanent-oauth-invite-for-your-discord-bot). Select the permissions listed above — not Administrator.*
Copy the URL at the bottom, open it in your browser, choose your server, and authorize the bot.
Discord documents this flow in [Adding bots to servers](https://discord.com/developers/docs/topics/oauth2#bot-authorization-flow).
 *Source: [discord.js guide — Adding Your App](https://discordjs.guide/preparations/adding-your-app)*
You need **Manage Server** (or equivalent) on the target Discord server to complete the invite.
## Step 5 — Optional: copy Server and user IDs
Use these if you want to restrict which server or users can talk to Alter.
In the Discord client: **User Settings → Advanced → Developer Mode** → on.
See [Discord's ID documentation](https://support.discord.com/hc/en-us/articles/206346498-Where-can-I-find-my-User-Server-Message-ID).
Right-click your server icon → **Copy Server ID**. Paste this into Alter's **Server ID (optional)** field to ignore messages from other servers.
Right-click a user → **Copy User ID**. Use comma-separated IDs in **Allowed Discord user IDs** to allow only those people.
Leave **Server ID** and **Allowed Discord user IDs** empty to allow anyone who can message the bot (subject to Discord channel permissions).
## Connect in Alter
Open **Settings** (⌘,) → **Integrations** → **Gateways**. See the [Gateways overview](/apps-tools/gateways#open-gateways-settings) for other ways to open Settings.
Click **Add gateway** → **Discord**. Alter creates a new gateway entry in the list.
| Field | What to enter |
| --------------------------------------- | ----------------------------------------------------------------------------------------------------------------------------------------------- |
| **Name** | A label you will recognize (for example `Discord — Work server`). |
| **Bot token** | The token from **Step 3**. Alter accepts tokens with or without a leading `Bot ` prefix. |
| **Server ID (optional)** | Your guild ID from **Step 5**, or leave empty for any server the bot is in. When set, Alter also registers slash commands for that server only. |
| **Ready message channel ID (optional)** | A channel ID where Alter posts “Hey, I'm up and running.” after a successful connection. |
| **Allowed Discord user IDs** | Comma-separated user IDs, or leave empty for open access. Use `*` to allow everyone explicitly. |
| **Require a mention in servers** | When on, the bot only responds in server channels when `@mentioned`. Direct messages are unaffected. |
A **Discord gateway setup guide** link at the bottom of the Connection section opens this page in your browser.
**Ask Anything** is the default and works on Discord out of the box. For a custom action, set **Availability** to **Discord** or **All** under **Action Editor → Gateways**.
Under **Behavior**, **Start server discussions in threads** is **on by default** for new Discord gateways — each new top-level server message gets its own Discord thread and Alter chat. Messages already inside a thread continue that chat. Direct messages are unchanged. Turn it off if you prefer replies in the main channel. If you keep it on, grant **Create Public Threads** and **Send Messages in Threads** when inviting the bot (**Step 4**).
Turn **Enabled** on, then click **Save and restart**. Wait for a status such as **Connected as bot …** or **Connected as @…**.
If connection fails, see [Gateways troubleshooting](/apps-tools/gateways#troubleshooting).
## Test the bot
Gateways only work while Alter is open on your Mac.
In a DM or server channel, send `/help` (or use Discord's `/help` slash command). The bot should list commands and show **New chat**, **Choose action**, and **Past chats** buttons.
Send a normal message (or `@mention` the bot in a server if **Require a mention in servers** is enabled). Alter should react with 👀, show a **Thinking…** placeholder, then stream the answer and react with ✅ or ❌ when done.
Run `/new` to start a fresh conversation with the **Default action**, or `/new ask-anything` to target a specific action ID.
Send a Discord **voice message** or attach an audio file. Alter transcribes it with your selected voice processor (**Settings → Voice**) and sends the text to the active action.
## Related pages
* [Gateways overview](/apps-tools/gateways)
* [Set up a Telegram gateway](/apps-tools/gateways-telegram)
* [Alter Actions — Gateway availability](/workflows/alter-actions#gateways)
* [Alter Settings](/how-to/settings-guide)
*Source: [discord.js guide — Adding Your App](https://discordjs.guide/preparations/adding-your-app)*
You need **Manage Server** (or equivalent) on the target Discord server to complete the invite.
## Step 5 — Optional: copy Server and user IDs
Use these if you want to restrict which server or users can talk to Alter.
In the Discord client: **User Settings → Advanced → Developer Mode** → on.
See [Discord's ID documentation](https://support.discord.com/hc/en-us/articles/206346498-Where-can-I-find-my-User-Server-Message-ID).
Right-click your server icon → **Copy Server ID**. Paste this into Alter's **Server ID (optional)** field to ignore messages from other servers.
Right-click a user → **Copy User ID**. Use comma-separated IDs in **Allowed Discord user IDs** to allow only those people.
Leave **Server ID** and **Allowed Discord user IDs** empty to allow anyone who can message the bot (subject to Discord channel permissions).
## Connect in Alter
Open **Settings** (⌘,) → **Integrations** → **Gateways**. See the [Gateways overview](/apps-tools/gateways#open-gateways-settings) for other ways to open Settings.
Click **Add gateway** → **Discord**. Alter creates a new gateway entry in the list.
| Field | What to enter |
| --------------------------------------- | ----------------------------------------------------------------------------------------------------------------------------------------------- |
| **Name** | A label you will recognize (for example `Discord — Work server`). |
| **Bot token** | The token from **Step 3**. Alter accepts tokens with or without a leading `Bot ` prefix. |
| **Server ID (optional)** | Your guild ID from **Step 5**, or leave empty for any server the bot is in. When set, Alter also registers slash commands for that server only. |
| **Ready message channel ID (optional)** | A channel ID where Alter posts “Hey, I'm up and running.” after a successful connection. |
| **Allowed Discord user IDs** | Comma-separated user IDs, or leave empty for open access. Use `*` to allow everyone explicitly. |
| **Require a mention in servers** | When on, the bot only responds in server channels when `@mentioned`. Direct messages are unaffected. |
A **Discord gateway setup guide** link at the bottom of the Connection section opens this page in your browser.
**Ask Anything** is the default and works on Discord out of the box. For a custom action, set **Availability** to **Discord** or **All** under **Action Editor → Gateways**.
Under **Behavior**, **Start server discussions in threads** is **on by default** for new Discord gateways — each new top-level server message gets its own Discord thread and Alter chat. Messages already inside a thread continue that chat. Direct messages are unchanged. Turn it off if you prefer replies in the main channel. If you keep it on, grant **Create Public Threads** and **Send Messages in Threads** when inviting the bot (**Step 4**).
Turn **Enabled** on, then click **Save and restart**. Wait for a status such as **Connected as bot …** or **Connected as @…**.
If connection fails, see [Gateways troubleshooting](/apps-tools/gateways#troubleshooting).
## Test the bot
Gateways only work while Alter is open on your Mac.
In a DM or server channel, send `/help` (or use Discord's `/help` slash command). The bot should list commands and show **New chat**, **Choose action**, and **Past chats** buttons.
Send a normal message (or `@mention` the bot in a server if **Require a mention in servers** is enabled). Alter should react with 👀, show a **Thinking…** placeholder, then stream the answer and react with ✅ or ❌ when done.
Run `/new` to start a fresh conversation with the **Default action**, or `/new ask-anything` to target a specific action ID.
Send a Discord **voice message** or attach an audio file. Alter transcribes it with your selected voice processor (**Settings → Voice**) and sends the text to the active action.
## Related pages
* [Gateways overview](/apps-tools/gateways)
* [Set up a Telegram gateway](/apps-tools/gateways-telegram)
* [Alter Actions — Gateway availability](/workflows/alter-actions#gateways)
* [Alter Settings](/how-to/settings-guide)